You are using an out of date browser. It may not display this or other websites correctly.
You should upgrade or use an alternative browser.
You should upgrade or use an alternative browser.
Scarves The How-To Guide for Scarves!!!! NO CHATTER!
- Thread starter jag
- Start date
TPF may earn a commission from merchant affiliate
links, including eBay, Amazon, and others
More options
Who Replied?


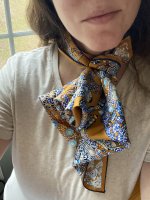

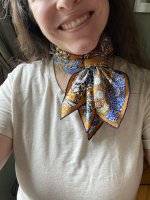
Step 2: wrap scarf around neck. Use a scarf ring on the side without the ends to loop through and create a hole that you can pull something through. This will feel short around your neck, but you should still put the scarf ring high enough up there that there is an inch or so of material under the ring.
Attachments
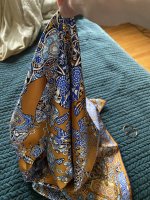

Step three: pull the ends through. You will need to hold the other side while you do this and adjust around your neck. It’s not a ton of material to work with.
Step four: hold on to the scarf ring and pull each side to tighten the knot.
This isn’t the most secure knot, but it should be ok if you don’t fuss with it.
Steph five: hold on to the scarf ring and fluff and adjust the ends of the knot so that all four ends are fanned out like nice little petals.
Step four: hold on to the scarf ring and pull each side to tighten the knot.
This isn’t the most secure knot, but it should be ok if you don’t fuss with it.
Steph five: hold on to the scarf ring and fluff and adjust the ends of the knot so that all four ends are fanned out like nice little petals.
Attachments
Greetings scarf lovers! Please remember this is a no-chatter thread. 
This is a step-by-step guide for the "Pautuck," popularized by Pautinka and named by turfnsurf in 2020.
First off, make a bias fold, then thread the mors ring through both holes and pull it to the center. It will be a bit tight (particularly with store-fresh scarves), but doable.

The key is that there's a little gap between the ring and the scarf. I've flipped it sideways so you can see here.

Keep the ring to the front, then cross the tails behind and bring back to the front. For compactness, you'll want to thread them under and back around, so that the tails are coming up towards your face once they come back the center front. Then take each tail and insert it into the scarf/ring loop. NB: this next photo doesn't show the tails coming up from the center front in order to better show the threading through the loop.

Even out and fluff, and you're done!

Modeled:

First off, make a bias fold, then thread the mors ring through both holes and pull it to the center. It will be a bit tight (particularly with store-fresh scarves), but doable.
The key is that there's a little gap between the ring and the scarf. I've flipped it sideways so you can see here.
Keep the ring to the front, then cross the tails behind and bring back to the front. For compactness, you'll want to thread them under and back around, so that the tails are coming up towards your face once they come back the center front. Then take each tail and insert it into the scarf/ring loop. NB: this next photo doesn't show the tails coming up from the center front in order to better show the threading through the loop.
Even out and fluff, and you're done!
Modeled:

Small elastic hair tie.

Position scarf folded in quarters with the side you want to highlight facing front. (I like my knots a little off to one side, so asymmetrical for me.)

Near the midpoint of the tail, gather one of the closer edges and a similar point from a middle pleat from the longer tail and one from the midpoint near edge of the shorter tail. Make a little tail of these three points and wrap with the band twice.

Pull similar midpoints from the two outer edges and pull them through the band with the others.

Fluff the gathered points out like petals.

Add extra edges as you need to get the look you want. Retied closer with an extra edge added this time.

And again lower, this time with tails fluffed too.

Attachments

Here are steps for the knot I posted on the SOTD thread that @Nomad asked about. I want to credit @Inirikina, whose Instagram account this tie comes from. She has some fun knots that are easy to do:
Fold in triangle; roll points A and B to center; loop around your neck; open point C and tie around your two rolls; double knot and adjust the tails. Happy rolling!


Fold in triangle; roll points A and B to center; loop around your neck; open point C and tie around your two rolls; double knot and adjust the tails. Happy rolling!
Super creative tie. And thank you!Here are steps for the knot I posted on the SOTD thread that @Nomad asked about. I want to credit @Inirikina, whose Instagram account this tie comes from. She has some fun knots that are easy to do:
Fold in triangle; roll points A and B to center; loop around your neck; open point C and tie around your two rolls; double knot and adjust the tails. Happy rolling!
View attachment 5090619View attachment 5090620View attachment 5090621View attachment 5090623View attachment 5090624
View attachment 5090615
Lovely!!! Thank you, dear LKBNOLA.Here are steps for the knot I posted on the SOTD thread that @Nomad asked about. I want to credit @Inirikina, whose Instagram account this tie comes from. She has some fun knots that are easy to do:
Fold in triangle; roll points A and B to center; loop around your neck; open point C and tie around your two rolls; double knot and adjust the tails. Happy rolling!
View attachment 5090619View attachment 5090620View attachment 5090621View attachment 5090623View attachment 5090624
View attachment 5090615
Posted in response to @HoneyLocks:
Here you go-- it is basically a simple version of a Camellia Knot. I will cross post to the tutorial thread as well. 1. Bias Fold 2. Make a twist 3. Pull one end under and up, now you have a loop 4. Same for other side 5. Pull ends through loops and adjust!
View attachment 5174484View attachment 5174485View attachment 5174486View attachment 5174487View attachment 5174488
Love this effortless tie. I’ll give it a go soon and report on how I get on! ThanksPosted in response to @HoneyLocks:
@xincinsin & @Karenska - Here’s the link to
IG’s Cherryblossom’s (@cherrybjpn) rosy knot:
https://www.instagram.com/reel/CQSrC2snv0U/?utm_source=ig_web_copy_link
-original via @Croisette7 (left) -vs.-
modification w/Mors ring (right):
 I just love it for red bordered designs!
IG’s Cherryblossom’s (@cherrybjpn) rosy knot:
https://www.instagram.com/reel/CQSrC2snv0U/?utm_source=ig_web_copy_link
-original via @Croisette7 (left) -vs.-
modification w/Mors ring (right):
I just love it for red bordered designs!
Last edited:
Register on TPF! This sidebar then disappears and there are less ads!