Scarves The How-To Guide for Scarves!!!! NO CHATTER!

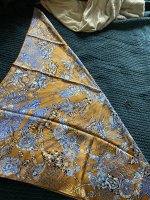
With a 90cm scarf, you need to work with a bias folded scarf to have enough length to do a Tods/Weave knot but after that, the instructions are the same.

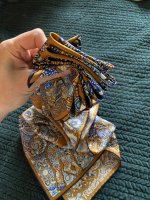
1- center, wrap and ends to front
tods90a.jpg


2- tuck one end down through the center so it comes out the bottom
tods90b.jpg


3- "Weave" the other tail so it comes out between the 2 parts on the other side
tods90c.jpg


4- pull to tighten and clean it up, and here's where you have to make some adjustments for a 90.
tods90d.jpg


5: just pulling the ends is not enough to keep it in place, because they are short and the silk is slippery, so just half knot the ends to secure them:
tods90e.jpg


6- Or, full knot to really be secure (you can tuck the knot up in the folds like I did or leave it)
tods90f.jpg
 
Putting a tute for a basic Weave knot (I call it a Tods knot out of habit to a tpf member) and my alteration of it for use on 90cm scarves.

Basic Weave/Tods knot is fab for larger or long formats (all that length on the Maxi Twillies or MT slims)


1- On a large format you can work with a bias fold, or just fold it down in to a thin rectangle and put the center of it at the front, bring tail around the back and to the front again.
View attachment 4770142


2- Insert one of the tails top to bottom under the center of the scarf:
View attachment 4770145

3- "Weave" the other tail in between the end you tucked and the center of the scarf, so it lays UNDER the tail, but comes out OVER the center

View attachment 4770144


4- Pull the ends to tighten and secure. You can generally leave this alone with the big formats, especially if you have used the bias to do this (as you will have long tails) but you can also half tie the ends to give extra security.

View attachment 4770143

Part two (altering it for use on a 90cm scarf) coming next.

.
.
.
.
Another name for that is Hacking Knot , Weave Knot
 
For @turfnsurf
I don’t know the name for this, but a very kind Instagrammer Craielover showed me how to do it.
It starts with the asymmetric fold:
D0B13277-FFBF-4B59-B8B4-3835B8AB4D7E.jpegPut it around your neck
ACDEF6B1-78BF-41F6-891B-FC9AA0124095.jpegNext take one end and wrap it over the other side - you can pleat that a bit of you like
C493597F-3636-4677-A604-348AFE5CD046.jpeg
Next, bring the end in your hand under that side, to get ready to tie a knot
AD620AA3-9A72-4B63-95D9-0CEA7EFB4E22.jpegTie a knot
AAF229AA-158B-4439-A550-A4C7C3A07A42.jpegTighten the knot
AEF5CFE2-6290-4A3C-8044-AA5B4B969239.jpeg
And you’re done! I hope this made sense!
1D3AB13C-C6EC-4510-9E7C-EA7C8A3EF435.jpeg
DBBFA267-0E37-42DD-9966-F3A56546FEDD.jpeg
 
Can somebody please teach me how to tie a rosy knot?
Sources:
View attachment 4825570View attachment 4825571View attachment 4825572View attachment 4825573View attachment 4825574View attachment 4825575
Paging :sos: @cherryblossum
 
The Plisse Forgiving Knot :giggle:

1. Fold plisse in half. IMHO it is useless to try and bias fold it because the pleats are like Slinkys. 2C2FBD1B-4FAA-4AEF-AFA2-CB9224AB33CF.jpeg
2. Loop/tie (not sure which word to use) it once:
E34CC3BF-E39F-463B-9E92-219E91087C51.jpeg
3. Loop/tie once again:
C30E17A8-3147-41B0-A219-631E687102C3.jpeg
4. This is where you can get a bit creative. Take the right tail (facing you) and bring it over from under. Take the left tail and bring over the top:
3AC49642-3147-4D60-B049-8D4D0407B362.jpeg
or loop the tails over/under as it suits.
5. Discreetly tie the tails under the knot.
3D17E128-D755-4FF3-AFDA-0235C2004177.jpeg
6. Fluff knot out. You could also tie tails so they show.
7. Enjoy!
THE END
 
Hi ladies - I have two knots people have asked me about so I’ll post here. I will represent I’ve never seen a tutorial for these, so hopefully these aren’t duplicative! I hope no one minds but I’ll do in multiple posts because I think sometimes posting multiple pictures doesn’t happen in uploading order.

here is the first:

step one: fold scarf in a triangle:
 

Attachments

  • 59A18F4E-BD0E-4671-8F4F-411D31248662.jpeg
    59A18F4E-BD0E-4671-8F4F-411D31248662.jpeg
    484.4 KB · Views: 23
  • Like
Reactions: Marie-the-Mary
Step three: wrap around neck - use a scarf ring (sample in my first photo) and thread the side with the ends through to make little opening that you can pull something through. Here is a sample with my finger through the opening.
 

Attachments

  • 48F8DF46-6858-46A3-A18A-1A56683D40CF.jpeg
    48F8DF46-6858-46A3-A18A-1A56683D40CF.jpeg
    193.7 KB · Views: 51
  • Like
Reactions: Marie-the-Mary