Scarves The How-To Guide for Scarves!!!! NO CHATTER!

TPF may earn a commission from merchant affiliate
links, including eBay, Amazon, and others

Here are the steps for doing an "infinity" style knot with a 90. You can also use a maxi twilly or a maxi twilly cut too with an extra wrap around the neck.

Bias fold and put center at back of neck
infinitya.jpg

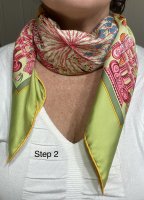
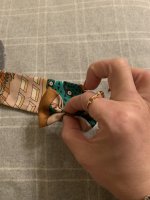
ends are in front, and cross them over each other
infinityb.jpg

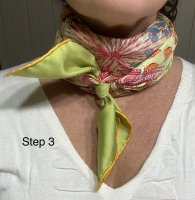
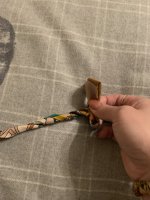
then wrap them around each other and take ends around to the back
infinityc.jpg

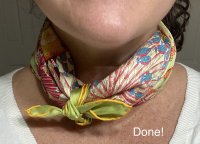
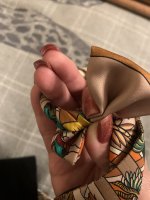
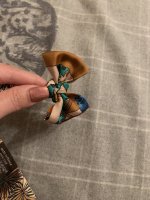
tie and it looks like this

infinityd.jpg


And worn:

tambourstoy.jpg
 
@Karenska Here’s the photos I promised you of the knot I tied for purple Selles a Housse (but with different scarf here). It’s a great tie for going out to eat b/c it’s stays put & ends aren’t long enough to flap around & get used as napkin. ;)

1. Bias fold to about 3” (8cm)
2. Place center on front of throat & bring ends fully around.
3. Knot at semi-loose comfort level.
4. Push knot behind folded section & take tails from ends of knot, capture first layer fold, and knot again.
(I labeled the pics b/c I can’t figure out how to separate them with text using my phone) :facepalm:

@bunnycat - Does this knot already have a name? I noticed something very similar on you recently over on SOTD... :girlsigh:
 

Attachments

  • 3AF6534F-08AE-4EA9-86A1-9B5EF64BA651.jpeg
    3AF6534F-08AE-4EA9-86A1-9B5EF64BA651.jpeg
    253.9 KB · Views: 566
  • C494861E-AFBA-4B22-84F3-146F07D61D20.jpeg
    C494861E-AFBA-4B22-84F3-146F07D61D20.jpeg
    270.2 KB · Views: 558
  • CD6D1901-1B8A-46AB-9C97-FBBD6065EE0E.jpeg
    CD6D1901-1B8A-46AB-9C97-FBBD6065EE0E.jpeg
    306.9 KB · Views: 567
  • DDC1B2DD-88EB-4807-BBCD-1372AA965FA7.jpeg
    DDC1B2DD-88EB-4807-BBCD-1372AA965FA7.jpeg
    203.5 KB · Views: 589
Last edited:
@Karenska Here’s the photos I promised you of the knot I tied for purple Selles a Housse (but with different scarf here). It’s a great tie for going out to eat b/c it’s stays put & ends aren’t long enough to flap around & get used as napkin. ;)

1. Bias fold to about 3” (8cm)
2. Place center on front of throat & bring ends fully around.
3. Knot at semi-loose comfort level.
4. Push knot behind folded section & take tails from ends of knot, capture first layer fold, and knot again.
(I labeled the pics b/c I can’t figure out how to separate them with text using my phone) :facepalm:

@bunnycat - Does this knot already have a name? I noticed something very similar on you recently over on SOTD... :girlsigh:
Thank you, Turfnsurf! It’s very pretty and neat. And yes, dining with our beloved scarves is quite a challenge.
 
@turfnsurf
How to turn 140cm scarf into a top
Fold the scarf into a triangle and then put the center of your back to make it easier to tie. Then cross the ends in the front and then bring the ends to the back and cross then Bring the remaining ends of the scarf to the front and make a bow or knot. Then pleat your scarf to your liking. For the back, tuck it front part of it in to make it look nice. If you don’t want to do that, then you can leave it. If you want to cover up, you can use a jacket and just let the scarf show in the front
 

Attachments

  • CCEAE5A1-8964-4CC5-910E-65769ED60A9D.jpeg
    CCEAE5A1-8964-4CC5-910E-65769ED60A9D.jpeg
    228.9 KB · Views: 437
  • 605EC341-A0F6-42E9-B83F-6E79294995F5.jpeg
    605EC341-A0F6-42E9-B83F-6E79294995F5.jpeg
    226.4 KB · Views: 426
  • CC3E35FE-0287-4377-9C28-193D19D73788.jpeg
    CC3E35FE-0287-4377-9C28-193D19D73788.jpeg
    232.5 KB · Views: 434
  • 3AED4BD6-A915-4C29-9B5C-F9E97C0F9FB9.jpeg
    3AED4BD6-A915-4C29-9B5C-F9E97C0F9FB9.jpeg
    234.7 KB · Views: 433
  • 1603A9A0-C9B6-4D61-B7DA-8E440C16E78B.jpeg
    1603A9A0-C9B6-4D61-B7DA-8E440C16E78B.jpeg
    197.9 KB · Views: 436
This one is for @shrpthorn ! The knot ends up looking like a big blowsy flower. It would look good with a little black dress.
1) Bias fold then tie a loose knot in middle of scarf.
IMG_20200206_163745.jpg2) Bring ends around back of neck and slip them through the middle of the loose knot.
IMG_20200206_163856.jpg 3) After passing BOTH ends through, tie them together in a double knot in front of the puffy bit.IMG_20200206_163946.jpg 4) Put your fingers into the top part of knot and fluff out. Repeat with bottom. I guess the looser the first knot the puffier you can make it.

Please forgive my dusty mannequin. It doesn't get used much these days and just stands in a corner.
 
Here's a quirky little necktie knot:
1. Start with a basic bias folded scarf draped around the neck
IMG_20200218_121458.jpg
2. Do a simple single half hitch by crossing one side over the other and draping it over the top:
PhotoGrid_1582097029120.jpg
3. Slip a simple round scarf ring over both tails:
IMG_20200218_121638_exported_937_1582061018506.jpg
3. To secure the ring, tie a simple slip knot on the bottom tail:
PhotoGrid_1582097076329.jpg
4. Yay! Here's your quirky femme necktie/cravat
IMG_20200218_121722.jpg
 
@WKN
First, you make a triangle with one end and then you fold it to make a rectangle. You scrunch it in the middle to make a bow shape. You twist the tail in the back and then you fold it over the middle of the bow and tie the end like a knot to make it tight. And then you’re done!
 

Attachments

  • 1E6D53CF-86C2-4C78-9CD2-6D34B3CFD1E6.jpeg
    1E6D53CF-86C2-4C78-9CD2-6D34B3CFD1E6.jpeg
    261.8 KB · Views: 681
  • BCFA8D8B-C910-4784-862D-459AEA8A6369.jpeg
    BCFA8D8B-C910-4784-862D-459AEA8A6369.jpeg
    236.8 KB · Views: 702
  • 65C64D43-A51D-43E4-8B73-CE432CFA7901.jpeg
    65C64D43-A51D-43E4-8B73-CE432CFA7901.jpeg
    141.3 KB · Views: 701
  • E0896B35-7557-4ACF-B1D9-DF9C0D356CDD.jpeg
    E0896B35-7557-4ACF-B1D9-DF9C0D356CDD.jpeg
    180 KB · Views: 718
  • 768E2380-7373-4618-9392-367F994D3EC8.jpeg
    768E2380-7373-4618-9392-367F994D3EC8.jpeg
    160.5 KB · Views: 711
  • DF412A37-2B68-4013-A9E6-8ABCC4191885.jpeg
    DF412A37-2B68-4013-A9E6-8ABCC4191885.jpeg
    144.2 KB · Views: 710
  • 59478F6E-3633-4800-8C6F-B630E9B5A499.jpeg
    59478F6E-3633-4800-8C6F-B630E9B5A499.jpeg
    169.5 KB · Views: 715
  • EE3AE135-3F79-4EF9-A072-7866A093ABB3.jpeg
    EE3AE135-3F79-4EF9-A072-7866A093ABB3.jpeg
    209.6 KB · Views: 714
  • 88AC35CC-1685-4AB5-82EF-1C3B11D2D98E.jpeg
    88AC35CC-1685-4AB5-82EF-1C3B11D2D98E.jpeg
    252.9 KB · Views: 696
@WKN
First, you make a triangle with one end and then you fold it to make a rectangle. You scrunch it in the middle to make a bow shape. You twist the tail in the back and then you fold it over the middle of the bow and tie the end like a knot to make it tight. And then you’re done!
That is so clever! I'm definitely going to practise doing this tonight. Thank you so much for your generous tutorial - much appreciated. Hugs!
 
Top