Current pictureIt looks like the magic eraser is really picking up a lot. I'm curious to see how it comes out, and I admire your determination!
You are using an out of date browser. It may not display this or other websites correctly.
You should upgrade or use an alternative browser.
You should upgrade or use an alternative browser.
Coach Rehab and Rescue Club
- Thread starter greenpixie
- Start date
TPF may earn a commission from merchant affiliate
links, including eBay, Amazon, and others
More options
Who Replied?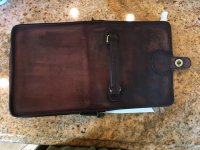

I love that color, I am looking forward to seeing it when done (I actually think it looks cool now, too.)After exhausting every cotton ball in the house and many many more hours rubbing, I tried applying the acetone with a magic eraser and voila! I think it may work. Off to the store today so I can get more acetone and magic erasers to finish it. She still may not survive, but at least I Might. Remember I am a complete novice so none of this can be construed as advice for your project.
I just recently learned that if you look for 'melamine sponges' they are the same thing as Magic Erasers, but cheaper. Maybe that will help if you have to buy a supply. Good luck!

and an update here: I dunked these a few weeks ago. The mocha Shoulder Bag shaped up very nicely, and the leather is a bit thicker than my older rust Shoulder bag. The Shoulder Purse is cleaner, but still stained. It was so heavily carried, the leather is actually burnished in a few patches. I am going to give them an app of Obenauf’s tomorrow, after I do a little cloth polishing is the brass I did not remove.
The Parker is nice and dry and I'm glad I gave her a dunk...her bottom was a bit dirty. Dont know if you can see any difference..but the water was dirty.
Please post the photos...I’m working on brass snap attachments for patches on the bag in the post above. Practicing setting the snaps in the leather and creating a backing for the patches.
Is saddlery bag rare to find?That's a Saddlery bag! What have you done?? I feel like there needs to be a proper funeral. Oh my. I can't.
Yes!Is saddlery bag rare to find?
And they're so classy looking. Petite and feminine with beautiful lines and curves. One of my favorite styles.Is saddlery bag rare to find?
My very first vintage coach was a red nyc saddlery from a local thrift shop years ago. Somehow she disappeared in the house. Lol ..I need to tear down the house to find her.And they're so classy looking. Petite and feminine with beautiful lines and curves. One of my favorite styles.
Yes you do! Right now!My very first vintage coach was a red nyc saddlery from a local thrift shop years ago. Somehow she disappeared in the house. Lol ..I need to tear down the house to find her.
Please post the photos...

so there’s 4 pieces and you sandwich them together with the leather in pairs for a button and snap

this is what I’ve tried so far

this side will be on the patch and the smooth button head will be inside the front pocket of the bag. Now feeling confident enough to poke some holes in the extra leather, cut to shape, and attach to patch backs with the E6000. Then fix the snap heads on the bag and she’ll be good to go! I’m going to make the flowers AND lightening bolt interchangeable. Fingers crossed!

That's a great idea! I used to use snaps like this when I made baby clothes.View attachment 4661274
so there’s 4 pieces and you sandwich them together with the leather in pairs for a button and snap
View attachment 4661272
this is what I’ve tried so far
View attachment 4661273
this side will be on the patch and the smooth button head will be inside the front pocket of the bag. Now feeling confident enough to poke some holes in the extra leather, cut to shape, and attach to patch backs with the E6000. Then fix the snap heads on the bag and she’ll be good to go! I’m going to make the flowers AND lightening bolt interchangeable. Fingers crossed!
The Parker is nice and dry and I'm glad I gave her a dunk...her bottom was a bit dirty. Dont know if you can see any difference..but the water was dirty.View attachment 4660686
It looks fantastic! Thanks for posting, I have this same bag in sand color and it is dirty and needs a bath!
Wow, you are at next level of rehabs. . Well done. I have a red Carley with bad ink marks can not be removed. Really tempting to butcher her for hardwares and leather parts. Feel guilty so haven't done that yet.View attachment 4661274
so there’s 4 pieces and you sandwich them together with the leather in pairs for a button and snap
View attachment 4661272
this is what I’ve tried so far
View attachment 4661273
this side will be on the patch and the smooth button head will be inside the front pocket of the bag. Now feeling confident enough to poke some holes in the extra leather, cut to shape, and attach to patch backs with the E6000. Then fix the snap heads on the bag and she’ll be good to go! I’m going to make the flowers AND lightening bolt interchangeable. Fingers crossed!
Before you do...if the leather is pebbled, I've gotten good results in covering up ink marks on pebbled leather with fabric puffy paint. You dot it on, trying to copy the pattern of pebbles while covering up the ink. Or you could get some appliques and cover up the ink that way. Coach sells leather appliques. Some stores have a customizing station where they will attach leather flowers or a variety of metal studs. Or you could paint a design on it to disguise the ink.Wow, you are at next level of rehabs. . Well done. I have a red Carley with bad ink marks can not be removed. Really tempting to butcher her for hardwares and leather parts. Feel guilty so haven't done that yet.
Register on TPF! This sidebar then disappears and there are less ads!