Good thinking, I imagine all those UAL flight attendants got their bags mixed up plenty of times!My guess on Pat is that if every woman you work with has the exact same bag you want to make sure you have yours. I sort of have this image of someone going “oh sorry I ate your Snickers and bought a coffee with your $$, I thought it was my bag they all look alike”
You are using an out of date browser. It may not display this or other websites correctly.
You should upgrade or use an alternative browser.
You should upgrade or use an alternative browser.
Coach Rehab and Rescue Club
- Thread starter greenpixie
- Start date
TPF may earn a commission from merchant affiliate
links, including eBay, Amazon, and others
More options
Who Replied?As promised I am back to share my Hasp brass closure rehab project.
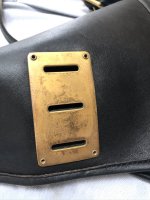
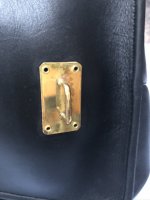
I received the bag and I went the brass was green all over, a bit more and it could be a Leprechaun bag, but I thought it would be worth to try. I will share the steps I took with pictures. So this might be long...
The way the brass looked when I got the bag
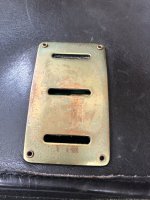
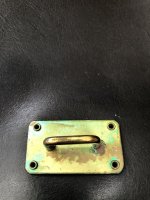
All my research mentioned to clean first with hot water and a mild detergent. So no problem because I was going to dunk the whole bag. I used Dawn as usual.
After a few minutes I came back and was surprised to see that the green stuff was dissolving/peeling by itself. I used a soft brush and finished taking it all out. I also used a toothpick (several), to scrape around the edges, underneath, etc..
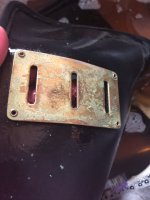
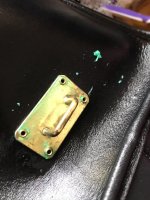
I rinsed, stuffed the bag, and let it dry as usual. After a day I went back to the brass that looked like this, no green but still very worn looking.
So now I used something I found "interesting" as recommended by people on a site, to clean brass from rifle slings. It was WD40.
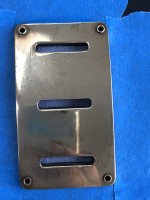
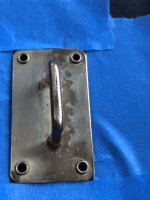
I gave it a try, no hard rubbing, just a bit on a soft cloth and go all over, the improvement was effortless. Afterwards looked like this (the lighting made it look silver, but still was golden)
Much, much better, but still I was not happy with it, so I used my "go to metal polish" that I have to thank to whoever here recommended it, and I have been using since then, the best ever for me... Mother's.
So now I rubbed as I normally do, and oh my! All the black that came out, was unreal. And after I was done (may be I could rub even more), the end result was all worth it! Only surface scratches left.
Judge by yourselves. (the green still seen is a reflection of the top I am wearing, LOL)
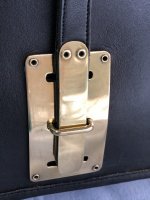
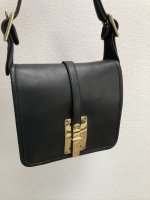
Oh and still I am not sure (I am not expert, LOL), if all the metal is real brass or brass plated, but there is engraving on it.....
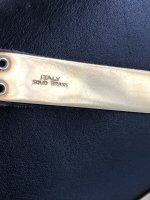
Bottom line, it was actually effortless and totally worth trying. My kudos to Coach again for making such superb quality products. And my thanks to you for your tips all along.
I received the bag and I went
 the brass was green all over, a bit more and it could be a Leprechaun bag, but I thought it would be worth to try. I will share the steps I took with pictures. So this might be long...
The way the brass looked when I got the bag


All my research mentioned to clean first with hot water and a mild detergent. So no problem because I was going to dunk the whole bag. I used Dawn as usual.
After a few minutes I came back and was surprised to see that the green stuff was dissolving/peeling by itself. I used a soft brush and finished taking it all out. I also used a toothpick (several), to scrape around the edges, underneath, etc..


I rinsed, stuffed the bag, and let it dry as usual. After a day I went back to the brass that looked like this, no green but still very worn looking.


So now I used something I found "interesting" as recommended by people on a site, to clean brass from rifle slings. It was WD40.
I gave it a try, no hard rubbing, just a bit on a soft cloth and go all over, the improvement was effortless. Afterwards looked like this (the lighting made it look silver, but still was golden)


Much, much better, but still I was not happy with it, so I used my "go to metal polish" that I have to thank to whoever here recommended it, and I have been using since then, the best ever for me... Mother's.

So now I rubbed as I normally do, and oh my! All the black that came out, was unreal. And after I was done (may be I could rub even more), the end result was all worth it! Only surface scratches left.
Judge by yourselves. (the green still seen is a reflection of the top I am wearing, LOL)


Oh and still I am not sure (I am not expert, LOL), if all the metal is real brass or brass plated, but there is engraving on it.....

Bottom line, it was actually effortless and totally worth trying. My kudos to Coach again for making such superb quality products. And my thanks to you for your tips all along.

Last edited:
This turned out so beautiful! Congrats on a lovely rehab and now a gorgeous bag.As promised I am back to share my Hasp brass closure rehab project.
I received the bag and I wentthe brass was green all over, a bit more and it could be a Leprechaun bag, but I thought it would be worth to try. I will share the steps I took with pictures. So this might be long...
The way the brass looked when I got the bag
View attachment 4637117 View attachment 4637119
All my research mentioned to clean first with hot water and a mild detergent. So no problem because I was going to dunk the whole bag. I used Dawn as usual.
After a few minutes I came back and was surprised to see that the green stuff was dissolving/peeling by itself. I used a soft brush and finished taking it all out. I also used a toothpick (several), to scrape around the edges, underneath, etc..
View attachment 4637120 View attachment 4637121
I rinsed, stuffed the bag, and let it dry as usual. After a day I went back to the brass that looked like this, no green but still very worn looking.
View attachment 4637122 View attachment 4637123
So now I used something I found "interesting" as recommended by peopleon a site, that clean brass from rifle slings. It was WD40.
I gave it a try, no hard rubbing, just a bit on a soft cloth and go all over, the improvement was effortless. Afterwards looked like this (the lighting made it look silver, but still was golden)
View attachment 4637127 View attachment 4637128
Much, much better, but still I was not happy with it, so I used my "go to metal polish" that I have to thank to whoever here recommended it, and I have been using since then, the best ever for me... Mother's.
So now I rubbed as I normally do, and oh my! All the black that came out, was unreal. And after I was done (may be I could rub even more), the end result was all worth it! Only surface scratches left.
Judge by yourselves.
View attachment 4637132 View attachment 4637133
Oh and I still I am not sure (I am not expert, LOL), if all the metal is real brass or brass plated, but there is engraving on it.....
View attachment 4637134
Bottom line, it was actually effortless and totally worth trying. My kudos to Coach again for making such superb quality products. And my thanks to you for your tips all along.
What a transformation..both in the brass and the bag.As promised I am back to share my Hasp brass closure rehab project.
I received the bag and I wentthe brass was green all over, a bit more and it could be a Leprechaun bag, but I thought it would be worth to try. I will share the steps I took with pictures. So this might be long...
The way the brass looked when I got the bag
View attachment 4637117 View attachment 4637119
All my research mentioned to clean first with hot water and a mild detergent. So no problem because I was going to dunk the whole bag. I used Dawn as usual.
After a few minutes I came back and was surprised to see that the green stuff was dissolving/peeling by itself. I used a soft brush and finished taking it all out. I also used a toothpick (several), to scrape around the edges, underneath, etc..
View attachment 4637120 View attachment 4637121
I rinsed, stuffed the bag, and let it dry as usual. After a day I went back to the brass that looked like this, no green but still very worn looking.
View attachment 4637122 View attachment 4637123
So now I used something I found "interesting" as recommended by people on a site, to clean brass from rifle slings. It was WD40.
I gave it a try, no hard rubbing, just a bit on a soft cloth and go all over, the improvement was effortless. Afterwards looked like this (the lighting made it look silver, but still was golden)
View attachment 4637127 View attachment 4637128
Much, much better, but still I was not happy with it, so I used my "go to metal polish" that I have to thank to whoever here recommended it, and I have been using since then, the best ever for me... Mother's.
So now I rubbed as I normally do, and oh my! All the black that came out, was unreal. And after I was done (may be I could rub even more), the end result was all worth it! Only surface scratches left.
Judge by yourselves.
View attachment 4637132 View attachment 4637133
Oh and I still I am not sure (I am not expert, LOL), if all the metal is real brass or brass plated, but there is engraving on it.....
View attachment 4637134
Bottom line, it was actually effortless and totally worth trying. My kudos to Coach again for making such superb quality products. And my thanks to you for your tips all along.
Thanks for showing us how you got there, with hard work. But worth it.
This came out great! I guess it is solid brass!As promised I am back to share my Hasp brass closure rehab project.
I received the bag and I wentthe brass was green all over, a bit more and it could be a Leprechaun bag, but I thought it would be worth to try. I will share the steps I took with pictures. So this might be long...
The way the brass looked when I got the bag
View attachment 4637117 View attachment 4637119
All my research mentioned to clean first with hot water and a mild detergent. So no problem because I was going to dunk the whole bag. I used Dawn as usual.
After a few minutes I came back and was surprised to see that the green stuff was dissolving/peeling by itself. I used a soft brush and finished taking it all out. I also used a toothpick (several), to scrape around the edges, underneath, etc..
View attachment 4637120 View attachment 4637121
I rinsed, stuffed the bag, and let it dry as usual. After a day I went back to the brass that looked like this, no green but still very worn looking.
View attachment 4637122 View attachment 4637123
So now I used something I found "interesting" as recommended by people on a site, to clean brass from rifle slings. It was WD40.
I gave it a try, no hard rubbing, just a bit on a soft cloth and go all over, the improvement was effortless. Afterwards looked like this (the lighting made it look silver, but still was golden)
View attachment 4637127 View attachment 4637128
Much, much better, but still I was not happy with it, so I used my "go to metal polish" that I have to thank to whoever here recommended it, and I have been using since then, the best ever for me... Mother's.
So now I rubbed as I normally do, and oh my! All the black that came out, was unreal. And after I was done (may be I could rub even more), the end result was all worth it! Only surface scratches left.
Judge by yourselves. (the green still seen is a reflection of the top I am wearing, LOL)
View attachment 4637132 View attachment 4637133
Oh and I still I am not sure (I am not expert, LOL), if all the metal is real brass or brass plated, but there is engraving on it.....
View attachment 4637134
Bottom line, it was actually effortless and totally worth trying. My kudos to Coach again for making such superb quality products. And my thanks to you for your tips all along.
Thank you everyone, it was much easier than I thought.
Remember now.... add WD40 to your rehab supplies, LOL
Remember now.... add WD40 to your rehab supplies, LOL
Followup report on my twill Convertible Clutch. I used Lincoln E-Z Cleaner on the "industrial cotton twill" and I'm happy with the result. I used both toothbrush and sponge and cleaned it all over, but didn't saturate the fabric. I avoided getting it on the leather trim for fear of dye coming off the leather.
The brass on this bag polished up beautifully to a soft glow, and the leather has a wonderful baseball glove character, true to Coach origins. Once again I'm impressed with the craftsmanship of the 1980s NYC bags. It's hard to describe but they have a certain aura.
BEFORE:
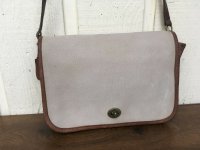
AFTER:
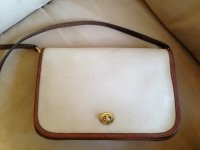
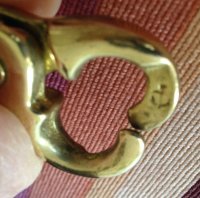
The brass on this bag polished up beautifully to a soft glow, and the leather has a wonderful baseball glove character, true to Coach origins. Once again I'm impressed with the craftsmanship of the 1980s NYC bags. It's hard to describe but they have a certain aura.
BEFORE:

AFTER:


Ooh, this spurs the imagination. Pat, a new UA flight attendant in the early '80s, issued this bag as part of her uniform, scrawls her name on the inside flap per her mother's instruction. Nervous and scared about her first flight, she soon becomes a seasoned veteran, eventually expertly transporting passengers across the globe with a smile and an assured hand for the anxious traveler. The bag traveled with her until her final flight to Paris, where she met her fiance for their destination wedding, and lived happily ever after off of his pilot's salary.Someone might obliterate a serial number if they knew it would be recognized as fake, but in your case, the bag is definitely authentic. There's no logical reason to do that.
People do weird things to handbags. I rehabbed a bag (a United Airlines Stewardess) that had the name "Pat" scrawled in permanent black marker inside the flap. Why would anyone do that???
View attachment 4637059

Incredible job! This was great and I will add this post to my tips folder -- thank you! And congratulations on your new beautiful acquisition!As promised I am back to share my Hasp brass closure rehab project.
I received the bag and I wentthe brass was green all over, a bit more and it could be a Leprechaun bag, but I thought it would be worth to try. I will share the steps I took with pictures. So this might be long...
The way the brass looked when I got the bag
View attachment 4637117 View attachment 4637119
All my research mentioned to clean first with hot water and a mild detergent. So no problem because I was going to dunk the whole bag. I used Dawn as usual.
After a few minutes I came back and was surprised to see that the green stuff was dissolving/peeling by itself. I used a soft brush and finished taking it all out. I also used a toothpick (several), to scrape around the edges, underneath, etc..
View attachment 4637120 View attachment 4637121
I rinsed, stuffed the bag, and let it dry as usual. After a day I went back to the brass that looked like this, no green but still very worn looking.
View attachment 4637122 View attachment 4637123
So now I used something I found "interesting" as recommended by people on a site, to clean brass from rifle slings. It was WD40.
I gave it a try, no hard rubbing, just a bit on a soft cloth and go all over, the improvement was effortless. Afterwards looked like this (the lighting made it look silver, but still was golden)
View attachment 4637127 View attachment 4637128
Much, much better, but still I was not happy with it, so I used my "go to metal polish" that I have to thank to whoever here recommended it, and I have been using since then, the best ever for me... Mother's.
So now I rubbed as I normally do, and oh my! All the black that came out, was unreal. And after I was done (may be I could rub even more), the end result was all worth it! Only surface scratches left.
Judge by yourselves. (the green still seen is a reflection of the top I am wearing, LOL)
View attachment 4637132 View attachment 4637133
Oh and I still I am not sure (I am not expert, LOL), if all the metal is real brass or brass plated, but there is engraving on it.....
View attachment 4637134
Bottom line, it was actually effortless and totally worth trying. My kudos to Coach again for making such superb quality products. And my thanks to you for your tips all along.
Great story! I do this sometimes while I'm working on a bag, make up a story about what it's been through. This is part of the joy of this hobby, for me.Ooh, this spurs the imagination. Pat, a new UA flight attendant in the early '80s, issued this bag as part of her uniform, scrawls her name on the inside flap per her mother's instruction. Nervous and scared about her first flight, she soon becomes a seasoned veteran, eventually expertly transporting passengers across the globe with a smile and an assured hand for the anxious traveler. The bag traveled with her until her final flight to Paris, where she met her fiance for their destination wedding, and lived happily ever after off of his pilot's salary.
I follow a few of us here on Instagram and also follow the #coachrehab. I always like to see what others or doing re coach makeovers. Found out of the first dozen most recent #coachrehab , 10 were mine.
I just like putting them up as I find the rehabbing fun to do...but wonder if I put too much up?
If any of you have Instagram and take photos of your rehabs, please put them up as well.
I just like putting them up as I find the rehabbing fun to do...but wonder if I put too much up?
If any of you have Instagram and take photos of your rehabs, please put them up as well.
I did buy a penny pocket that had a stippling of red on the toggle plate on the front of the bag. I did not know what it was but knew I needed to take care of it since it wasn't like regular tarnish. I used 0000 steel wool on it and it came up beautiful. Glad to know what it was and that I was able to stop the rotting process.Yesterday I came across something new (to me) in a NYC bag's nautical hardware. I received a red Companion bag that had fasteners with signature anchors, Talon zipper etc - I wouldn't doubt its authenticity. The leather is in an average condition as expected, I don't think there would be a particular challenge making it to look good after dunking and thorough conditioning. The hardware, however, had something I'd never seen before - a layer of red matte, what I thought, base paint under the gold top paint that mostly peeled off. I instantly panicked and tried rubbing it off with a jewelry polishing square. It took some really hard rubbing to see a normal golden brass color underneath. What the hell, I thought, and went to show it to my husband who knows way more about metals than I do. He said this is something called "red rot" that appears on brass surface (which is essentially a copper and zinc alloy) in the corrosion process called "dezincification", when zinc leaches out of metal. That mostly happens due to prolong exposure to oxigen/high humidity and is typically seen in older brass musical instruments. If it could be rubbed off with thorough polishing, that means the corrosion is not deep and the metal parts should be safe for future use as the process would be stopped. I also did a bit of research about the differences in brass alloy and found out that naval (nautical) brass is considered corrosion resistant due to presence of tin that prevents dezincification of parts exposed to water and moisture in the air. So it looks like whoever supplied these lobster claw fasteners and d-rings to Coach used a lower grade alloy, containing little or no tin, which only became obvious after years of use and exposure to elements.
If any of you ever had experience of dealing with red rot, were you able to get rid of it completely, and has it ever come back again?
In the second picture you can see some clean brass on the top after I rubbed off some leftover gold paint and red rot layer.
Good evening, rehabbers!
I am a newbie to vintage coach. My first few purchases either didn’t need any work or had already been restored by the seller.
My most recent arrival is a red shoulder sac (dated to be from the early 90’s by the helpful authenticators here). It looks quite clean and I am contemplating trying the warm towels as stuffing trick to give the bag some of its body back. My bigger question is that I find the red colour to be quite muted and dull. I am guessing my bag would benefit from some conditioning?
I have tried reading through the multiple posts here about the different products available and am frankly a bit overwhelmed! I see a lot of love on this forum for Leather CPR. Leather Therapy Restorer and Conditioner seemed to also be well reviewed. Another factor is that I am not sure where I can find any of these leather conditioners where I live (Quebec, Canada). I have looked online and I think the only product that I can order for a reasonable price is Leather Therapy (that’s the one with a picture of a saddle and boots on it, right?)
I am not planning on becoming a rehabber so I am hoping to keep things simple in my care of my new to me bag.
Thanks in advance for your input!
I’m in Ontario and was able to buy leather cpr at Bed Bath and Beyond in store for $20Good evening, rehabbers!
I am a newbie to vintage coach. My first few purchases either didn’t need any work or had already been restored by the seller.
My most recent arrival is a red shoulder sac (dated to be from the early 90’s by the helpful authenticators here). It looks quite clean and I am contemplating trying the warm towels as stuffing trick to give the bag some of its body back. My bigger question is that I find the red colour to be quite muted and dull. I am guessing my bag would benefit from some conditioning?
I have tried reading through the multiple posts here about the different products available and am frankly a bit overwhelmed! I see a lot of love on this forum for Leather CPR. Leather Therapy Restorer and Conditioner seemed to also be well reviewed. Another factor is that I am not sure where I can find any of these leather conditioners where I live (Quebec, Canada). I have looked online and I think the only product that I can order for a reasonable price is Leather Therapy (that’s the one with a picture of a saddle and boots on it, right?)
I am not planning on becoming a rehabber so I am hoping to keep things simple in my care of my new to me bag.
Thanks in advance for your input!
All 3 of my XL Ergos have different style numbers. I believe because all 3 are different leather types. I can provide them later today if you'd like.Mine is 11285. I didn't know there was an even smaller one! I once bought a 10743 in much better condition but I sold it after trying to make it work for me. I didn't think it was very small. These bags aren't really my style. I am a satchel with crossbody kinda gal. I do love the look of the bags though!
ETA: I think the one @CoachMaven has is a completely different style number.
Side note- I never got the notification that you tagged me in this thread! Sorry for the delayed response.
Register on TPF! This sidebar then disappears and there are less ads!
