Coach Rehab and Rescue Club

TPF may earn a commission from merchant affiliate
links, including eBay, Amazon, and others

Status
Not open for further replies.
Alright so not the most drastic rehab to date but a good outcome none the less. My friend and I found this bag at Value Village for $39.99. After convincing the SA to give us 20% off for the spots we scored it for $31.99.

It was authenticated as a 91-92 "Spectator Scout Bag"

First two pics are before, then afters.

You sure brought this one back to life...Beautiful job!
 
Washing in cool water is a good idea, too bad I didn't read that before I decided to go ahead and "take the plunge"!

I started by dunking the 2 burgandy bags in warm sudsy water and there was some color release into the water, but not bad at all.

Encouraged, I gave the red duffle a good looking-over and decided to wash it too. I added it to the suds with the other 2 bags and the water still just had a light redish tinge so I was encouraged to continue.

When I started rubbing the bags with a soft cloth to try and get out the dirt - that's when the water really started to turn red! My fingers were staining red too, so I had to put on rubber gloves.

The small burgandy bag seemed to bleed the most. By the time I was done the water looked like blood!

The rinse water had a lighter red color and the bags are drying now. They look okay for the moment, but they are wet so we will have to wait and see what happens.


Below are some pics of the washing process.

Pic 1: Hardware, the 2 burgandy bags had bad verdigris so I had to remove the turnlocks; they are soaking in vinegar and water.

Pic 2: Reddish-tinged suds after dunking and soaking the bags.

Pic 3: Blood-red water after vigorous washing.

Pic 4: Reddish rinse water and red-stained fingers.

Pic 5: Stuffed and drying.

Very similar to my experience...my hands were pink for several days!

And I need to start paying better attention to hardware...I had no idea the yucky green stuff could be underneath, as well as on the surface (duh!). I don't recall a step-by-step removal and replacement guide. It seems like a straightforward process, but prying up those little brass tabs looks like an accident waiting to happen. If you have time, could you please share your technique?

Your rehabs are always amazing...Good luck with these 3...I always look forward to your results!
 
FYI one of the sales associates told me to use waxed paper to lubricate zipper teeth. It's at least worth a try, because you are not messing with the bag. I also use an old tooth brush while I am washing the bags it tends to make them look shinier. You can even use a little tooth paste on the brush while you are dunking the bag - just be sure to wash it off well so that it doesn't get on the fabric part of the zipper.
 
FYI one of the sales associates told me to use waxed paper to lubricate zipper teeth. It's at least worth a try, because you are not messing with the bag. I also use an old tooth brush while I am washing the bags it tends to make them look shinier. You can even use a little tooth paste on the brush while you are dunking the bag - just be sure to wash it off well so that it doesn't get on the fabric part of the zipper.

I have used a toothbrush on the teeth while washing but I've never tried toothpaste! Well, they call them the "teeth of the zipper" so why not?! Thanks for the tip, I will try it next time - cleaning the zipper teeth is always a challenging process.
 
Very similar to my experience...my hands were pink for several days!

And I need to start paying better attention to hardware...I had no idea the yucky green stuff could be underneath, as well as on the surface (duh!). I don't recall a step-by-step removal and replacement guide. It seems like a straightforward process, but prying up those little brass tabs looks like an accident waiting to happen. If you have time, could you please share your technique?

Your rehabs are always amazing...Good luck with these 3...I always look forward to your results!

Thanks!, I follow DemRam's advice for removing the turnlock hardware, see below. Be careful not not cut yourself or the bag!

From DemRam:
"My husband has an X-acto set that has various shaped blades. The blades are very thin so I used the widest one (east-west) to gently pry up the "tabs" on the back of both parts of the turnlocks. (It's amazing how easy it is to get both parts of those old turnlocks off)

You can pry gently and jiggle them around so that they aren't too bent. I wouldn't want to do this more than once on a turnlock...because the brass may just snap.

When I got the turnlock parts off of my little Dinky bag, I couldn't believe how much "gunk" was underneath. (The leather was just yucky under the brass and no amount of cleaning from the outside would get rid of the green stuff).

Once the brass was removed, I cleaned them with Brasso and let them sit for days... until the bag was bathed, clean and completely dry.

When the bag was dry, I did the reverse and put the brass parts back on. I now have a shiny, clean, tiny little Dinky bag."
 
...And I need to start paying better attention to hardware...I had no idea the yucky green stuff could be underneath, as well as on the surface (duh!). I don't recall a step-by-step removal and replacement guide. It seems like a straightforward process, but prying up those little brass tabs looks like an accident waiting to happen. If you have time, could you please share your technique?...

Thanks!, I follow DemRam's advice for removing the turnlock hardware, see below...

BTW, if you do break the turnlock hardware (or buy a bag with a broken turnlock) Coach will send you a free replacement kit, the same way that they will send a free hangtag.
 
I googled "shoe shine video" and found this on YouTube:
http://www.youtube.com/watch?v=bdb1x2vQ2Z0

After applying Blackrocks and letting it dry, usually overnight, I use a similar technique - short, light, brisk strokes, changing directions, working all over the bag. It just makes the leather glow! Hope this helps.
where do you buy a horse brush?? Thank you for the video and the tip!!;)
 
I know that this has been discussed recently but I can't seem to find the information. The burgandy small shoulder bag that I am rehabbing is incredibly dry and has small cracks in the leather at the folds and on the strap. The strap was like beef jerky!

I wonder if the reason that this bag lost color so badly when I washed it has anything to do with the dryness of the leather?

While it was drying I treated it with a heavy application of emu oil and it just drank it in! It's still drying but I have just given it an application of leather cpr to try and prevent it from cracking further.

Has anyone come up with a good solution for repairing those little cracks in the leather caused by dry rot? Thanks!
 
It's just so strange how the same color in 2 different bags will react so differently. I imagine even cooler water would still cause some bleed since I don't often make my water more than tepid ever. These look like great bags so my fingers are crossed that they dry evenly!!!

Thanks! I think that the difference must be due to different lots of dye.

I've just mentioned that the leather on the small burgandy bag is terribly dry so maybe that has something to do with the rate of color loss during washing?
 
FYI, I was recently at the local Tuesday Morning store and I picked up some 12 oz tubes of Leather CPR for $6. They also some other interesting CPR products like Granite CPR and Carpet CPR.

Also at Tuesday Morning they had the 30 count containers of Goddard's alcohol-free Jewelry Wipes for $3 that I often use to clean hardware before putting a bag into storage, although I suppose that alcohol-free baby wipes would work too.

I was surprised to see that Goddard's also makes other unusual products and I picked up a container of Electronic Wipes for $3 that are advertised as safe for cleaning home electronic devices including LCD screens.
 
I know that this has been discussed recently but I can't seem to find the information. The burgandy small shoulder bag that I am rehabbing is incredibly dry and has small cracks in the leather at the folds and on the strap. The strap was like beef jerky!

I wonder if the reason that this bag lost color so badly when I washed it has anything to do with the dryness of the leather?

While it was drying I treated it with a heavy application of emu oil and it just drank it in! It's still drying but I have just given it an application of leather cpr to try and prevent it from cracking further.

Has anyone come up with a good solution for repairing those little cracks in the leather caused by dry rot? Thanks!

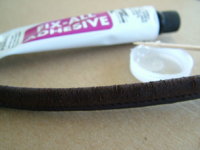
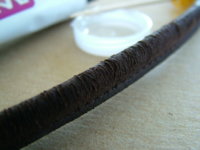
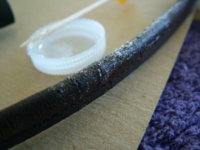
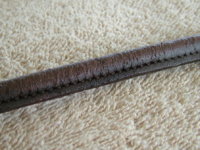
I've been working on a couple of Compact Pouches this week. One brown, the other black. The brown one is older (NYC late 70s to 87) and had severe cracking on its skinny strap. Bad cracking. I had a thought to fill the cracks with glue, then cover with acrylic. NOT! The glue, although suggested on the package for leather, didn't penetrate very well at all. It just sat on top and dried like rubber cement. Lumpy, ugly rubber cement! The package said stray dried glue could be removed with an eraser, so I started erasing, and erasing and erasing. Unfortunately much of the finish came off too in the worst-worn places. Then I started mixing acrylic colors to get a close match to the dark, reddish brown. Dabbed it on with a sponge-tipped eyeshadow applicator and it filled in a bit. I will repeat the process, bending the strap to try to fill in as much as possible. I've put a little Leather CPR over the acrylic and it didn't pick up the color, and it seemed to penetrate, so she's resting before another fill-in in the morning. Pics are below. The first 3 are of the gluey-mess, the last one is after acrylic and CPR. Though not out of the woods yet, I think she'll be use-able!

Hope this helps...most of my rehab efforts so fast and furiously over the last several weeks have been in an effort to protect my bags, as I never had the knowledge or skills I needed before. I'm about at the end of the oldest Coach Leatherware bags, and have enjoyed good success, thanks to the education I've received here. Good Luck!

AND Thanks Everyone for the zipper tips!
 

Attachments

  • DSCF7647.JPG
    DSCF7647.JPG
    74.2 KB · Views: 226
  • DSCF7648.JPG
    DSCF7648.JPG
    69.8 KB · Views: 227
  • DSCF7649.JPG
    DSCF7649.JPG
    83.5 KB · Views: 231
  • DSCF7657.JPG
    DSCF7657.JPG
    131.9 KB · Views: 226
Status
Not open for further replies.
Top