ITA... that extra hidden pocket is really cool!! And I love that it can be crossbody or just a shoulder bag without being heavy!!I have a tan whitney that I rehabbed a while back.
http://forum.purseblog.com/coach/coach-rehab-and-rescue-club-624452-195.html on this page about halfway down I posted before and after pics.
Anyways, I bought the bag for 5 dollars since it was in such terrible condition. I loved the style of it and found later after i was able to look up the style number that it was the whitney duffle. Thought the pockets were awesome then noticed that the section behind the big main section and where flap attaches on the back basically is a whole other huge section but it's kind of hidden. This bag is SUPER durable (mine was made in '96) and yet lightweight, feels great when you wear it crossbody and everything about it is perfect to me.
You are using an out of date browser. It may not display this or other websites correctly.
You should upgrade or use an alternative browser.
You should upgrade or use an alternative browser.
Coach Rehab and Rescue Club
- Thread starter bunnymasseuse
- Start date
TPF may earn a commission from merchant affiliate
links, including eBay, Amazon, and others
- Status
- Not open for further replies.
More options
Who Replied?thank you so much!! Im going to go to Joannes tomorrow and look for some leather safe adhesive. Maybe I can even mix a little lexol in it and apply with a fine point needle/toothpick. Thanks for the tip!I went to Joann's Fabric and Hobby store and they had an entire aisle of adhesives. I picked a fabric glue that listed leather among the types of fabrics and materials that were safe to use with the glue. They had lots of them.
I use this glue often when I reattach the 2 halves of leather hangtags that have come apart with age. It works great.
There is another very handy product that I get at Joann's but I have never tried it on leather. It is called Fray Check and you dab it on fraying cloth and it dries clear and stops the damage. It is useful for a lot of things.
Remember to always spot check in an obscure area of the bag, good luck!
...and the rest of my summer free time. I finally got enough nerve to drag out my bins full of thrift shop Coach fixer-uppers. Anybody wanna become a refurb. intern ? LOL.I DO I DO!! I'll come over and help you
")
As far as ink spots, some of my purses that are in good condition have light ink marks. I have learned that it is better to leave these alone because trying to clean them will sometimes leave you with a white spot surrounding the ink. If the bag has scratches and loss of color, then I would try to clean the ink spots because I know I am going to have to do some cosmetic work on it anyway.
Good luck. Make sure you post pics of your results.
I agree with this, sometimes it's not worth losing the color for a not very noticeable stray mark. Also I really think that using the rubbing alcohol or hair spray on ink and letting it dry without removing the stain sets the ink. As a general rule I think it's better to work on a spot until it's gone. In fact, there is a mark on the bottom of my BT Logan bag that the seller mentioned that she had tried to clean, and I worked on it a little and that mark isn't budging at all. It's not in a very noticeable spot and it really doesn't bother me though, I worked on it more for the practice than anything.
Now that I've said to ignore stray marks that aren't obvious, I also want to say to keep an eye on ink on the inside of the bag. I was working on an older bag that had a SPLOTCH in a hidden place on the insde, and I dunked and rinsed it, but when I checked on it after it had dried for a half hour or so, the ink had started to leak through. I've had this happen before, but it was always darker. This was in a very obvious spot on the outside, and you really couldn't see it at all on the inside.
I pulled all the stuffing out, grabbed the alcohol and soaked the inside of the spot with it, and kind of dabbed the outside. I was able to clean it up but I wanted to get it all at once. I should mention that just getting that spot wet caused it to soak through. I doubt I got it all from the inside, so I am going to avoid dunking that bag again.
I'll be posting pix of this bag later, I got half done with it but I'm slammed right now so she's half rehabbed.
You are so right about the ink "leaking". On that white bag I posted earlier the damage extends beyond that original small spot. Apparently there are hidden (maybe not hidden but I thought they were some other dirt) blue ink all over inside of the bottom leather. Sadly via washing the bag, the ink also leaked to the outside on two other places. Horror story indeed! Never again!
What I did with mine, and this might not have worked on yours, because it's different leather, was just keep treating it with alcohol and dabbing the outside. I actually felt like I was pushing the ink through the bag and wiping it off the outside. I think if I hadn't noticed before it dried it would not have come off, but by working at it consistently until it was gone, I was able to get it all off on the outside.
If the bag had been a different shape I might have tried working in the other direction, pushing the ink through and dabbing off the inside, but it was near the bottom of a large duffle and I just couldn't get inside it to really work on.
Different leathers will react differently though, unfortunately.
...and the rest of my summer free time. I finally got enough nerve to drag out my bins full of thrift shop Coach fixer-uppers. Anybody wanna become a refurb. intern ? LOL.


It's like all my babies cloned themselves and went north for the summer...LOVE the new white kisslock tote! Can't wait to show my hubby
")
Thank you for the info, and I sure will when I do the project I am going to do bunches of research here on the site for the rehab, besides what has been suggested and I have been told... so that I feel confident in what I am doing when I go into the rehab, I don't want to make any mistakes, well ok that many mistakes if I make any...lol
Welcome to rehab!
...and you're already on the right track with doing lots of research! There is so much well-written, detailed info here about doing just about anything and everything to a bag! We've all experienced our successes - and not-so successes - but it's really fulfilling to breathe new life into an old neglected bag! Every rehab is different, as every bag has its own unique challenges, but for me, that's what makes it fun...and addicting! Post lots of pictures, before and after...and ask lots of questions. We all get smarter with each adventure. Good Luck!
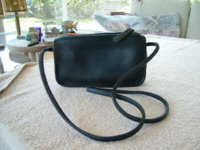
This is an early 90s Kimball Bag, authenticated by Hyacinth a few days ago. Follow the link for the before pics: http://forum.purseblog.com/coach-shopping/authenticate-this-coach-694619-713.html#post21917630. I paid $5.99 at a thrift store in Hilton Head, SC, in 2005.
I did my usual rehab bath with extra strength Dawn, though slightly warmer to help take the kinks out of the strap - and it worked well. Reshaping her was tricky as I think she was over-stuffed in her past life. Kinda like the zipper at the top of the bag was stretched. And possibly replaced, as there is a lot of bad, double stitching all around it! It's really hinky zipper...sometimes it misses a couple of teeth near the beginning and doesn't zip right. Does anyone have any experience with this? Any suggestions? I wonder if there might be debris in the zipping mechanism.
Conditioned her with lots of Leather CPR and touched up the strap edges and zipper pull edges with black acrylic. Finished with Blackrocks 2x, buffed with a horsehair brush and polished the brass (unfortunately losing its plating).
Below are 2 after pics. Now she's clean, shining and happy...there's nothing like Coach leather!
Attachments
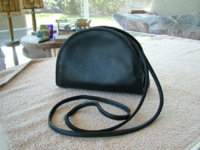
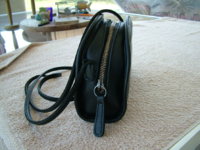
This one has been in my collection since 2005...don't recall where she came from, or what I paid, as I had not become a nut-job about record keeping yet Hyacinth identified her as a Zippered Pouch #9655 from the early to mid 80s. See http://forum.purseblog.com/coach-shopping/authenticate-this-coach-694619-713.html#post21917665 for before pics.
If all rehabs could be this easy! Same procedure as the Kimball in the last post, in fact, they went swimming together! And now she's back to being beautiful...and I just love the old-school chunky zipper!
I'm in complete agreement with katev's advice to newbies: start with a black, or dark colored bag for your first rehab adventure. They're much easier, and usually turn out very, very well. Thanks everyone, for teaching me these rewarding skills!
Hyacinth identified her as a Zippered Pouch #9655 from the early to mid 80s. See http://forum.purseblog.com/coach-shopping/authenticate-this-coach-694619-713.html#post21917665 for before pics.If all rehabs could be this easy! Same procedure as the Kimball in the last post, in fact, they went swimming together! And now she's back to being beautiful...and I just love the old-school chunky zipper!
I'm in complete agreement with katev's advice to newbies: start with a black, or dark colored bag for your first rehab adventure. They're much easier, and usually turn out very, very well. Thanks everyone, for teaching me these rewarding skills!
Attachments

Now this is what I love about vintage Coach Leatherware...one of the sturdiest bags Ive ever seen! And she came back to life beautifully.
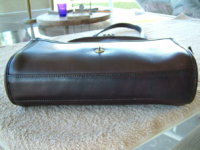
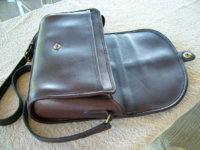
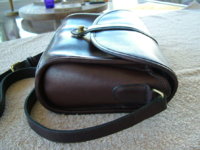
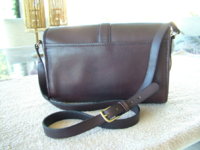
Shes been in my closet since 2006, since before I kept records on what I paid, etc. (too bad, as Hyacinth said her original MSRP was $210). Authenticated as a Roll Bag #9887 from 1992, she was scuffed up, but structurally solid as a rock! Check out the before pics here: http://forum.purseblog.com/coach-shopping/authenticate-this-coach-694619-716.html#post21925888
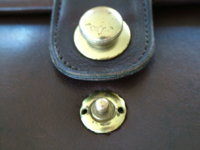
Theres lots of leather here, as the flap, side panels and bottom are double sided! And it was all badly in need of conditioning, so after a bath, she got lots of Leather CPR. During the conditioning, the Springlock Closure popped off in my hand, but I was able to carefully re-attach it with a pair of needle-nosed pliers (I remember it always seemed loose). It's a shame the outer button of the closure has been scratched through the plating. I touched up the strap edges with a mixture of black acrylic and Lexol, as I wanted it to sink into the raw leather edges, rather than having a solid acrylic edge. After 2 applications of Blackrocks, I buffed with a horsehair brush and the sheen is amazing. Blackrocks rules!
Im really pleased with this one...the rich patina is gorgeous...shes got many, many years of life left in her!
Shes been in my closet since 2006, since before I kept records on what I paid, etc. (too bad, as Hyacinth said her original MSRP was $210). Authenticated as a Roll Bag #9887 from 1992, she was scuffed up, but structurally solid as a rock! Check out the before pics here: http://forum.purseblog.com/coach-shopping/authenticate-this-coach-694619-716.html#post21925888
Theres lots of leather here, as the flap, side panels and bottom are double sided! And it was all badly in need of conditioning, so after a bath, she got lots of Leather CPR. During the conditioning, the Springlock Closure popped off in my hand, but I was able to carefully re-attach it with a pair of needle-nosed pliers (I remember it always seemed loose). It's a shame the outer button of the closure has been scratched through the plating. I touched up the strap edges with a mixture of black acrylic and Lexol, as I wanted it to sink into the raw leather edges, rather than having a solid acrylic edge. After 2 applications of Blackrocks, I buffed with a horsehair brush and the sheen is amazing. Blackrocks rules!
Im really pleased with this one...the rich patina is gorgeous...shes got many, many years of life left in her!
Attachments


I love these two new lovely bags!! I'm curious to see a photo of your horsehair brush. I'd not thought to use a brush for buffing....duh...but curious about what you like to useNow this is what I love about vintage Coach Leatherware...one of the sturdiest bags Ive ever seen! And she came back to life beautifully.
Shes been in my closet since 2006, since before I kept records on what I paid, etc. (too bad, as Hyacinth said her original MSRP was $210). Authenticated as a Roll Bag #9887 from 1992, she was scuffed up, but structurally solid as a rock! Check out the before pics here: http://forum.purseblog.com/coach-shopping/authenticate-this-coach-694619-716.html#post21925888
Theres lots of leather here, as the flap, side panels and bottom are double sided! And it was all badly in need of conditioning, so after a bath, she got lots of Leather CPR. During the conditioning, the Springlock Closure popped off in my hand, but I was able to carefully re-attach it with a pair of needle-nosed pliers (I remember it always seemed loose). It's a shame the outer button of the closure has been scratched through the plating. I touched up the strap edges with a mixture of black acrylic and Lexol, as I wanted it to sink into the raw leather edges, rather than having a solid acrylic edge. After 2 applications of Blackrocks, I buffed with a horsehair brush and the sheen is amazing. Blackrocks rules!
Im really pleased with this one...the rich patina is gorgeous...shes got many, many years of life left in her!
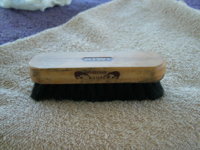
I love these two new lovely bags!! I'm curious to see a photo of your horsehair brush. I'd not thought to use a brush for buffing....duh...but curious about what you like to use
Thanks...OOPS! It's a horsehair "mixture" brush. I suppose any garden variety horsehair shoe brush would work as well. My hubby has a bigger one that's just horsehair, but I like this one as it fits in my hand better and is good for getting in tight spots...really makes leather shine!
Attachments
Good morning everyone, I just received my suede bag that I bought from eBay and it needs a little TLC, there is some dirty spots on the bag, I have a brush like was suggested for doing work (rubber on one side and nylon fine metal bristles on the other). My question is what side of the brush do I use first and which way do you brush the suede?
Thank you
Thank you
Now this is what I love about vintage Coach Leatherware...one of the sturdiest bags Ive ever seen! And she came back to life beautifully.
Shes been in my closet since 2006, since before I kept records on what I paid, etc. (too bad, as Hyacinth said her original MSRP was $210). Authenticated as a Roll Bag #9887 from 1992, she was scuffed up, but structurally solid as a rock! Check out the before pics here: http://forum.purseblog.com/coach-shopping/authenticate-this-coach-694619-716.html#post21925888
Theres lots of leather here, as the flap, side panels and bottom are double sided! And it was all badly in need of conditioning, so after a bath, she got lots of Leather CPR. During the conditioning, the Springlock Closure popped off in my hand, but I was able to carefully re-attach it with a pair of needle-nosed pliers (I remember it always seemed loose). It's a shame the outer button of the closure has been scratched through the plating. I touched up the strap edges with a mixture of black acrylic and Lexol, as I wanted it to sink into the raw leather edges, rather than having a solid acrylic edge. After 2 applications of Blackrocks, I buffed with a horsehair brush and the sheen is amazing. Blackrocks rules!
Im really pleased with this one...the rich patina is gorgeous...shes got many, many years of life left in her!
Cool, I love seeing these more unusual bags!
As for zippers, if you haven't tried it already, lubricating them helps. I've heard different things, from soap to mineral oil. I'd probably try something like a dab of vaseline because you can control where it goes pretty easily so you can keep it on the "teeth", without risking your pretty clean bag, but I'm sure there are lots of options. I've had mixed results with lubricating zippers, it depends if there's something else wrong with it, but sometimes it helps.
- Status
- Not open for further replies.
Register on TPF! This sidebar then disappears and there are less ads!