Could you share with me the same ? Please.Check your PM ASAP!
You are using an out of date browser. It may not display this or other websites correctly.
You should upgrade or use an alternative browser.
You should upgrade or use an alternative browser.
Rejuventating, Repairing or Restoring Your Balenciaga
- Thread starter didi78
- Start date
TPF may earn a commission from merchant affiliate
links, including eBay, Amazon, and others
More options
Who Replied?Sorry, I was trying to get her attention regarding a different matter!Could you share with me the same ? Please.
😂👍 thanks muchSorry, I was trying to get her attention regarding a different matter!
Mini City Mini Makeover
F/W 2014 Olive Green Nylon Mini City
Treated rub marks with Saphir Beaute Du Cuir Crème Polish and used Zelikovitz Professional Satin Top Coat. In hindsight, I should have used a matte top coat, but ended up treating all the edges so everything matches.
Before:
View attachment 5925259
After:
View attachment 5925260
Front & Back (Before & After):
View attachment 5925261
@Deco I saw your questions posted on the other thread re: this post, but it was deleted so moving to answer here. Going by memory so if I miss anything just hollar.

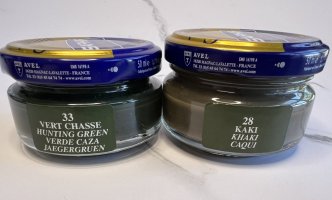
Your Saphir cream guesses are spot on! Used a blend of Hunting Green & Khaki.
You can get away without a topcoat if the damage isn’t severe. I ended up going this route because: 1) The creams weren’t cutting it due to how bad the corners were scuffed even after several coats. 2) It helped to ”seal” in more of the color coverage. 3) I’m hoping adding this topcoat step will extend the life of the corners. Time will tell on this one!

Apologize for the longer than normal post, I want to be as detailed as possible and have you all learn through my mistakes on this one. 
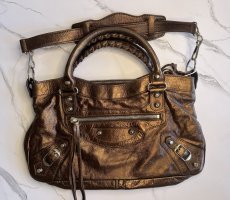
Grabbed an 05 Metallic Bronze First recently and it arrived with rub marks throughout that revealed a silver color underneath the original bronze coating.
Using the mirror as my test starting point, I thought I was prepared for surgery.
🚫 DO NOT DO THIS 🚫
Armed with Saphir Bronze metallic cream polish tested a small spot, but quickly discovered this technique was not going to work. It just slid around leaving behind a dirty looking residue that wasn’t covering anything. I recovered quickly by wiping this off.
🚫 DO NOT DO THIS 🚫
Next up, acrylic leather metallic paints. Played around with different mixtures until I was satisfied, after it was applied the paint did not sit well on top of the silver. The finish also wasn’t drying right and it looked horrible. This couldn’t be rubbed off like the Saphir polish. Panic was starting to set in.
⚠️ MAYBE DO THIS ⚠️
To fix my paint screw up, I grabbed a few cheap items you all likely already have at home: Q-tips and rubbing alcohol (70%). I was able to take the paint off slowly by using the Q-tip with a little bit of rubbing alcohol on the end using light feathering brushstrokes. After several minutes, I noticed that not only was the paint gone on the spot I was testing, but the silver spot I was trying to coverup had disappeared and I was left with a finish that looked almost like new! 💡
💡
What I learned is the alcohol was spreading the metallic finish and if done carefully I could cover up the silver spots doing this without any damage to the bag itself. This technique ended up working because this bag has the metallic finish coated on top and the spots being treated weren’t terribly large. As the Q-tips get dirty or start to loose it’s shape, discard and grab a fresh one. Always let dry and try another pass if needed. Once done, let dry completely and protect with your go-to leather conditioning cream, mine is Leather CPR.
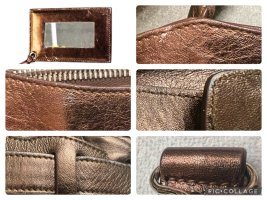
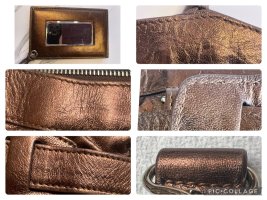
Here are a few before and after photos of some of the areas I touched-up.
BEFORE:

AFTER:


Grabbed an 05 Metallic Bronze First recently and it arrived with rub marks throughout that revealed a silver color underneath the original bronze coating.
Using the mirror as my test starting point, I thought I was prepared for surgery.

🚫 DO NOT DO THIS 🚫
Armed with Saphir Bronze metallic cream polish tested a small spot, but quickly discovered this technique was not going to work. It just slid around leaving behind a dirty looking residue that wasn’t covering anything. I recovered quickly by wiping this off.
🚫 DO NOT DO THIS 🚫
Next up, acrylic leather metallic paints. Played around with different mixtures until I was satisfied, after it was applied the paint did not sit well on top of the silver. The finish also wasn’t drying right and it looked horrible. This couldn’t be rubbed off like the Saphir polish. Panic was starting to set in.
⚠️ MAYBE DO THIS ⚠️
To fix my paint screw up, I grabbed a few cheap items you all likely already have at home: Q-tips and rubbing alcohol (70%). I was able to take the paint off slowly by using the Q-tip with a little bit of rubbing alcohol on the end using light feathering brushstrokes. After several minutes, I noticed that not only was the paint gone on the spot I was testing, but the silver spot I was trying to coverup had disappeared and I was left with a finish that looked almost like new!
 💡
💡What I learned is the alcohol was spreading the metallic finish and if done carefully I could cover up the silver spots doing this without any damage to the bag itself. This technique ended up working because this bag has the metallic finish coated on top and the spots being treated weren’t terribly large. As the Q-tips get dirty or start to loose it’s shape, discard and grab a fresh one. Always let dry and try another pass if needed. Once done, let dry completely and protect with your go-to leather conditioning cream, mine is Leather CPR.
Here are a few before and after photos of some of the areas I touched-up.
BEFORE:

AFTER:


Last edited:
So good, looks good as new!Apologize for the longer than normal post, I want to be as detailed as possible and have you all learn through my mistakes on this one.
Grabbed an 05 Metallic Bronze First recently and it arrived with rub marks throughout that revealed a silver color underneath the original bronze coating.
Using the mirror as my test starting point, I thought I was prepared for surgery.
🚫 DO NOT DO THIS 🚫
Armed with Saphir Bronze metallic cream polish tested a small spot, but quickly discovered this technique was not going to work. It just slid around covering nothing and only leaving behind a dirty looking residue that wasn’t covering anything. I recovered quickly by wiping this off.
🚫 DO NOT DO THIS 🚫
Next up, acrylic leather metallic paints. Played around with different mixtures until I was satisfied, after it was applied the paint did not sit well on top of the silver. The finish also wasn’t drying right and it looked horrible. This couldn’t be rubbed off like the Saphir polish. Panic was starting to set in.
⚠️ MAYBE DO THIS ⚠️
To fix my paint screw up, I grabbed a few cheap items you all likely already have at home: Q-tips and rubbing alcohol (70%). I was able to take the paint off slowly by using the Q-tip with a little bit of rubbing alcohol on the end using light feathering brushstrokes. After several minutes, I noticed that not only was the paint gone on the spot I was testing, but the silver spot I was trying to coverup had disappeared and I was left with a finish that looked almost like new!💡
What I learned is the alcohol was spreading the metallic finish and if done carefully I could cover up the silver spots doing this without any damage to the bag itself. This technique ended up working because this bag has the metallic finish coated on top and the spots being treated weren’t terribly large. As the Q-tips get dirty or start to loose it’s shape, discard and grab a fresh one. Always let dry and try another pass if needed. Once done, let dry completely and protect with your go-to leather conditioning cream, mine is Leather CPR.
Here are a few before and after photos of some of the areas I touched-up.
BEFORE:
View attachment 5927653
AFTER:
View attachment 5927650
View attachment 5927657
But scary, lol.
And here I was ready to get different metallic bronze leather colors for my first ever "repair adventure". Phew, good thing I didn't. Rubbing alcohol? Now I'm scared again. Damn that the worst of it is on the front of mine. I think I'm too chicken to try it though...

She looks great!Apologize for the longer than normal post, I want to be as detailed as possible and have you all learn through my mistakes on this one.
Grabbed an 05 Metallic Bronze First recently and it arrived with rub marks throughout that revealed a silver color underneath the original bronze coating.
Using the mirror as my test starting point, I thought I was prepared for surgery.
🚫 DO NOT DO THIS 🚫
Armed with Saphir Bronze metallic cream polish tested a small spot, but quickly discovered this technique was not going to work. It just slid around leaving behind a dirty looking residue that wasn’t covering anything. I recovered quickly by wiping this off.
🚫 DO NOT DO THIS 🚫
Next up, acrylic leather metallic paints. Played around with different mixtures until I was satisfied, after it was applied the paint did not sit well on top of the silver. The finish also wasn’t drying right and it looked horrible. This couldn’t be rubbed off like the Saphir polish. Panic was starting to set in.
⚠️ MAYBE DO THIS ⚠️
To fix my paint screw up, I grabbed a few cheap items you all likely already have at home: Q-tips and rubbing alcohol (70%). I was able to take the paint off slowly by using the Q-tip with a little bit of rubbing alcohol on the end using light feathering brushstrokes. After several minutes, I noticed that not only was the paint gone on the spot I was testing, but the silver spot I was trying to coverup had disappeared and I was left with a finish that looked almost like new!💡
What I learned is the alcohol was spreading the metallic finish and if done carefully I could cover up the silver spots doing this without any damage to the bag itself. This technique ended up working because this bag has the metallic finish coated on top and the spots being treated weren’t terribly large. As the Q-tips get dirty or start to loose it’s shape, discard and grab a fresh one. Always let dry and try another pass if needed. Once done, let dry completely and protect with your go-to leather conditioning cream, mine is Leather CPR.
Here are a few before and after photos of some of the areas I touched-up.
BEFORE:
View attachment 5927653
AFTER:
View attachment 5927650
View attachment 5927657
It seems scary, but really this one isn’t. I got the truly horrifying please don’t try these steps out of the way for you!So good, looks good as new!
But scary, lol.
And here I was ready to get different metallic bronze leather colors for my first ever "repair adventure". Phew, good thing I didn't. Rubbing alcohol? Now I'm scared again. Damn that the worst of it is on the front of mine. I think I'm too chicken to try it though...

Last edited:
My mirror looks even worse than yours did. I never use them, so will sacrifice it before attacking the bag.It seems scary, but really this one isn’t. I got the truly horrifying please don’t try these steps out of the way for you!

 🤞
🤞My mirror looks even worse than yours did. I never use them, so will sacrifice it before attacking the bag.🤞

Is the concept that you move existing color from plentiful places to nicked and faded places? I have a heavily faded/discolored magenta metallic that doesn't have enough color to spare. Is coloring/dying over not an option?Apologize for the longer than normal post, I want to be as detailed as possible and have you all learn through my mistakes on this one.
Grabbed an 05 Metallic Bronze First recently and it arrived with rub marks throughout that revealed a silver color underneath the original bronze coating.
Using the mirror as my test starting point, I thought I was prepared for surgery.
🚫 DO NOT DO THIS 🚫
Armed with Saphir Bronze metallic cream polish tested a small spot, but quickly discovered this technique was not going to work. It just slid around leaving behind a dirty looking residue that wasn’t covering anything. I recovered quickly by wiping this off.
🚫 DO NOT DO THIS 🚫
Next up, acrylic leather metallic paints. Played around with different mixtures until I was satisfied, after it was applied the paint did not sit well on top of the silver. The finish also wasn’t drying right and it looked horrible. This couldn’t be rubbed off like the Saphir polish. Panic was starting to set in.
⚠️ MAYBE DO THIS ⚠️
To fix my paint screw up, I grabbed a few cheap items you all likely already have at home: Q-tips and rubbing alcohol (70%). I was able to take the paint off slowly by using the Q-tip with a little bit of rubbing alcohol on the end using light feathering brushstrokes. After several minutes, I noticed that not only was the paint gone on the spot I was testing, but the silver spot I was trying to coverup had disappeared and I was left with a finish that looked almost like new!💡
What I learned is the alcohol was spreading the metallic finish and if done carefully I could cover up the silver spots doing this without any damage to the bag itself. This technique ended up working because this bag has the metallic finish coated on top and the spots being treated weren’t terribly large. As the Q-tips get dirty or start to loose it’s shape, discard and grab a fresh one. Always let dry and try another pass if needed. Once done, let dry completely and protect with your go-to leather conditioning cream, mine is Leather CPR.
Here are a few before and after photos of some of the areas I touched-up.
BEFORE:
View attachment 5927653
AFTER:
View attachment 5927650
View attachment 5927657
Correct. I would only recommend doing this on small areas and only on metallics that are top coated on. Coloring / dying is still an option, I just don’t have experience doing it (yet!). If I tried harder, I may have gotten the metallic paint formula to eventually work, however, when I discovered that I could “borrow” color from the surrounding areas to blend with amazing results, I switched to this route.Is the concept that you move existing color from plentiful places to nicked and faded places? I have a heavily faded/discolored magenta metallic that doesn't have enough color to spare. Is coloring/dying over not an option?
Apologize for the longer than normal post, I want to be as detailed as possible and have you all learn through my mistakes on this one.
Grabbed an 05 Metallic Bronze First recently and it arrived with rub marks throughout that revealed a silver color underneath the original bronze coating.
Using the mirror as my test starting point, I thought I was prepared for surgery.
🚫 DO NOT DO THIS 🚫
Armed with Saphir Bronze metallic cream polish tested a small spot, but quickly discovered this technique was not going to work. It just slid around leaving behind a dirty looking residue that wasn’t covering anything. I recovered quickly by wiping this off.
🚫 DO NOT DO THIS 🚫
Next up, acrylic leather metallic paints. Played around with different mixtures until I was satisfied, after it was applied the paint did not sit well on top of the silver. The finish also wasn’t drying right and it looked horrible. This couldn’t be rubbed off like the Saphir polish. Panic was starting to set in.
⚠️ MAYBE DO THIS ⚠️
To fix my paint screw up, I grabbed a few cheap items you all likely already have at home: Q-tips and rubbing alcohol (70%). I was able to take the paint off slowly by using the Q-tip with a little bit of rubbing alcohol on the end using light feathering brushstrokes. After several minutes, I noticed that not only was the paint gone on the spot I was testing, but the silver spot I was trying to coverup had disappeared and I was left with a finish that looked almost like new!💡
What I learned is the alcohol was spreading the metallic finish and if done carefully I could cover up the silver spots doing this without any damage to the bag itself. This technique ended up working because this bag has the metallic finish coated on top and the spots being treated weren’t terribly large. As the Q-tips get dirty or start to loose it’s shape, discard and grab a fresh one. Always let dry and try another pass if needed. Once done, let dry completely and protect with your go-to leather conditioning cream, mine is Leather CPR.
Here are a few before and after photos of some of the areas I touched-up.
BEFORE:
View attachment 5927653
AFTER:
View attachment 5927650
View attachment 5927657
🚨 WARNING: IMPORTANT UPDATE 🚨
Tried this technique on my 04/05 Holiday Orange Metallic City and found out quickly it will NOT work on this one. The only reason it worked on the 05 Bronze is that it has a silver undercoat that allowed the color to be pushed around easily. Think of it like glass on top of glass, that glides. The Holiday Orange has the metallic coated straight on the leather (no undercoat) and the metallic doesn’t budge when you try to blend it and the leather just absorbs the alcohol.
Last edited:
Hello! I would love to know the recommendation for removing the stickiness on handles too if you wouldn’t mind sharingCheck your PM ASAP!

As mentioned earlier, I was trying to get the particular poster's attention relating to a different matter, sorry!Hello! I would love to know the recommendation for removing the stickiness on handles too if you wouldn’t mind sharing
Register on TPF! This sidebar then disappears and there are less ads!
