Rejuventating, Repairing or Restoring Your Balenciaga

TPF may earn a commission from merchant affiliate
links, including eBay, Amazon, and others

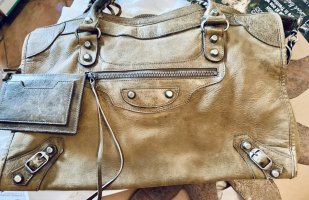
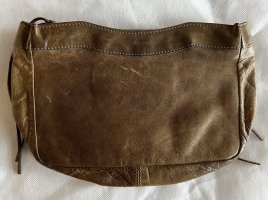
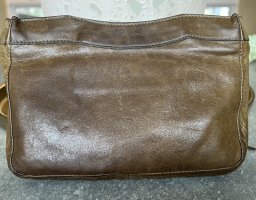
That rouge cardinal bag was pretty dry, but it seems like a different kind of dry than you might be describing. Only the first photo in that series was a before pic. I let go of that bag several years ago but I might be able to find some more pics.

I really like leather creams because they tend to pull a 1-2 punch for color restoration as well as sheen. When you put them on you let it dry for 10min or so, then you buff to activate the waxes in the cream, which ends up bringing back some of that luster.

I’ve also put cream on a bag and then touched up topcoat in places as well, but not over large areas, more corners and whatnot. In my experience, leather moisturizers wouldn’t necessarily bring back a shine, since that’s more a surface aspect. Another thought is that all of your moisturizers might be what’s dulling any coating the bag has left, making it seem matte? Might be worth just trying to buff the front with a clean soft cloth to see if that does anything. Some conditioners will actually recommend a buffing after application for that purpose.

Or, if you’re not scared of it… trying a leather cream might be worthwhile? I also have an 03 olive city and probably have colors I can recommend.
Thank you for your detailed response
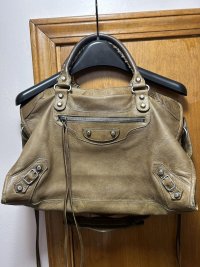
The leather was already pretty flat (matte) when I received it. The color was super faded but moisturizing it actually darkened the color a bit, closer to its original color. I'm not sure you can tell by my pics, but the bottom & back of the bag still have that glossy finish that Bbags have, but thats completely gone from the front of the bag. I don't think using the moisturizing lotions made it any worse (or better) other than the color.

Have you ever tried the Natural Wax Polish?
Has anyone here tried it? I wonder if it might add the shine I'm looking for more since I've already moisturized it with a leather conditioner/lotion
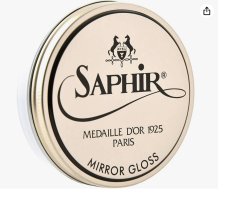

Image 11-27-23 at 9.33 PM.jpeg

I also notice they have a Mink Oil and Macadamia Oil conditioner -- do you by any chance know if one is better than the other?
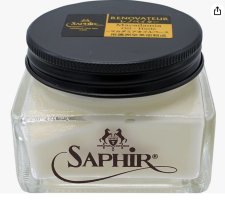

Image 11-27-23 at 9.32 PM.jpeg
 
Last edited:
I don’t really mess with oil conditioners, tbh. If anyone has, would be interested in hearing about that experience.

I have used “natural” / “neutral” aka colorless creams, and the one thing I’ll caution is that while they are *technically* colorless, the product does ultimately contain wax which when dry and buffed on darker colored bags could end up seeming like it has left white (“colorless”) residue in creases or anywhere it was more deposited.

Even if I don’t need a color rehab on a bag I’ll still use (usually mix) a cream color close to the bag’s color so that doesn’t happen. Creams have more of a “tinted moisturizer” effect on bags so they’re not really going to cover over anything unless you’re using lighter colors that have a strong white base.
 
  • Like
Reactions: iluvmybags
Here’s a photo that CeeJay shared of this bag when she got it
I had originally thought her lighting was bad & it washed out the color, but nope — the leather was that faded and light when I received it too. See all the spots down at the corners where the buckles are? I managed to clean those up & made it look more even (I wish I had taken a “before” photo before I moisturized & conditioned it)

I just wish I could restore at least some of the shine, but I don’t know if thats going to be possible at this point

IMG_7381.jpegIMG_0559.jpeg
 
Here’s a photo that CeeJay shared of this bag when she got it
I had originally thought her lighting was bad & it washed out the color, but nope — the leather was that faded and light when I received it too. See all the spots down at the corners where the buckles are? I managed to clean those up & made it look more even (I wish I had taken a “before” photo before I moisturized & conditioned it)

I just wish I could restore at least some of the shine, but I don’t know if thats going to be possible at this point

View attachment 5902224View attachment 5902227
This post is perfect timing for me as I’ve been testing out several Saphir products recently and today for the first time used the Saphir Medaille d’Or Renovator - Mink Oil version. To help see what the potential difference would be on your bag, I used it on my F/W 2003 Olive Brown MU.

Since you have the mirror, for any product you use, I would highly suggest testing it out there first before going all out. :smile:

Word of caution, a little goes a long way and the smell, while not terrible, is strong and smelled up my entire living room until it dissipated. Apply the product using a clean chamois cloth. It seemed to melt into the leather. Next, the directions state to wait 3 minutes and then buff it out to help activate those natural oils. After some elbow grease, I noticed luster return back and the feel of the leather is softer than before.

My MU still has some color unevenness, but thought this would be good to show to get an idea with just a first pass of the renovator on it.

Hope this helps! :hugs:

Before Front

IMG_9297.jpeg

After Front

IMG_9323.jpeg

Before Back

IMG_9298.jpeg

After Back

IMG_9356.jpeg
 
Last edited:
Wow @haisley :eek:
Thats pretty impressive!
After @kerryisntreal’s warning about oils, I was leaning towards the Mirror Glass (wax polish), but I’m tempted to give the mink oil a try! You did a really good job! Is the product I linked above the same one you used?

Also, did your bag have ANY shine to it? or could you feel that glaze (although dull), when you ran your hand over it before you started? Thats what concern me - there’s literally nothing left to the finish these bags usually have on the front

Here’s a link to the Saphir Medaille d’Or Renovator Mink oil product. You posted a few products, so wanted to be clear on which one I’m referring to. :smile:

Originally, my MU was dull with very little shine. Since yours has no shine, I’m not sure this will help, but definitely something worth considering. This is the only time I wish I had a bag in worse condition so I could try it out for you before you make a decision.

Best of luck! Keep us posted on whatever you decide to do! 🤞
 
  • Like
Reactions: iluvmybags
Here’s a link to the Saphir Medaille d’Or Renovator Mink oil product. You posted a few products, so wanted to be clear on which one I’m referring to. :smile:

Originally, my MU was dull with very little shine. Since yours has no shine, I’m not sure this will help, but definitely something worth considering. This is the only time I wish I had a bag in worse condition so I could try it out for you before you make a decision.

Best of luck! Keep us posted on whatever you decide to do! 🤞
Thats kind of you to say :hugs:
I‘m definitely going to give it a try. I may get the wax polish too and try both products (separately - not together) on the corners just to see if they have any affect on the leather
 
  • Like
Reactions: haisley
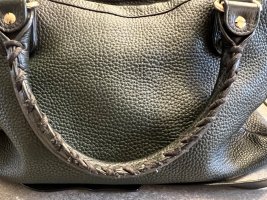
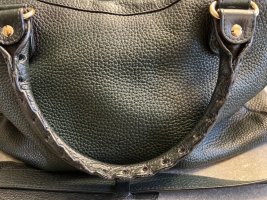
How-To Guide: Re-Stringing Bal Bag Handles

Pulling this together in the hopes it helps someone else. This guide would not have been possible without the knowledge of our resident Bal Rehab Doctor, @kerryisntreal.

For this demonstration I used a regular sized City, 2014 LE Ombre Calfskin.

Before Pic:
IMG_9482.jpeg

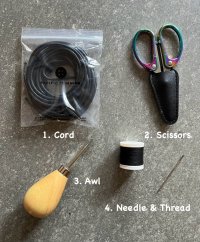
Materials Needed
  1. 2.5mm Cord
  2. Sharp scissors
  3. An awl
  4. Needle & thread
IMG_9466.jpeg

Cord (2.5mm):
For a regular sized City bag you’ll need about 2 yards. I was fortunate in that the color I needed for this bag is black (#30). Here’s where I purchased mine: https://pacifictrimming.com/products/japanese-waxed-cotton-cord

Awl:
If you don’t have an awl you can substitute with a small screwdriver or something similar. This handy tool helps to push the cord through (when needed) and is also useful with removing the old ends and tucking in the new ones. The one I have can be found here: https://www.amazon.com/dp/B001NOAEX0?psc=1&ref=ppx_yo2ov_dt_b_product_details

Steps:

1. Using scissors cut out the old string. If needed, use the awl to help fish out the old ends.

IMG_9483.jpeg

2. Cut your cord to size. Start with about a yard (3 feet) of string. This is decently longer than what you’ll need.

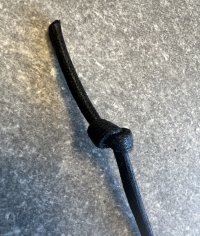
3. Make a simple knot in one end of the string and leave about 1” of string at the end. This will get tucked away into the bag when you’re done.

IMG_9505.jpeg

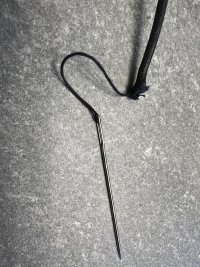
4. Use the needle and thread the end of the cord. My thread was thin so I threaded three strands into it to make it stronger which helped prevent it from breaking as easily. Loop the thread into the end of the cord a few times so that it doesn’t fray as much.

IMG_9488.jpeg

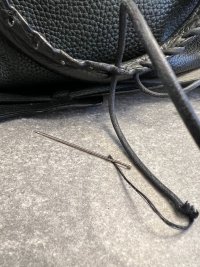
5. Use the needle as a guiding point to assist with getting the cord through the holes.

IMG_9487.jpeg

6. As you work your way around the handle, the fraying of the end of the string may make it difficult to pull through the holes. When this happens, cut a bit off the end and re-thread the cord with the needle.

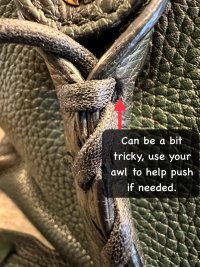
7. The ends of the handle where the cord goes into one hole can be tricky, Use the awl to assist in pushing it through where needed.

IMG_9492.jpeg

8. Once you have fully rethreaded the handle, tie a simple knot on the other end, getting it as close to the handle as possible. Same as in the first end leaving about 1” and then cut.

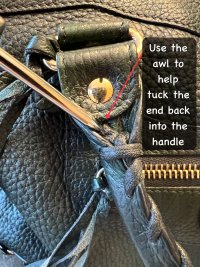
9. Tuck the end back into the handle. I found it helpful to use the awl for this step.
IMG_9506.jpeg

10. Congrats! You’re done!

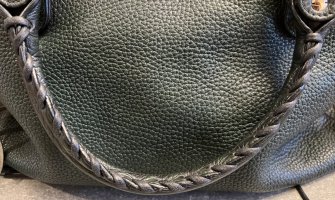
After Pic:
IMG_9495.jpeg

Looking forward to seeing pics posted of others that go through this process! :heart:
 
How-To Guide: Re-Stringing Bal Bag Handles

Pulling this together in the hopes it helps someone else. This guide would not have been possible without the knowledge of our resident Bal Rehab Doctor, @kerryisntreal.

For this demonstration I used a regular sized City, 2014 LE Ombre Calfskin.

Before Pic:
View attachment 5908373

Materials Needed
  1. 2.5mm Cord
  2. Sharp scissors
  3. An awl
  4. Needle & thread
View attachment 5908370

Cord (2.5mm):
For a regular sized City bag you’ll need about 2 yards. I was fortunate in that the color I needed for this bag is black (#30). Here’s where I purchased mine: https://pacifictrimming.com/products/japanese-waxed-cotton-cord

Awl:
If you don’t have an awl you can substitute with a small screwdriver or something similar. This handy tool helps to push the cord through (when needed) and is also useful with removing the old ends and tucking in the new ones. The one I have can be found here: https://www.amazon.com/dp/B001NOAEX0?psc=1&ref=ppx_yo2ov_dt_b_product_details

Steps:

1. Using scissors cut out the old string. If needed, use the awl to help fish out the old ends.

View attachment 5908372

2. Cut your cord to size. Start with about a yard (3 feet) of string. This is decently longer than what you’ll need.

3. Make a simple knot in one end of the string and leave about 1” of string at the end. This will get tucked away into the bag when you’re done.

View attachment 5908374

4. Use the needle and thread the end of the cord. My thread was thin so I threaded three strands into it to make it stronger which helped prevent it from breaking as easily. Loop the thread into the end of the cord a few times so that it doesn’t fray as much.

View attachment 5908375

5. Use the needle as a guiding point to assist with getting the cord through the holes.

View attachment 5908376

6. As you work your way around the handle, the fraying of the end of the string may make it difficult to pull through the holes. When this happens, cut a bit off the end and re-thread the cord with the needle.

7. The ends of the handle where the cord goes into one hole can be tricky, Use the awl to assist in pushing it through where needed.

View attachment 5908382

8. Once you have fully rethreaded the handle, tie a simple knot on the other end, getting it as close to the handle as possible. Same as in the first end leaving about 1” and then cut.

9. Tuck the end back into the handle. I found it helpful to use the awl for this step.
View attachment 5908383

10. Congrats! You’re done!

After Pic:
View attachment 5908384

Looking forward to seeing pics posted of others that go through this process! :heart:
Awesome! That is fabulous, I-now have to rummage for an awl, I think I have one somewhere. Thank you so much!
 
  • Love
Reactions: haisley
How-To Guide: Re-Stringing Bal Bag Handles

Pulling this together in the hopes it helps someone else. This guide would not have been possible without the knowledge of our resident Bal Rehab Doctor, @kerryisntreal.

For this demonstration I used a regular sized City, 2014 LE Ombre Calfskin.

Before Pic:
View attachment 5908373

Materials Needed
  1. 2.5mm Cord
  2. Sharp scissors
  3. An awl
  4. Needle & thread
View attachment 5908370

Cord (2.5mm):
For a regular sized City bag you’ll need about 2 yards. I was fortunate in that the color I needed for this bag is black (#30). Here’s where I purchased mine: https://pacifictrimming.com/products/japanese-waxed-cotton-cord

Awl:
If you don’t have an awl you can substitute with a small screwdriver or something similar. This handy tool helps to push the cord through (when needed) and is also useful with removing the old ends and tucking in the new ones. The one I have can be found here: https://www.amazon.com/dp/B001NOAEX0?psc=1&ref=ppx_yo2ov_dt_b_product_details

Steps:

1. Using scissors cut out the old string. If needed, use the awl to help fish out the old ends.

View attachment 5908372

2. Cut your cord to size. Start with about a yard (3 feet) of string. This is decently longer than what you’ll need.

3. Make a simple knot in one end of the string and leave about 1” of string at the end. This will get tucked away into the bag when you’re done.

View attachment 5908374

4. Use the needle and thread the end of the cord. My thread was thin so I threaded three strands into it to make it stronger which helped prevent it from breaking as easily. Loop the thread into the end of the cord a few times so that it doesn’t fray as much.

View attachment 5908375

5. Use the needle as a guiding point to assist with getting the cord through the holes.

View attachment 5908376

6. As you work your way around the handle, the fraying of the end of the string may make it difficult to pull through the holes. When this happens, cut a bit off the end and re-thread the cord with the needle.

7. The ends of the handle where the cord goes into one hole can be tricky, Use the awl to assist in pushing it through where needed.

View attachment 5908382

8. Once you have fully rethreaded the handle, tie a simple knot on the other end, getting it as close to the handle as possible. Same as in the first end leaving about 1” and then cut.

9. Tuck the end back into the handle. I found it helpful to use the awl for this step.
View attachment 5908383

10. Congrats! You’re done!

After Pic:
View attachment 5908384

Looking forward to seeing pics posted of others that go through this process! :heart:
This is fabulous! Thank you so much! :hugs:
 
  • Love
Reactions: haisley
How-To Guide: Re-Stringing Bal Bag Handles

Pulling this together in the hopes it helps someone else. This guide would not have been possible without the knowledge of our resident Bal Rehab Doctor, @kerryisntreal.

For this demonstration I used a regular sized City, 2014 LE Ombre Calfskin.

Before Pic:


Materials Needed
  1. 2.5mm Cord
  2. Sharp scissors
  3. An awl
  4. Needle & thread


Cord (2.5mm):
For a regular sized City bag you’ll need about 2 yards. I was fortunate in that the color I needed for this bag is black (#30). Here’s where I purchased mine: https://pacifictrimming.com/products/japanese-waxed-cotton-cord

Awl:
If you don’t have an awl you can substitute with a small screwdriver or something similar. This handy tool helps to push the cord through (when needed) and is also useful with removing the old ends and tucking in the new ones. The one I have can be found here: https://www.amazon.com/dp/B001NOAEX0?psc=1&ref=ppx_yo2ov_dt_b_product_details

Steps:

1. Using scissors cut out the old string. If needed, use the awl to help fish out the old ends.


2. Cut your cord to size. Start with about a yard (3 feet) of string. This is decently longer than what you’ll need.

3. Make a simple knot in one end of the string and leave about 1” of string at the end. This will get tucked away into the bag when you’re done.


4. Use the needle and thread the end of the cord. My thread was thin so I threaded three strands into it to make it stronger which helped prevent it from breaking as easily. Loop the thread into the end of the cord a few times so that it doesn’t fray as much.


5. Use the needle as a guiding point to assist with getting the cord through the holes.


6. As you work your way around the handle, the fraying of the end of the string may make it difficult to pull through the holes. When this happens, cut a bit off the end and re-thread the cord with the needle.

7. The ends of the handle where the cord goes into one hole can be tricky, Use the awl to assist in pushing it through where needed.


8. Once you have fully rethreaded the handle, tie a simple knot on the other end, getting it as close to the handle as possible. Same as in the first end leaving about 1” and then cut.

9. Tuck the end back into the handle. I found it helpful to use the awl for this step.


10. Congrats! You’re done!

After Pic:


Looking forward to seeing pics posted of others that go through this process! :heart:

WOW!!:wtf:
Thats amazing!
You're so brave to take on these projects. I think I'd be too scared of causing new damage or ruining an already damaged bag

Can I make a suggestion if anyone else tries this?
Film a short video of some of the most important (tricky steps)
Like maybe a short one of the weaving process, another of the knotting & tucking of the ends
Combined with step by step instructions & pics, I might be brave enough to try this with the help of a how-to video
 
  • Like
Reactions: andral5
We all have our own rituals of what we do when we acquire a new bag. Mine involves vacuuming the interior, giving it a full body look over and baby wipe down. For the initial cleaning, I start with the least aggressive option and work my way up with WaterWipes being the first line of defense. WaterWipes are baby wipes made with 99.9% water and are super gentle. I swear by these and even use them on my sensitive face to remove makeup.

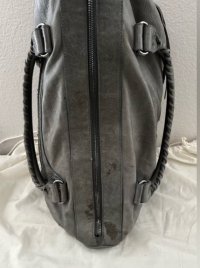
Using only the wipes on the outside of my 04 Grey Twiggy here’s a before and after top view. I do not know the cause of the stains on the bag, but I wanted to share this with you all as an example of how it might be useful for bags you currently own or ones in your future.

Before pic:

IMG_9810.jpeg

After pic:

IMG_9856.jpeg
 
Last edited:
We all have our own rituals of what we do when we acquire a new bag. My involves vacuuming the interior, giving it a full body look over and baby wipe down. For the initial cleaning, I start with the least aggressive option and work my way up with WaterWipes being the first line of defense. WaterWipes are baby wipes made with 99.9% water and are super gentle. I swear by these and even use them on my sensitive face to remove makeup.

Using only the wipes on the outside of my 04 Grey Twiggy here’s a before and after top view. I do not know the cause of the stains on the bag, but I wanted to share this with you all as an example of how it might be useful for bags you currently own or ones in your future.

Before pic:

View attachment 5921083

After pic:

View attachment 5921089
Great improvement!
 
Top