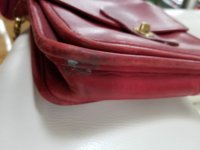
BEAUTIFUL job, marleneryd! I have a very similar (to the 'old' one you rehabbed) Willis, and am wondering if you could list your steps/products. I have Leather Therapy Restorer and Conditioner, Apple cleaner and conditioner, Blackrock Leather 'n Rich, and Obenaufs Leather Oil. But just like hair products, I'm always looking for the Holy Grail product! Thanks, and again, AWESOME Willis!A friend asked me to try and rehab an old Willis for her that was in horrible condition. Verdigris in spots around the brass, scratches galore, stitching coming undone on the strap, piping worn through in one spot, edge coating worn off around the tongue (not sure what that part is called!), misshapen and totally dried out. I think she's going to be thrilled with the rehab!View attachment 3645042 View attachment 3645044 View attachment 3645045 View attachment 3645046 View attachment 3645047 View attachment 3645048
You are using an out of date browser. It may not display this or other websites correctly.
You should upgrade or use an alternative browser.
You should upgrade or use an alternative browser.
Coach Rehab and Rescue Club
- Thread starter greenpixie
- Start date
TPF may earn a commission from merchant affiliate
links, including eBay, Amazon, and others
More options
Who Replied?I was about to suggest trying rubbing alcohol but then I saw the gorgeous color of that bag and now I am say "no alcohol"!. Without seeing a picture it is hard to say, but I think that heat and massage might be the best way to go. Try warming it up with a hair dryer and rubbing it off. Gum is disgusting stuff so you might want to wear gloves!
I was thinking the opposite approach with the gum. Although I have not tried this on a purse, I have been successful using ice on gum on other items. It hardens the gum so it can be peeled off easily.
I also agree with no alcohol. What a gorgeous bag you found. Love the color!
I have, and I almost threw up in the process! It was really gross!
I agree. Heat is the worst thing for gum because it will make it gooey and it will extremely hard to remove. I know, because I dunked my gummy bag in warm water before I realized there was gum there. Ice is much better! Then you can use goo gone for any residue. If it is in the inside, you can sand the suede afterwards.
Thanks so much everyone for the advice! I will give the ice a try and let you know how it turns out.

I have a 1941 Duffle in yellow that I really want to dye black. It's brand new, no stains or wear of any kind. Can someone point me to the best method for doing this? I can take it to a leather repair shop, but was interested in trying it myself unless that would be ill advised.
Be very careful. Most dyes available on the market are hard to use, hard to apply evenly, and most are too shiny. However, black is the easiest dye to use. You can keep applying it until you get full coverage. I can't recommend a dye as I haven't found one I love.I have a 1941 Duffle in yellow that I really want to dye black. It's brand new, no stains or wear of any kind. Can someone point me to the best method for doing this? I can take it to a leather repair shop, but was interested in trying it myself unless that would be ill advised.
BEAUTIFUL job, marleneryd! I have a very similar (to the 'old' one you rehabbed) Willis, and am wondering if you could list your steps/products. I have Leather Therapy Restorer and Conditioner, Apple cleaner and conditioner, Blackrock Leather 'n Rich, and Obenaufs Leather Oil. But just like hair products, I'm always looking for the Holy Grail product! Thanks, and again, AWESOME Willis!
I have a 1941 Duffle in yellow that I really want to dye black. It's brand new, no stains or wear of any kind. Can someone point me to the best method for doing this? I can take it to a leather repair shop, but was interested in trying it myself unless that would be ill advised.
I agree, dying bags is very risky and the results can be disappointing. I had a light bag dyed black professionally and I wasn't happy with the results. I would only try it if the bag was cheap and badly soiled. I certainly wouldn't risk ruining a new, pristine bag.
You might go to the thrift store and buy a cheap, light-colored leather bag and try dying it before black and see how it works, before you risk damaging your duffle.
BEAUTIFUL job, marleneryd! I have a very similar (to the 'old' one you rehabbed) Willis, and am wondering if you could list your steps/products. I have Leather Therapy Restorer and Conditioner, Apple cleaner and conditioner, Blackrock Leather 'n Rich, and Obenaufs Leather Oil. But just like hair products, I'm always looking for the Holy Grail product! Thanks, and again, AWESOME Willis!
Happy to help you out! I got my rehab process from this forum-it's a treasure trove of helpful advice!!
1. Bathed Willis in sink filled with warm water and a spoonful of Dawn dish soap. Let the bag sit in water for about 20 min. Since the water was so dirty, I drained and refilled the sink a second time with warm water/Dawn.
2. Rinsed well and dried with some towels. I stuffed the bag with crumpled paper towels to re-shape then put it in my basement where it's nice and warm.
3. I should've started conditioning the day after the bath while the bag was damp but didn't have time so the bag dried for 2 days before I started conditioning.
4. I used Brasso to polish all the brass.
5. Started conditioning/dyeing by mixing Saphir Juvacuir in black with Saphir Leather Balm. Since the bag was in such bad shape and so dried out I knew I would use a lot of conditioner for the first coat. I used at least a couple spoonfuls of dye mixed with about 1/8 cup leather balm. (I'm just guessing at amounts. In reality I squeezed a bunch of dye into a plastic tub and then added a healthy dose of conditioner!) Stirred the mix and applied all over the bag and straps with a rag. Used this mix on every smooth leather section of bag even the interior pockets. I use this combo of dye and conditioner because my local cobbler recommended staying within the same brand of products to mix dye and conditioner and she picked them out for me.
6. After first coat dried, I rubbed in 2 more coats of the leather balm letting the bag dry between coats and buffing with a horsehair brush.
7. Next I used my fingers to rub in Blackrocks all over, let dry and buffed with horse hair brush then a clean rag.
8. The tongue area on outside flap and the raised leather piece with the clasp were both missing the edge coating and had what looked like exposed brown cardboard showing so I cut up thin cardboard to shove under these pieces all around. Then I used Fiebing's Edge Kote in black with a tiny kids paint brush to coat the edges. It only took one coat. The dyeing process covered most of this damage.
9. I went back over all the brass again with a tiny bit of Brasso on a paper towel.
10. On the shorter piece of strap there was a tiny section (about one stitch in length) that was coming apart near the buckle and I knew I couldn't get a needle and thread through 3 layers of leather so I used Shoe Goo (from Target in the hardware section). I took a piece of jewelry wire, dabbed it into the tube of a Shoe Goo then pushed the glue into the section that needed to be adhered together. I weighted down that piece for an hour or so.
I wanted to mention there was a tiny section of piping on a corner that was worn out. After the dyeing and conditioning, you can't even see this worn area. I decided to let it go rather than make a mess using puffy paint or some other product.
That's about it! Hope this helps you out! Good luck with your Willis! This rehabbing is addictive-I need more Coach bags like I need a hole in my head yet every day I'm trolling through EBay looking for "treasures"!
Last edited:
Happy to help you out! I got my rehab process from this forum-it's a treasure trove of helpful advice!!
1. Bathed Willis in sink filled with warm water and a spoonful of Dawn dish soap. Let the bag sit in water for about 20 min. Since the water was so dirty, I drained and refilled the sink a second time with warm water/Dawn.
2. Rinsed well and dried with some towels. I stuffed the bag with crumpled paper towels to re-shape then put it in my basement where it's nice and warm.
3. I should've started conditioning the day after the bath while the bag was damp but didn't have time so the bag dried for 2 days before I started conditioning.
4. I used Brasso to polish all the brass.
5. Started conditioning/dyeing by mixing Saphir Juvacuir in black with Saphir Leather Balm. Since the bag was in such bad shape and so dried out I knew I would use a lot of conditioner for the first coat. I used at least a couple spoonfuls of dye mixed with about 1/8 cup leather balm. (I'm just guessing at amounts. In reality I squeezed a bunch of dye into a plastic tub and then added a healthy dose of conditioner!) Stirred the mix and applied all over the bag and straps with a rag. Used this mix on every smooth leather section of bag even the interior pockets. I use this combo of dye and conditioner because my local cobbler recommended staying within the same brand of products to mix dye and conditioner and she picked them out for me.
6. After first coat dried, I rubbed in 2 more coats of the leather balm letting the bag dry between coats and buffing with a horsehair brush.
7. Next I used my fingers to rub in Blackrocks all over, let dry and buffed with horse hair brush then a clean rag.
8. The tongue area on outside flap and the raised leather piece with the clasp were both missing the edge coating and had what looked like exposed brown cardboard showing so I cut up thin cardboard to shove under these pieces all around. Then I used Fiebing's Edge Kote in black with a tiny kids paint brush to coat the edges. It only took one coat. The dyeing process covered most of this damage.
9. I went back over all the brass again with a tiny bit of Brasso on a paper towel.
10. On the shorter piece of strap there was a tiny section (about one stitch in length) that was coming apart near the buckle and I knew I couldn't get a needle and thread through 3 layers of leather so I used Shoe Goo (from Target in the hardware section). I took a piece of jewelry wire, dabbed it into the tube of a Shoe Goo then pushed the glue into the section that needed to be adhered together. I weighted down that piece for an hour or so.
I wanted to mention there was a tiny section of piping on a corner that was worn out. After the dyeing and conditioning, you can't even see this worn area. I decided to let it go rather than make a mess using puffy paint or some other product.
That's about it! Hope this helps you out! Good luck with your Willis! This rehabbing is addictive-I need more Coach bags like I need a hole in my head yet every day I'm trolling through EBay looking for "treasures"!
 I know what you mean!
Thank you for such a detailed how-to. Great tips!
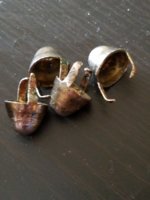
Can you try to push the prongs down from inside the bag?I am seriously stuck trying to get these things into the bag. I have no idea what to do. I wrestled one in but it's totally loose and I'm not sure how to tighten it! Any ideas on what tools or techniques to use?
View attachment 3651988 View attachment 3651989
I am seriously stuck trying to get these things into the bag. I have no idea what to do. I wrestled one in but it's totally loose and I'm not sure how to tighten it! Any ideas on what tools or techniques to use?
View attachment 3651988 View attachment 3651989
I usually grab regular needle nose pliers and straighten prongs first. I start at the base of each prong and work my way to the end, gently bending in the opposite direction of each kink to straighten it. Doesn't have to be perfect, but a little straightening makes a huge difference in getting whatever I'm installing to snug up against the leather. Once it's in, I bend each prong by putting the end of an XL flathead screwdriver at the base and pushing in. I've also used the flat side of a pair of wire cutters - anything metal with a flat surface will do, I think. Some people have said jewelry tools are easier to use but I haven't tried.
I usually grab regular needle nose pliers and straighten prongs first. I start at the base of each prong and work my way to the end, gently bending in the opposite direction of each kink to straighten it. Doesn't have to be perfect, but a little straightening makes a huge difference in getting whatever I'm installing to snug up against the leather. Once it's in, I bend each prong by putting the end of an XL flathead screwdriver at the base and pushing in. I've also used the flat side of a pair of wire cutters - anything metal with a flat surface will do, I think. Some people have said jewelry tools are easier to use but I haven't tried.
Okay yeah, some good ideas. I did flatten the prongs out a little but I can see how a tool might help like a mini flathead screwdriver, kinda shove it in there.. I'm going to work on it right now.
house of 999 there is some lining in the bottom of the bag so the prongs don't go through. That's what makes it extra challenging!
Putting those in blind under the lining deserves bonus points for difficulty!
@Belicious, maybe take it to a luggage repair place? They most likely will have all the tools needed for this and be done with it in ten min.
Yeah, maybe...@Belicious, maybe take it to a luggage repair place? They most likely will have all the tools needed for this and be done with it in ten min.
but I already did it now. Some of the prongs ended up going through the lining but the thing with that is now those are the ones I could pull through the tightest. Overall they're all in pretty good I think. I am a bit worried that those prongs might be a little sharp and could potentially damage contents of my bag. I may have to glue little leather patches over them or something.
I never thought replacing feet was going to be so difficult! Live and learn I guess. I do love this bag anyway!
On to next hardware problem which is still trying to reconnect the kisslock in the watermelon bag to the leather. Can't pretend to know what I'm doing with that either!
Register on TPF! This sidebar then disappears and there are less ads!


