I usually prefer Leather CPR to LT! LT can get greasy, but it's great for dark colors and super dry leather. If you're only going to get one, I'd go for Leather CPR - it's also great for cleaning up leather. I've gotten crud off of the bottom of my Willis (probably from a restaurant) using Leather CPR. I've never used Renapur, but I know there are some ladies on here that prefer it to Blackrocks!I am hoping to not use any shoe cream CPR VS LT and Blackrocks VS Renapure opinion? Thanks for your advice!
You are using an out of date browser. It may not display this or other websites correctly.
You should upgrade or use an alternative browser.
You should upgrade or use an alternative browser.
Coach Rehab and Rescue Club
- Thread starter greenpixie
- Start date
TPF may earn a commission from merchant affiliate
links, including eBay, Amazon, and others
More options
Who Replied?
Thanks! I know our local Ace store has the Leather CPR - will get some today and see how it works. Multiple applications OK if needed? Appreciate your advice and will post results!I usually prefer Leather CPR to LT! LT can get greasy, but it's great for dark colors and super dry leather. If you're only going to get one, I'd go for Leather CPR - it's also great for cleaning up leather. I've gotten crud off of the bottom of my Willis (probably from a restaurant) using Leather CPR. I've never used Renapur, but I know there are some ladies on here that prefer it to Blackrocks!
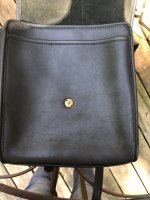
Yes, multiple applications are okay! I follow the directions on the bottle. Using a craft sponge, I thickly apply CPR to areas of the purse and leave it sitting for 1-2 minutes, making sure to spread it around if it's absorbing quickly. You don't want it to dry out before you wipe it off. Then I wipe off with a soft cotton towel and wait until it's dry to the touch to apply another coat. I've had purses take 5+ coats of CPR before they feel well conditioned!Thanks! I know our local Ace store has the Leather CPR - will get some today and see how it works. Multiple applications OK if needed? Appreciate your advice and will post results!
The UA Stewardess I just dunked was dyed ages ago and it bled its original tabac in the water, not a hint of black dye. Although the black is wearing through on parts.Thanks @artax two for documenting everything! I think the bag looks great. I do want to try this one day, just don’t know when and what color and what bag...
I do have a question for anyone who may know- what happens if you want to dunk your dyed bag (say, you throw it into the closet and forget about it another 10 years and want to reshape it, or you happen to spill something inside and want to clean it etc), does the dye stay on if you happened to seal it well with the resolene? Or will there be some fading occurring as a result of the bath no matter what? Sorry if this has been answered before.
edit: and another question, mainly for me to see if I’m understanding correctly- is the reason a pigmented bag like a bone colored bag is harder to dye because the layer of the paint sitting on top doesn’t allow for even soaking of the dye whereas aniline bags have all the leather pores open to receive the dye?
For me, CPR and Blackrocks are proven.I am hoping to not use any shoe cream CPR VS LT and Blackrocks VS Renapure opinion? Thanks for your advice!
What us this madness?!? Attached a pic after one application!Yes, multiple applications are okay! I follow the directions on the bottle. Using a craft sponge, I thickly apply CPR to areas of the purse and leave it sitting for 1-2 minutes, making sure to spread it around if it's absorbing quickly. You don't want it to dry out before you wipe it off. Then I wipe off with a soft cotton towel and wait until it's dry to the touch to apply another coat. I've had purses take 5+ coats of CPR before they feel well conditioned!
Attachments
oooohh I LOVE it!Inspired by @Punkkitten I decided to customize my taupe City! I haven’t been using it because I didn’t like the wrinkled and stained flap. I used patched instead of pins because I found these pretty ones on Etsy:
View attachment 4758716View attachment 4758706
The patches match so much better than I thought they would. The one on the front flap covers up a dark stain and some of the wrinkling. The one on the inside doesn’t cover anything; I just thought it would be cool to have one there
I have had that happen with the rolled edges too. Is what it is and sometimes you just do what you have to do. love the color!Post 2 of 3
....Well I thought it was looking pretty good until I took it outside the next day into the direct sunlight. Quite a bit of difference between the shade and the direct light. Ahhhh the perils of the stormy season where days go by without any sunlight. I couldn't have picked a worse time to begin this.
10. Looked pretty flippin good in the shade. I was feeling kinda proud of myself.
View attachment 4758734
11. Until the sun came out and it was clearly showing red. So back to the dye table.
View attachment 4758735
12. Comparing the different black shades, I was trying to determine what I was going to end up with and prepare myself to be happy with it. It was shaping up to be a warm black versus Coach's typical cool or neutral black. My reaction: This is fine. This is fine. This is fine. Realized it needed another coat of dye for sure.
It was all in these several days where I stopped documenting the process and started slightly panicking. I found that as I added a 2nd and 3rd coat of dye to the bag to get some very persistent red spots from shining through, the dye was taking on an irridesence. After asking on this forum and googling some, I realized that getting an irridesence with the Angelus dye means it has been applied too thick, and I was also seeing areas that had become uneven in the coverage. But seeing as I'd already done the coats and they'd dried, and that using CPR after the 2nd coat and after the 3rd coat did not removed all the excess, I had a moment of weakness and took some alcohol to the bag to forcibly remove excess dried dye. This got me back to a place where I could apply another THIN coat and try to get the coverage without the irridesence building up. It turned out to be quite difficult to get the coverage both complete and even without getting the irridesence. So at some point I just had to get the bag to the most even coverage I could and stop dyeing. The interior was especially difficult to get evenly coated. I must not have deglazed enough, or I don't know why but there was quite a bit of red peeking through it bright sunlight. Remember, in the shade or indoors, the bag looked fantastic and had a satisfying deep rich black.
View attachment 4758736
13. Here we are, I think, after one coat of resolene. I cut the resolene to one capful of resolene and three capfulls of water and applied it with a sponge brush I think. When it dried in only like 45 minutes, I was loving the sheen. Not too shiny. It seemed perfect to the naked eye. But in several photos it looked just a tad too dull and was not quite matching areas where the dye sheen was shinier and there were obvious differences in sheens. Also, it was allowing a huge amount of dye ruboff onto a wet q-tip. As much as I hated it, I knew it would need more coats of resolene.
View attachment 4758737
14. I think this is the 2nd coat of Resolene and dried for 45 minutes. Gettin a little more shiny but still within the range I liked. But sadly it still allowed some ruboff onto a wet q-tip. The next day I went in with the attitude that the MOST important thing was to have a good seal so I gave up on the idea of keeping the resolene sheen in check and I mixed up another small batch cut down to only two capfulls of water to one capfull of resolene and applied the 3rd coat. The instructions were then to let it dry for a full 24 hours before using it. Which I dutifully did. Turns out after 24 hours, the bag was fully sealed and I didn't get any ruboff on anything wet, not a q-tip, sponge, cotton swab or anything. Makes me wonder if I'd let it cure after the 2nd coat for 24 hours if I'd have gotten the same cure, but I didn't realize the 24 hours wait was an actual "cure time," I just thought that meant it needed that long to fully dry. oh well, that is in the past now. The sheen I ended up with was at the threshold, or just BARELY over what I'd strived for that would still allow me to REALLY like the result.
View attachment 4758738
15. I absolutely could not get the strap edge to take the dye. It kept soaking in past the surface. So I went with a light, single coat of acrylic paint to touch lightly touch up a the strap edge and a few tiny spots here and there that didn't take the dye all that well.
View attachment 4758739
I found a green Bleecker flap bag for $42 and while it's in good condition overall, I think I'm going to dunk it like @katev did with her ink version to get it shaped and to condition out the scratches. Such a pretty color and bag!

I found a green Bleecker flap bag for $42 and while it's in good condition overall, I think I'm going to dunk it like @katev did with her ink version to get it shaped and to condition out the scratches. Such a pretty color and bag!
View attachment 4759594
[/QUOTE/]
that’s great bag At a great price!
I have it in the wine color too and I love it! Greens in general seem so difficult to find, and when you do find them they tend to be much pricier than other colors. I was so happy to find this one. I plan to start rehabbing it tomorrow.
My Rambler is finished! The spots and scratches evened out once she completely dried. I finished with Renpur. I am so pleased with how this rehab turned out and I'm surprised at how much I love the size and style of this bag. This is definitely one of my new favorites!

Does anyone else have this problem? I polish the hardware and a few days later it looks bad again. Sometimes not tarnished but cloudy.
Does anyone else have this problem? I polish the hardware and a few days later it looks bad again. Sometimes not tarnished but cloudy.
sometimes when I use brasso but doesn’t seem to get cloudy when I use jewelry cloth ♀️
me...I polish with brasso and now I give it a go with those Cape Cod pollishing cloths after brasso.seems to work ...although I must check my bags and see.Does anyone else have this problem? I polish the hardware and a few days later it looks bad again. Sometimes not tarnished but cloudy.
Register on TPF! This sidebar then disappears and there are less ads!