Post 3 of 3
16. In some direct lighting, it looks like this. I am perfectly happy with this. A SLIGHT red tinge but nothing that most people would even notice unless they were told about it.

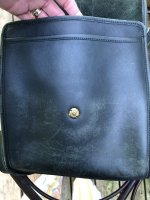
17. In the shade, in the car, or indoors, it looks like this. I am thrilled when it looks like this. A full, even, and complete blackout. No one would EVER know the difference, even if I did tell them.

18. At one point I looked down and the sun was hitting it just perfectly...and I was shocked to see it look like this! WTF???
I mean, I wasn't going for that look, but maybe its kind of cool, its like a chameleon bag. I know, I know, I'll see myself out.

19. The only thing I could think of at that point was that I would have to get a super adorable keyfob that was a range of metallic colors so that WHATEVER shade she wanted to be at any given time, she would have something to set her off. So the search began and I think I found the perfect one. But I also knew that I was going to outfit her with two hangtags, one red and one black, to remind me of her childhood and young adult life. This is outdoors in the shade and the red shades you see were reflections from the brick entryway. Just trust me, it was not red peeking though!

20. Some final indoor shots, sorry they're a little blurry. Here's a peek at her red unmentionable pocket interior. I had to leave SOMETHING inside as the lovely red as a little guilty pleasure.

21. I did find a nice vintage style, but edge coated in black, hangtag to add some attitude, again as a reminder of how she was born.

22, 23. Overall, I am happy with how it turned out. I have no qualms about carrying her in all kinds of light. I hope maybe she will catch someone's eye and they'll ask about it and she'll turn yet another person into a vintage Coach lover.


16. In some direct lighting, it looks like this. I am perfectly happy with this. A SLIGHT red tinge but nothing that most people would even notice unless they were told about it.
17. In the shade, in the car, or indoors, it looks like this. I am thrilled when it looks like this. A full, even, and complete blackout. No one would EVER know the difference, even if I did tell them.
18. At one point I looked down and the sun was hitting it just perfectly...and I was shocked to see it look like this! WTF???
I mean, I wasn't going for that look, but maybe its kind of cool, its like a chameleon bag. I know, I know, I'll see myself out.
19. The only thing I could think of at that point was that I would have to get a super adorable keyfob that was a range of metallic colors so that WHATEVER shade she wanted to be at any given time, she would have something to set her off. So the search began and I think I found the perfect one. But I also knew that I was going to outfit her with two hangtags, one red and one black, to remind me of her childhood and young adult life. This is outdoors in the shade and the red shades you see were reflections from the brick entryway. Just trust me, it was not red peeking though!
20. Some final indoor shots, sorry they're a little blurry. Here's a peek at her red unmentionable pocket interior. I had to leave SOMETHING inside as the lovely red as a little guilty pleasure.
21. I did find a nice vintage style, but edge coated in black, hangtag to add some attitude, again as a reminder of how she was born.
22, 23. Overall, I am happy with how it turned out. I have no qualms about carrying her in all kinds of light. I hope maybe she will catch someone's eye and they'll ask about it and she'll turn yet another person into a vintage Coach lover.
Last edited: