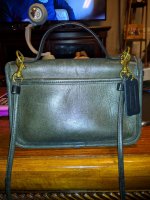
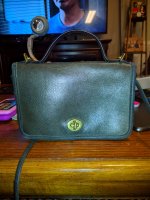
Below are the steps that I use to clean up vintage, unlined bags. It sounds like a lot of work, but it is really pretty easy and I get a lot of satisfaction from fixing up a dirty, scuffed, beat-up classic bag and bringing it back to usefulness and beauty! It may also seem like you have to buy a lot of products, but you only use a little at a time and they last a long time.
This is just my approach and I cannot guarantee that it will work for every bag. You should search TPF and check out this Rescue and Rehab thread to read the advice of others; especially if the bag is made of delicate leather, like vachetta leahter. I've learned most of this stuff from other generous TPFers.
Selecting a bag for rehab:
1) I suggest starting with a black vintage bag because they are usually pretty easy to rehab. But all of the older, unlined bags are nearly indestructible, so don't be afraid to go for it! You can pick one up cheap at a thrift store, garage sale, flea market, or on
eBay and online sales sites.
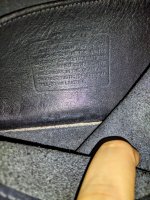
2) Examine it carefully because the more popular vintage bags have been faked and you don't want to waste money, time, and effort on a fake. Before you start the rehab process, take photos and post them on the authentication thread to verify authenticity.
3) I always give the bags a sniff (or ask the online vendor about smells and odors.) Most vintage bags have a musty, dusty smell and that's fine, it will be eliminated by the rehab process. But if the bag smells like mold and mildew I usually leave it on the shelf. You know the smell, like damp towels that have been allowed to sit too long. And some bags have the strong smell of cigarette smoke and that is very difficult to eliminate.
Rehabbing a vintage bag:
1) If there is a lot of lint and dust inside the bag then vacuum it out, otherwise just shake out the crud.
2) If it appears that the hardware, especially the turnlock, has been afflicted with verdigris (green metal disease) it may be necessary to remove the male and female parts of the turnlock, before giving it a bath.
If your bag has verdigris you can usually see some green color around the edges of the turnlock plate. You have to carefully pry up the prongs that secure the turnlock without breaking them to get it off the bag, dunk all the parts in vinegar, rinse well, and then scrub away the grunge - and let it dry well. After you finish rehabbing the bag you can replace the turnlock and securely press the prongs back into place
3) Give the bag a bath in the sink using warm water and Dawn dish soap. Let it soak for about 20 - 25 minutes. Turn the bag several times while soaking to make sure the entire bag gets submerged.
I am more cautious about giving a bath to a brightly colored bag, like a red bag because of concerns about color loss. Unless it is filthy I usually try surface cleaning it first. Lexol cleaning solution (and Lexol cleaning wipes) are products I often use for surface cleaning. But sometimes just wiping the bag down with mild soap and water can do wonders!
If the bag is very dirty, I have turned them inside out in the sink so that I can thoroughly clean the inside!
If the bag has ink marks, try applying soap and massaging the area. Sometimes dabbing with rubbing alcohol will remove the ink but you run the risk color loss - first try spot testing with alcohol in an obscure area that won't be seen. It is almost impossible to completely eradicate old ink marks.
4) Drain the soapy water, fill the sink with warm clean water and rinse well.
5) Let the bag drain in the sink until it isn't dripping wet and then stuff it with clean, dry, old towels or rags. Shape the bag while you are stuffing it so that it will dry with the proper form. I usually stuff old washcloths into the pockets. Try not to distend the pockets too much because they may dry with a strange shape.
6) Set the bag on a towel to dry and remember to turn and move it every now and then.
7) After about a day, take the towels out and continue turning it periodically, shaping it carefully, as it continues to air dry. Try to make sure that the pockets and compartments get some air exposure, too.
8) When it is almost dry but still damp, apply leather conditioner (like Leather CPR) to the finished leather surfaces, massage it in and let it absorb, then buff with a clean, soft horsehair brush or a soft cloth. Some parts of the bag may dry more quickly, like the straps, so condition them as soon as they are almost dry.
If the bag was very dry then apply more leather conditioner, you may need to apply a few coats, but allow several hours between applications. Let the bag absorb each application and then buff to make the leather shine.
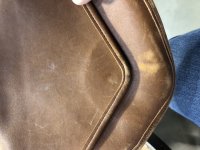
Vintage bags often have faded, worn, and dull areas and a product called Blackrocks Leather n Rich does a great job at restoring color and camouflaging flaws. Use it sparingly! Rub some Blackrocks lightly into one section of the bag, massage it in and then quickly wipe it off with a clean dry rag before moving on to the next section of the bag. If you put it on too heavily it gets a sticky, tacky feeling. Blackrocks has a strong odor but it fades soon.
9) After the bag dries use a metal polish like Wenol and a soft, dry cloth to shine up the hardware. Try not to get the metal polish on the leather or the fabric around the zipper threads. Keep a damp rag nearby to clean the metal polish off quickly, if you do get any on the leather or fabric. Don't forget to polish the zipper pulls and the chain that holds the hang tag! Giving the hardware a final rub with a jeweler's cloth is also very helpful, especially on the zipper threads.
10) Sometimes there are a few, tiny frayed threads sticking out in places and I just use a sharp nail scissors to trim them. If the bag has serious stitching/ripped thread problems (like the strap is partially ripped away from the body of the bag) I take it to a shoe repair (cobbler) shop for professional repair. I usually do that before I start the rehab process to find out how much it will cost and to decide if it is worth it to continue. Fabric glue can be useful for securing loss areas - or gluing the 2 halves of a separated hangtab back together.
11) Vintage bags often lose sealant (color) along the edges of the straps and handles. I use small bottles of permanent acrylic paint to touch up the edges. You can find them at hobby stores and often at fabric stores like Joann's Fabrics. You will also need an artist's paint brush.
I usually take the bag's hangtag to the store with me to match the color but be careful not to lose the hangtag, I did that once! The black is an easy match, but you can also mix small amounts of the acrylic paints in Leather CPR until you get the color you need. Like mixing a few drops of black with a small amount of a brighter blue to get a darker blue.
I have found that the colors on the labels are pretty accurate but you can usually unscrew the cap in the store to look at the actual paint color under the cap.
Before applying paint (or using any new products) it's always a good idea test first; especially if you are mixing paint colors. Apply a small amount of your paint mixture to an area of the bag that doesn't show. Let it dry completely to see how well it matches before applying it in areas that do show. Always use good lighting when working with paints.
The paint is permanent after in dries, but it cleans up easily with soap and water while it is wet or damp. I wear rubber gloves when I am working with paint.
Use the brush to lightly dab the paint along the edges of the strap or handles, try not to get any on the finished surface of the strap, and wipe it off quickly if you do get some on it. Let the paint dry completely, it dries pretty fast.
Don't neglect the edging; it is amazing how much of a difference it can make to the overall appearance of the bag!
12) If the bag is missing its hangtag, call
Coach Customer Service in Jacksonville and ask them to you a free replacement. They will usually send a silver or gold-tone metal hangtag and chain to match the hardware. It usually takes a few weeks for the new tag to arrive.
You can also buy hangtags on
eBay other online sites, most of the vintage bags just have a leather hangtag that is the same color as the bag.
That's all there is to it! Enjoy carrying your lovely bag and be sure and post before and after pics in this Rescue and Rehab thread!