Making a Replacement Drawstring End Cap
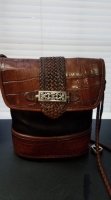
This Lula's Legacy drawstring bag was missing one of the end caps on the drawstring (pictures 1,2).
View attachment 4316429
View attachment 4316430
I wanted to try my hand at making a replacement. I made a "proof of concept" test piece before I decided to go for it (picture 4 below, on the left)
Locate a piece of leather (local leather shop had a near-perfect matching scrap)
Trace around the end cap to make a pattern
Fold leather in half (wrong side out) and draw around pattern with pen (picture 3)
View attachment 4316431
Cut out (I used scissors; an Xacto knife might give neater edges) (picture 4)
View attachment 4316432
Punch holes around the edge with sewing needle (easier to sew if holes are already made). Using a leather punch, choose the appropriate size hole and punch the center at the top for drawstring to go through later (don't make hole too big) (picture 5)
View attachment 4316436
Lightly sand around the edges to make them smooth and even
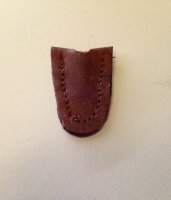
Sew around edges, joining the two sides (picture 6)
View attachment 4316437
I used an unknotted single thread (leaving a long tail), going first one way doing every other stitch, then back the other direction to fill in the missed stitches. When I got back to the start, I tied the two thread ends together and tucked them inside. You could also use a classic backstitch if you prefer, or machine sew.
Brush two light coats of Fiebing's Leather Cement just around the sides and tip to seal. Let it dry.
Light coat of Blackrock on front and back of the piece. Let it dry. (picture 7)
View attachment 4316439
Brush Fiebing's leather cement on the end of the drawstring and insert it into the top hole. Let it dry. (picture 8)
View attachment 4316440
This was a true "labor of love" due to the time it took, but fun and worthwhile. I like the handmade end cap better than just tying a knot at the end of the drawstring.