Coach Rehab and Rescue Club

TPF may earn a commission from merchant affiliate
links, including eBay, Amazon, and others

Status
Not open for further replies.
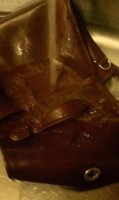
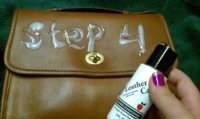
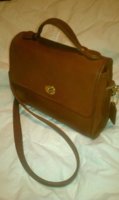
I finished with a couple of rounds of Blackrocks, buffed her with my horsehair blend brush and tidied up the brass. I may at some point, continue to improve the piping...just anxious to take her out on the town! I love the pockets on both sides and lots of room!

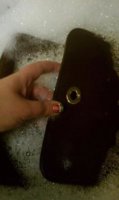
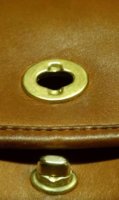
The next to last photo shows a white stripe on the piping...just an outdoor lighting highlight...it's really black. Oh yeah, and it came with the usual (in my experience) single-sided Coach Leatherware hangtag.

The results are definitely worth my time and patience, though, she looks waaaay younger and has a lot of life yet to live...this was one rewarding, therapeutic rehab!

Awesome awesome AWESOME job! Well worth testing your (im)patience!!!
 
Merm? are you going to show us that Court Bag you working on awhile back?

Oh yeah duh, I should do that huh!?
I have a few pics of the process but only one pic of the final results, and I'm away from home but I can show those at least.... Gimme a few, friend is hogging the computer right now.
 
Hope this all uploads in the right order...

Step 1: Soapy bath in the sink (I was soooo scared but not anymore)

Step 2: Rinse

Step 3: Stuff with towels and sitting on a towel to dry for a coupla days

Step 4: CONDITION!! (man did it ever suck the stuff in)

Step 5: Polished brass with Brasso and Q-Tips & Dremel... Will need to work on this, my background in being a goldsmith had me more used to polishing precious metals... This was different. The only things I managed to get a really high shine on was the ball chain for the hangtag and the bottom part of the turnlock. Oh and I got a drop of Brasso on the leather and FREAKED because it didn't come out right away.... Had to wash/rinse the spot lol
 

Attachments

  • 1.jpg
    1.jpg
    27.9 KB · Views: 187
  • 2.jpg
    2.jpg
    31.3 KB · Views: 182
  • 3.jpg
    3.jpg
    59.5 KB · Views: 187
  • 4.jpg
    4.jpg
    44.3 KB · Views: 187
  • 5.jpg
    5.jpg
    43.6 KB · Views: 186
And here she is, all done.

I might re-do it tho, because I was a bit of a fraidy-cat with it being my first time and I didn't even dare tackle the little pen marks on the back. And I was pretty gentle with the dirt on the tophandle. But now I'm not afraid anymore, so I might try again and be a bit more aggressive. :p
 

Attachments

  • 6.jpg
    6.jpg
    28.5 KB · Views: 177
And here she is, all done.

I might re-do it tho, because I was a bit of a fraidy-cat with it being my first time and I didn't even dare tackle the little pen marks on the back. And I was pretty gentle with the dirt on the tophandle. But now I'm not afraid anymore, so I might try again and be a bit more aggressive. :p

She looks great!! -- Love the color and that style ! (love your step 4 conditioner note too)
I am intrigued by your metal polishing/goldsmith background. I have been attempting the Dremel, and it works better on the really old brass. My first time using the Dremel (posted in this thread) it was amazing. But I am fighting its tendency to put "black" back ONTO the brass, and it may even be that the newer brass isn't pure brasss, but is plated so it just doesn't look as good. If you have any thoughts on this I"d love to hear them. And maybe not using a brand new felt tip everytime is a problem but those things are too dang expensive to use 3 tips per bag !! If you discover anything about this in your rehab attempts I'd love to hear your thoughts and expertise.

The key with this is using a really light touch and very little polishing compound. And keep it moving/sweeping away the crud as well as you can. You'll get it over time (I'm sure you've already gotten better since your very first time)
And the problem is that yeah, we don't know the EXACT metal or alloy used on each purse or piece of hardware, so it's hard to research exactly what we need to do. Some metals are porous meaning you will get dirt and it'll kinda pit right in there and become part of the metal. Technically you can re-use the buffs BUT--You're not supposed to use the same buff on different metals... Meaning if it polished one thing (metal x), it has to ONLY be used for metal x. Never mix, meaning don't use it for meal Z. And since we don't know FOR SURE what the metals/mixtures are, it's prolly best not to mix in these incidences, so use a new one for at least each purse. But you don't have to get the Dremel brand buffs, you can get little cheapies from China by the hundreds for very little money :smile1:

P.S. polishing definitely wasn't my favorite part of making jewelry, in fact it was a pain in the tookus and I never got it "perfected" just "pretty good"... And then the vibrating tumbler with mixed steel shot & pins would finish the job, which we can't do with purses!! LOL
 
Last edited:
The key with this is using a really light touch and very little polishing compound. And keep it moving/sweeping away the crud as well as you can. You'll get it over time (I'm sure you've already gotten better since your very first time)
And the problem is that yeah, we don't know the EXACT metal or alloy used on each purse or piece of hardware, so it's hard to research exactly what we need to do. Some metals are porous meaning you will get dirt and it'll kinda pit right in there and become part of the metal. Technically you can re-use the buffs BUT--You're not supposed to use the same buff on different metals... Meaning if it polished one thing (metal x), it has to ONLY be used for metal x. Never mix, meaning don't use it for meal Z. And since we don't know FOR SURE what the metals/mixtures are, it's prolly best not to mix in these incidences, so use a new one for at least each purse. But you don't have to get the Dremel brand buffs, you can get little cheapies from China by the hundreds for very little money :smile1:

P.S. polishing definitely wasn't my favorite part of making jewelry, in fact it was a pain in the tookus and I never got it "perfected" just "pretty good"... And then the vibrating tumbler with mixed steel shot & pins would finish the job, which we can't do with purses!! LOL
Thanks for your input! I'll definitely go lighter on the compound as well as the pressure. Is it ok to just polish with the Brass polish like Brasso or is a compound like what comes with the Dremel better/good enough for tarnish and polishing? Sorry, I'll quit bugging you now LOL
 
Thanks for your input! I'll definitely go lighter on the compound as well as the pressure. Is it ok to just polish with the Brass polish like Brasso or is a compound like what comes with the Dremel better/good enough for tarnish and polishing? Sorry, I'll quit bugging you now LOL

You're not bugging! The stuff that comes with the dremel is the red stuff right? It's been so long since I got my dremel that I don't remember, but yeah I think Dremel comes with the red, it's commonly referred to as jeweler's rouge.... I dunno which would be better, the rouge or Brasso... But I will definitely be experimenting!
 
Amazing results! Wow. When I saw those first pics I thought it was hopeless. Great job!

Amazing job, she looks fabulous!

Wow..you are more patient than me!! Amazing!! enjoy her!!
(and silly question, but could you take a photo at some point of the tubes of acrylic you use? I am just curious as to the look of them, and my art supply stores are disappearing all around me so I hope to get an idea of what you guys are looking at)

Although the acrylic in tubes would have been a better - and probably a faster - option, I don't have any. I used the kind that comes in a little plastic bottle made by Plaid Apple Barrel colors. It's just garden-variety craft paint. The thicker stuff in the tubes would certainly have speeded up this project!

Nice Work! I always tell myself I will never get a bag that needs piping repair. Stop making it look easy or I might break my rule! :D

Thanks everyone...I greatly appreciate all the positive support we share here!
 
The key with this is using a really light touch and very little polishing compound. And keep it moving/sweeping away the crud as well as you can. You'll get it over time (I'm sure you've already gotten better since your very first time)
And the problem is that yeah, we don't know the EXACT metal or alloy used on each purse or piece of hardware, so it's hard to research exactly what we need to do. Some metals are porous meaning you will get dirt and it'll kinda pit right in there and become part of the metal. Technically you can re-use the buffs BUT--You're not supposed to use the same buff on different metals... Meaning if it polished one thing (metal x), it has to ONLY be used for metal x. Never mix, meaning don't use it for meal Z. And since we don't know FOR SURE what the metals/mixtures are, it's prolly best not to mix in these incidences, so use a new one for at least each purse. But you don't have to get the Dremel brand buffs, you can get little cheapies from China by the hundreds for very little money :smile1:

P.S. polishing definitely wasn't my favorite part of making jewelry, in fact it was a pain in the tookus and I never got it "perfected" just "pretty good"... And then the vibrating tumbler with mixed steel shot & pins would finish the job, which we can't do with purses!! LOL

Gorgeous job on your Court Bag...and a big AMEN to the polishing. I did some silversmithing back in college (not quite the dark ages, but long, long ago) and polishing was the bane of my existence! Again, great job...and they definitely get less scary each time!
 
Good morning ladies! I have a new rehab project to show you.

The lovely ladies in the Authenticate thread told me this is a vintage satchel from the mid-'80s. The leather was in great shape, but I could tell she had been stored somewhere for a long time, probably with something on top her.

You can see here that one side is misshapen:

IMG_6166-1.jpg


IMG_6170.jpg


Bottom:

IMG_6167-1.jpg


Side:

IMG_6169.jpg


I put her in the bath for about an hour and the water was disGUSTing. It was brown with tons of little particles. I rinsed her and bathed her again, then scrubbed the inside. Rinsed, soaked in clear water, then rinsed again.

Coach leather has the loudest, strangest smell when it's wet. It actually filled the room. I stuffed her and set her in front of an open window to dry. Here's what she looked like wet and stuffed:

IMG_6175-1.jpg


And here she is mostly dry and with two coats of Leather CPR:

IMG_6195-1.jpg


No flash:

IMG_6197-1.jpg


As you can see, that left side still looks a little off. I have no idea how to fix that, so if anyone has any ideas, I'm all ears!:D

Side:

IMG_6191.jpg


The smell is mostly gone now that the bag is almost dry, but it's still strong compared to my other leather bags (non-Coach).

Thanks for looking!:p
 
Last edited:
Status
Not open for further replies.
Top