You are using an out of date browser. It may not display this or other websites correctly.
You should upgrade or use an alternative browser.
You should upgrade or use an alternative browser.
Scarves The How-To Guide for Scarves!!!! NO CHATTER!
- Thread starter jag
- Start date
TPF may earn a commission from merchant affiliate
links, including eBay, Amazon, and others
More options
Who Replied?


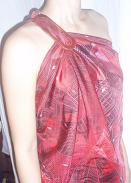
toga style :
Put one end (point A ) of the scarf thru a scarf ring. this gives the scarf some weight and definition on the front toga. You can also slide the scarf ring up and down the scarf to rest wherever comfortable.
tie three ends of the scarf together at the back, leaving one end (the end diagonally opposite point A) loose on the front.
the last pic show how it looks from the back with a tube top under the scarf.
Have fun !!
Attachments
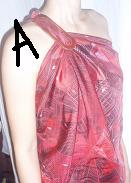
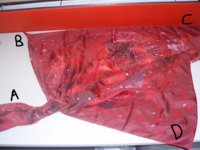
I'm attaching more pics and instructions ! Hope this helps !!
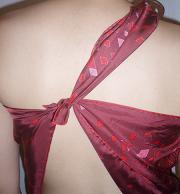
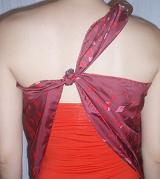
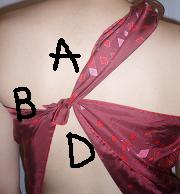
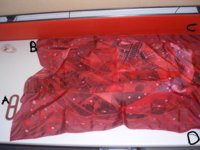
Pic 1) I've labelled each end - A, B, C and D.
Pic 2) Put A thru your scarf ring. I find that the (flat type of) scarf ring sits very nicely on my collar bone/neck area.
Pic3) Tie A to B. Slip this neck opening over your head and under one arm.
Pic 4) A will sit on your shoulder and you can slide the scarf ring lower down your chest. Bring D behind and tie it to the existing A/B knot. (You'd probably need some help with this !!)
Pic 5) this is how it looks from the back - all three ends tied together. You may leave C just on it's own in front, or you can shift it to the side so it looks asymmetrical.
Attachments

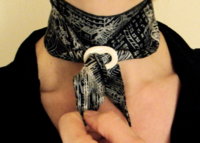
OK, this is for all those ladies how love the look of friendship knot but find those diagrams confusing (as did I in the beginning - but lots of patience paid off).
Apologies for not the gratest pics but I did my best.
Step 1 -- put folded scarf over your neck, both ends of pretty much equal length
Step 2 -- fold end 1 over in half and flip over your arm
Step 3 -- hold the fold of end 1 together
Step 4 -- take end 2 and put it over the fold of end 1
Step 5 -- continuing with end 2 flip it under the fold 1 so that end 2 ends sticking out on your opposite arm
Sorry Ladies, I'm having some real issues with tpf right now and I can't upload my pics 
Maybe better luck this time
Steps 1-5
Maybe better luck this time
Steps 1-5
Attachments


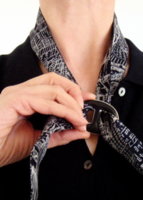
Step 6 -- take end 1 and go under and over the opening close to your neck
Step 7 -- pull the end 1 down -- you should have both ends on the same arm side with end 2 under end 1
Step 8 -- [that's the step I was getting most confused about] take end 2 and take it over end 1 [which is lying flat] -- which takes you to Step 9
Step 10 -- take end 2 and tuck it through the very first fold you made that should be sitting on the bottom of the friendship knot)
Voila -- you're done. Just fluff up and tidy up those 4 sections of the knot and make the ends looks pretty
If you start the fold closer to the neck the ends will be shorter and the knot will be sitting close to the neck -- which I like to wear with button-down shirts. With sweathers I like the knot to be a bit lower so I start the fold lower too.
Really hope this helps and apologies for maybe somewhat confusing descriptions -- I tried
Ok -- I have pics issues again [sigh]
Attachments


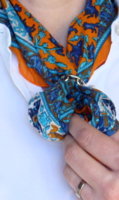
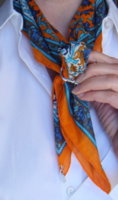
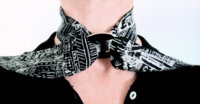
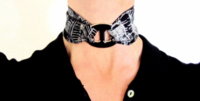
Bow knot
Cotton carré 70cm with charm/Chain d'Ancre scarf ring
1. Fold your carré into a triangle, let the ends hang off your neck and secure with your scarf ring (photo No.1)
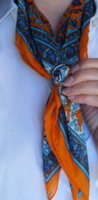
2. Pull both strands halfway or less through the ring, depending on the size of bow you want to create (photo No.2)
3. Work each strand separately and tease them into a bow shape (photo No.3&4)
4. If you want the bow to sit a little bit closer to your neck, ease the scarf ring upwards (photo No.5)
Cotton carré 70cm with charm/Chain d'Ancre scarf ring
1. Fold your carré into a triangle, let the ends hang off your neck and secure with your scarf ring (photo No.1)
2. Pull both strands halfway or less through the ring, depending on the size of bow you want to create (photo No.2)
3. Work each strand separately and tease them into a bow shape (photo No.3&4)
4. If you want the bow to sit a little bit closer to your neck, ease the scarf ring upwards (photo No.5)
Attachments


Register on TPF! This sidebar then disappears and there are less ads!