Fantastic work! It’s beautiful. And thank you posting your detailed process, super helpful. I plan to tackle my first paint this afternoon and now I’m going to use swabs instead of my brushes. Thanks!I'm pretty pleased with how this turned out. I stopped stalling and just went ahead with the paint job. I even shocked myself how close a match for Leaf I was able to mix up. I used only 4 shades of Angelus paint (avocado, yellow, blue and white), I noticed the respective thread has been a bit dead for some time, but I might post a breakdown there as well.
I really only wanted to hide the color loss where it had occurred and not paint over whole portions of the bag. I started with the bottom of the bag as the rim had consistent color loss. I initially tried prepping the immediate area with acetone but dropped it as I found that it was unnecessary and changed how the paint acted. I also started out by using a brush and simply wiping the excess with a paper towel, but I quickly switched to cotton swabs which give a far better result for small areas because of the way it restricts the quantity of paint and also somehow has the leather soak up the paint, rather than just brushing it on so it just sits on top, becoming a noticeable layer that you have to blend around the edges. I still worked on a small area at a time and wiped over it after I was done on a section. The result is such that in I myself can't really distinguish the painted areas from the rest in daylight. Looking extra close in bright sunlight I can see that the layer of paint seems ever so slightly more transluscent in those areas, but you wouldn' be able to tell unless you knew to look and put your nose to it. I also applied only one coat and don't feel more is necessary. The sheen of the paint also matches the rest so I don't feel like I have to apply any type of finish. The difference between the before and after is best seen on the bottom and on the strap. The two closeups of the strap are from the same area (see where the leather is overlayed for reference). The edges of the strap had the same type of color loss the whole way around as the bottom, just not as extreme.
You are using an out of date browser. It may not display this or other websites correctly.
You should upgrade or use an alternative browser.
You should upgrade or use an alternative browser.
Coach Rehab and Rescue Club
- Thread starter greenpixie
- Start date
TPF may earn a commission from merchant affiliate
links, including eBay, Amazon, and others
More options
Who Replied?
Thank you! I want to add about the cotton swabs that this is probably best suited for small areas. Although I guess there's room here for a number of other tools between the swabs and brushes, perhaps make up sponges etc. I just found that I much prefer going slow and careful. You can always add more, and I also think multiple thin layers is better as it will dry more evenly. I just realized that a brush will mostly just deposit the paint on a surface and it's quite uneven. But as the Angelus paints start to dry quite quickly, especially in such small quantities, you have to work fast and don't have a lot of time to smooth it out. And if you only work on a small area at a time, you will inevitably create a lot of those transition areas beween sections. But if you're only dabbing on the paint to create a thin even layer and wipe the excess then the result is much more seamless, and it allowed me to work faster too. Plus the leather has natural texture and the brush tends to either smooth it over with paint or creates its own.Fantastic work! It’s beautiful. And thank you posting your detailed process, super helpful. I plan to tackle my first paint this afternoon and now I’m going to use swabs instead of my brushes. Thanks!
My project is very small area touchups so this is perfect. Thanks for taking the time to share!Thank you! I want to add about the cotton swabs that this is probably best suited for small areas. Although I guess there's room here for a number of other tools between the swabs and brushes, perhaps make up sponges etc. I just found that I much prefer going slow and careful. You can always add more, and I also think multiple thin layers is better as it will dry more evenly. I just realized that a brush will mostly just deposit the paint on a surface and it's quite uneven. But as the Angelus paints start to dry quite quickly, especially in such small quantities, you have to work fast and don't have a lot of time to smooth it out. And if you only work on a small area at a time, you will inevitably create a lot of those transition areas beween sections. But if you're only dabbing on the paint to create a thin even layer and wipe the excess then the result is much more seamless, and it allowed me to work faster too. Plus the leather has natural texture and the brush tends to either smooth it over with paint or creates its own.
Wanted to share a small progress report an on a Madison Soectator Satchel (6765) that I recently picked up that had a few marks on the outside. I saw @whateve recommend benzoyl peroxide cream on marks/stains on light bags so tested it on this one. 24 hrs later and it’s lifted quite a bit! Thinking I’ll do another round and hopefully it’ll lighten even more. Grateful to you all for sharing your experience and expertise 🫶


Flap bag is done. Some leather dye touch ups, and regular rehab.


Looking good! I’ve used this tip from @whateve many times and found I can leave the cream on longer to address dark stains if I use a cotton swab to paint the cream very precisely onto just the mark. Might be worth trying for round 2! I especially love the cotton swabs that have one pointed end, which I never bought until reading about them here in the forum.Wanted to share a small progress report an on a Madison Soectator Satchel (6765) that I recently picked up that had a few marks on the outside. I saw @whateve recommend benzoyl peroxide cream on marks/stains on light bags so tested it on this one. 24 hrs later and it’s lifted quite a bit! Thinking I’ll do another round and hopefully it’ll lighten even more. Grateful to you all for sharing your experience and expertise 🫶View attachment 6154036View attachment 6154037View attachment 6154038
Thank you! I’ve put it in for an additional round. I tried with a regular cotton swab to go directly on the mark and um, not as thin an application as I would’ve liked 😅 I will be on the lookout for a pointy ended cotton swab for the future. I appreciate the recommendations!Looking good! I’ve used this tip from @whateve many times and found I can leave the cream on longer to address dark stains if I use a cotton swab to paint the cream very precisely onto just the mark. Might be worth trying for round 2! I especially love the cotton swabs that have one pointed end, which I never bought until reading about them here in the forum.
Pointy swabs: https://www.amazon.com/dp/B09FZ875N4?ref=ppx_pop_dt_b_asin_image&th=1 I’m certain there are others, and probably cheaper, but I like the strength of these (and there are 500 in a box). ☺️Thank you! I’ve put it in for an additional round. I tried with a regular cotton swab to go directly on the mark and um, not as thin an application as I would’ve liked 😅 I will be on the lookout for a pointy ended cotton swab for the future. I appreciate the recommendations!
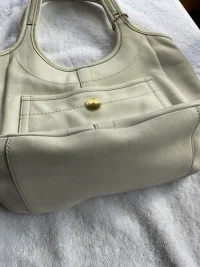
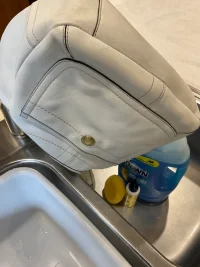
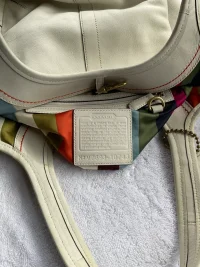
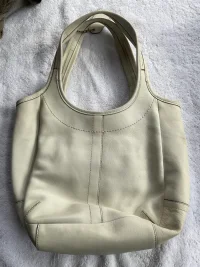
First white bag underway….thanks to everyone who has already given advice. It was grimier than expected (as I think bags always are) and bc of your input I dunked and gently washed in warm water without fear of the colored leather or the striped lining. The three on the towel are before, the one in the sink is fresh from bath. Already looking cleaner and no bleeding whatsoever.@Hoku44 you inspired me to get over my fear and finally try a white rehab!! I have a fondness for the 65th Anniversary Ergo totes. Purchased this summer beauty last night (graciously authenticated by @whateve , thank you again!). The bright lining may make cleaning a little trickier, but I can’t wait to receive and get started.
Attachments
Been a very long time since posting here. Hi!
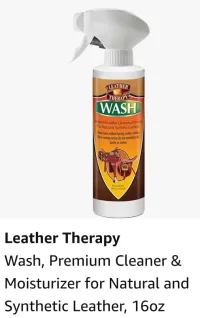
Wanted to share a new addition that's white - a color I swore I wouldn't buy because it's very difficult to "rehab" and I did not want a bag I wouldn't carry. I mean, who has the courage to carry a white bag and I never really thought they were very pretty. If anyone is afraid of carrying white, don't be. I have carried this beauty on numerous occasions and I am shocked at how durable this color is! I'm very cautious of my bags so there's that too. Anyway, I must say that white in person is stunning, pictures do not do it justice! I used a magic eraser (very, very carefully!) on the tongue and other areas that had dirt marks. I then washed the bag in Leather Therapy Wash and all the dirt came right out.
Don't be afraid of white! Nubuck, on the hand, is something to be afraid of though! Love the results of you red nubuck bag @katev!
**EDIT**
Why is that picture so huge??!
View attachment 6129956
View attachment 6129958
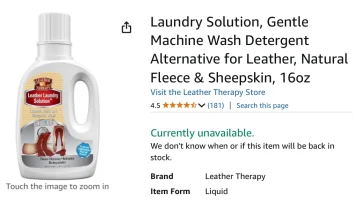
Question @Hoku44 , did you use the LT spray or laundry wash (pics below for ease)? Thanks!
Attachments
Last edited:
Started two new rehabs. One is s Sterling Clutch, and the other is some kind of compartment bag---need to double check the name/number.

I've used LT Therapy wash and it's important to know that a little of that stuff really goes a long way as it's very easy to use too much. It has moisturizers in it and if I do use it, I won't even consider applying an additional conditioner for several days. I did use the LT Therapy wash on my white Courier *after* I very lightly wiped the bag with a magic eraser. I have not used the LT Laundry wash - I've seen it but haven't tried it.Question @Hoku44 , did you use the LT spray or laundry wash (pics below for ease)? Thanks!
One thing I've learned is that there isn't one end-all-be-all conditioner, cleaner or even process that will work for every bag. I have an arsenal of stuff.. Hard core cleaners for really bad stains like mold I use RenoMat or M. Mowbrays. I know many people love saddle soap and I jumped on that bandwagon at first only to find that it can leave a weird film and I do not use it anymore.
I really like Bick 1 Leather cleaner - I put that in a small spray bottle with water (4 to 1 ratio) and spray directly on leather and wipe with a microfiber for tougher stains or cleaning. If a bag needs dunking (another controversy that has become looked down upon as well as shaming of ones that have or do), I use Woolite or Palmolive. I am a huge fan of Furniture Clinic Leather Cleaner. Doesn't leave any film whatsoever - the same as Bick 1 Leather Cleaner.
I would advise against a heavy conditioner like Blackrock or Renapur on a white bag. Stick to Bick 4 or Leather CPR.
Probably a much longer answer than what you asked. Sometimes I like to explain how the watch works as opposed to just giving the time.
")
That bag is in excellent condition! I don't know if this is your first white bag rehab, if it is, I'd like to say that white looks really awful until it is thoroughly dry. You'll think there's remnants of dirt but it's just... damp - even after three or four days. All that bag needs is a light conditioner and a couple weeks to "heal".First white bag underway….thanks to everyone who has already given advice. It was grimier than expected (as I think bags always are) and bc of your input I dunked and gently washed in warm water without fear of the colored leather or the striped lining. The three on the towel are before, the one in the sink is fresh from bath. Already looking cleaner and no bleeding whatsoever.
Fantastic color matching! Yay you!I'm pretty pleased with how this turned out. I stopped stalling and just went ahead with the paint job. I even shocked myself how close a match for Leaf I was able to mix up. I used only 4 shades of Angelus paint (avocado, yellow, blue and white), I noticed the respective thread has been a bit dead for some time, but I might post a breakdown there as well.
I really only wanted to hide the color loss where it had occurred and not paint over whole portions of the bag. I started with the bottom of the bag as the rim had consistent color loss. I initially tried prepping the immediate area with acetone but dropped it as I found that it was unnecessary and changed how the paint acted. I also started out by using a brush and simply wiping the excess with a paper towel, but I quickly switched to cotton swabs which give a far better result for small areas because of the way it restricts the quantity of paint and also somehow has the leather soak up the paint, rather than just brushing it on so it just sits on top, becoming a noticeable layer that you have to blend around the edges. I still worked on a small area at a time and wiped over it after I was done on a section. The result is such that in I myself can't really distinguish the painted areas from the rest in daylight. Looking extra close in bright sunlight I can see that the layer of paint seems ever so slightly more transluscent in those areas, but you wouldn' be able to tell unless you knew to look and put your nose to it. I also applied only one coat and don't feel more is necessary. The sheen of the paint also matches the rest so I don't feel like I have to apply any type of finish. The difference between the before and after is best seen on the bottom and on the strap. The two closeups of the strap are from the same area (see where the leather is overlayed for reference). The edges of the strap had the same type of color loss the whole way around as the bottom, just not as extreme.
I always giggle when someone asks "What color matches 'X'?" Like there's one color that will match perfectly.
You have to mix colors to get it right. Absolutely have to.
Register on TPF! This sidebar then disappears and there are less ads!