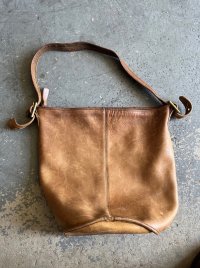
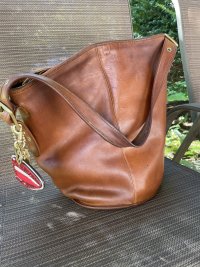
Got some leather CPR today and WOW! That stuff is great!It couldn't hurt. I love leather CPR!
You are using an out of date browser. It may not display this or other websites correctly.
You should upgrade or use an alternative browser.
You should upgrade or use an alternative browser.
Coach Rehab and Rescue Club
- Thread starter greenpixie
- Start date
TPF may earn a commission from merchant affiliate
links, including eBay, Amazon, and others
More options
Who Replied?Love this! Such an improvement. Nice job!I have a distressed Ranch bag, it was rehabbed still I felt something wasoff about that bag. Finally I realized it was the brass square rings, they were thin, small and flimsy looking, they moved around during usage, sometimes the side with a gap became visible. Today replace them with two D-rings (same hardware as Willis), I prefer the new look much better, finally I can enjoy this well used Ranch bag, the size is quite big, but will be good for winter, room for scarf, gloves, etc..
Before & after
View attachment 5606566
View attachment 5606567
View attachment 5606568
View attachment 5606570
View attachment 5606571
Thank you, @LadaZuri. I think it's a potentially gorgeous bag but the price for the condition is holding me back. I think I will make an offer (even though the listing is not specifically set up that way) and see what happens.I also think the bag might restore quite well, however that is a shocking price for one in that condition.
the initials are still there but faint. Conditioning the bag really helped & smoothed out the lines in the bag. Im intending on going back to the mink oil conditioner & try rubbing them out & see what happens. (I had to take the purse outside in the sun to get a pic of the initials). If it works, I will have to try it on my own wrinkles lolDid those initials disappear after the dunk? I don't see the initials in the after picture, or is it that Saphir polish that covered it up?
I've got a dinky with initials... your initials seem gone
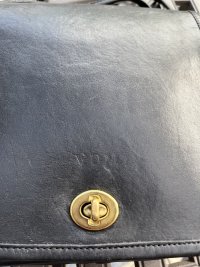
I think your Duffle knows my Buckle Tote!This is the bag I referenced as the one making me look at distressed bags.
Before
View attachment 5610134
AfterView attachment 5610135
Agree. I use brasso or some other metal polish and 0000 steel wool. Easy Peasy.I don't know an easy way. Some people have used dremels. I've used fine steel wool with vinegar.
How about trying a warm iron while the area is damp? Sort of like steaming out the impression. Use a press cloth between the purse and the iron for protection.the initials are still there but faint. Conditioning the bag really helped & smoothed out the lines in the bag. Im intending on going back to the mink oil conditioner & try rubbing them out & see what happens. (I had to take the purse outside in the sun to get a pic of the initials). If it works, I will have to try it on my own wrinkles lol
View attachment 5610307
Beautiful bag! Large Plaza is high on my wishlist! I just need to crowbar open my wallet
that’s a thought, i will have to play around with that…. have you tried it?How about trying a warm iron while the area is damp? Sort of like steaming out the impression. Use a press cloth between the purse and the iron for protection.
I haven't tried it to remove a stamp but I have ironed purses with a presscloth.that’s a thought, i will have to play around with that…. have you tried it?
@VintageEnthusiast
Got some time on my hands & can tell you what I know about “burnishing” leather straps. Note: this only works on a raw edge of leather & where 2 pieces are sewn together & has a raw edge exposed. I have burnished the bottom edge on my Sonoma bag where I pulled the leather around the pipping & glued the leather. It helped lay down the egde of the leather fibers & creates a water resistant barrier plus helps retain the moisture in the leather to protect the repair. Did the straps of my Dinky, Sonoma & compact pouch- i liked the results- unless you tell someone about it- i highly doubt anyone would know…. They talk about beveling the edge- I wouldn’t do it! I believe they are referring to new leather.
Here’s a great resource I used.

 www.sailrite.com
Hand Burnishing tool is called a slicker. you can buy one or just go in the kitchen & find a wooden spoon & use the handle portion.
1. Gathered supplies of your choosing.
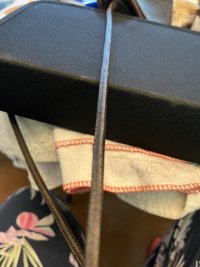
(pic 1). I like beeswax, I can see it on the leather & when it melts by hand friction it turns clear. The other works well. Water compress the fibers well (and it’s cheap)- still like the protection of the wax imo. Burnishing cream works also. I can not speak for what last overtime or how often you should do this.
2. Lightly sand the edge- fine sand paper- i use a large nail file. 200grit- I’ve skipped that step by accident at times- try both. It will depend on how ruff the edges are.
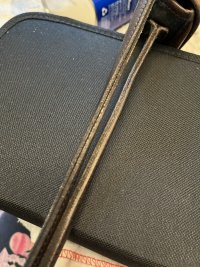
3. I rub the wax, water or burnishing cream on 3 inches. (pic 2) With beeswax, it will look hazy
4. rub the burnishing tool back & forth very fast, it will create friction, the wax will melt & the leather will compress to a nice edge. Note: very light colored leather will change color & get darker.
(I don’t use those rounded groves in the tool- i found it easier to use the smooth edge as i could hold the leather, therefore a wooden handle of a spoon would work)
5. Now do the next section! Viola!
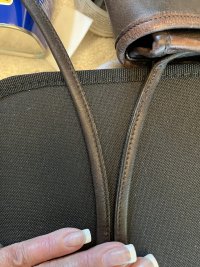
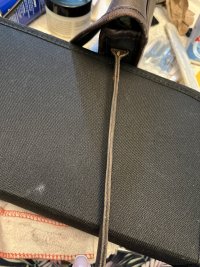
I posted before & after of a section I burnished. Note. a) the edges of the 2 pieces sewn together are closer & sealed more. b) notice there’s very little seam that runs down the middle as they were burnished together c) the side view is a little more compressed. d) It has a light shine- pic is shining bc i have a light on it so you can see.
e) it straightens the strap & gives it a little support.
It’s a bit maniacal…. Enjoy! let me know how it goes.
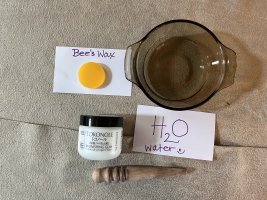

Got some time on my hands & can tell you what I know about “burnishing” leather straps. Note: this only works on a raw edge of leather & where 2 pieces are sewn together & has a raw edge exposed. I have burnished the bottom edge on my Sonoma bag where I pulled the leather around the pipping & glued the leather. It helped lay down the egde of the leather fibers & creates a water resistant barrier plus helps retain the moisture in the leather to protect the repair. Did the straps of my Dinky, Sonoma & compact pouch- i liked the results- unless you tell someone about it- i highly doubt anyone would know…. They talk about beveling the edge- I wouldn’t do it! I believe they are referring to new leather.
Here’s a great resource I used.

How to Burnish Leather
Learn why burnishing your leather edges is an important finishing step in your leatherwork and leather crafting.
Hand Burnishing tool is called a slicker. you can buy one or just go in the kitchen & find a wooden spoon & use the handle portion.
1. Gathered supplies of your choosing.
(pic 1). I like beeswax, I can see it on the leather & when it melts by hand friction it turns clear. The other works well. Water compress the fibers well (and it’s cheap)- still like the protection of the wax imo. Burnishing cream works also. I can not speak for what last overtime or how often you should do this.
2. Lightly sand the edge- fine sand paper- i use a large nail file. 200grit- I’ve skipped that step by accident at times- try both. It will depend on how ruff the edges are.
3. I rub the wax, water or burnishing cream on 3 inches. (pic 2) With beeswax, it will look hazy
4. rub the burnishing tool back & forth very fast, it will create friction, the wax will melt & the leather will compress to a nice edge. Note: very light colored leather will change color & get darker.
(I don’t use those rounded groves in the tool- i found it easier to use the smooth edge as i could hold the leather, therefore a wooden handle of a spoon would work)
5. Now do the next section! Viola!
I posted before & after of a section I burnished. Note. a) the edges of the 2 pieces sewn together are closer & sealed more. b) notice there’s very little seam that runs down the middle as they were burnished together c) the side view is a little more compressed. d) It has a light shine- pic is shining bc i have a light on it so you can see.
e) it straightens the strap & gives it a little support.
It’s a bit maniacal…. Enjoy! let me know how it goes.


Last edited:
Hi Team, need some help here...
I've looked through this site til I can't click another link, lol, and I still haven't found what I'm seeking.
Question: When you all say "Remove" hardware, does this mean "all" except for zippers...how is this possible, lol.
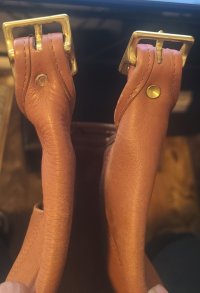
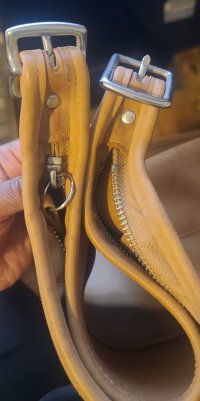
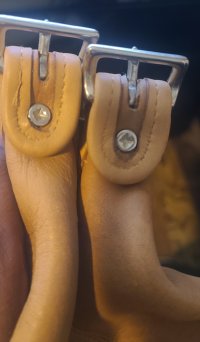
I've attached pictures of the two rehabs I just purchased and I'm sure these will get dyed...am I to remove the hardware shown; is it possible, lol. If so, please help with some tools used, youtube videos, pictures, anything you got...thank you so much


Hello, knowledgeable ones! I got a vintage station bag with a turnlock that's too loose as it turns, and angled. Is there a way to tighten the internal mechanism of it? I pulled the thing off and I looked at it and the screw inside but I can't figure out the HOW of adjustment. Or does it just need to be replaced?
ETA: I found some (I hope the right size) replacements at the Buckleguy. https://www.buckleguy.com/3016-natural-brass-turn-lock-solid-brass-ll-four-piece-set/
ETA: I found some (I hope the right size) replacements at the Buckleguy. https://www.buckleguy.com/3016-natural-brass-turn-lock-solid-brass-ll-four-piece-set/
Last edited:
Great Question- this inquiring mind would love to know- my compact Pouch had one also- my bff looked at it, did a few things and no luck.Hello, knowledgeable ones! I got a vintage station bag with a turnlock that's too loose as it turns, and angled. Is there a way to tighten the internal mechanism of it? I pulled the thing off and I looked at it and the screw inside but I can't figure out the HOW of adjustment. Or does it just need to be replaced?
Register on TPF! This sidebar then disappears and there are less ads!

