You've already gotten great advice. I think your pig brush would be fine. My kids raised pigs for 4-H. That was fun!I am about to embark on my first rehab attempt. Navy City Bag with no obvious stains.
After reading through these threads it seems like the basic process is as follows (assuming I don't intend to dye in any way. That's clearly at least intermediate level expertise.
1) Clean and brush out the inside
2) Give her a bath in warm water with dawn and / or vinegar. This can clean and help moisten
3) Dry and reshape using towels.
4) Condition, condition, condition. Most seem to use Leather CPR (thankfully available at my local Tractor Supply).
5) Apply BlackRocks Leather N Rich. Let sit and wipe off.
5) Brush with horse hair brush to shine.
I have several questions, so please bear with me. And thank you in advance.
Did I miss any steps?
When do you use vinegar in the bath ?
Do most people use their hands to apply the Leather CPR? Or are there inexpensive towels or sponges you like?
I found a horse hair brush that is intended for show pigs. What do you think? Or do you have a better suggestion?
Finally I've also seen references to Lexol. What is this used for?
Thanks in advance for your help. I also plan to spend some time on YouTube. If you've found any videos particularly useful or bad, I'd welcome that input too.
You are using an out of date browser. It may not display this or other websites correctly.
You should upgrade or use an alternative browser.
You should upgrade or use an alternative browser.
Coach Rehab and Rescue Club
- Thread starter greenpixie
- Start date
TPF may earn a commission from merchant affiliate
links, including eBay, Amazon, and others
More options
Who Replied?OMG. Thank you all. @LadaZuri @LaVinCoach @Paris Girl @katev
I hope I didn't miss anyone
The details on trimming and hardware was much needed and missing. Do you tend tackle hardware before or after rehabbing the leather (if you are keeping it on)?
I will definitely post before and after. I have to order a few supplies as my Local Tractor supply is limited to Saddle supplies.
Re addictive. I can see how that happens. Fewer calories than baking, though my husband might not be happy.
The pig brush was way cheaper and described as ideal for white haired pigs who tend to have softer skin apparently. I'll give it a try. Thanks.You've already gotten great advice. I think your pig brush would be fine. My kids raised pigs for 4-H. That was fun!
Very excited that my sacrificial bag I mean spring lock is coming! Really hoping it fits well but I think it should! I think the seller thinks I'm crazy for asking them for pictures inside of the lock and for the size of the lock  (which btw, is what I'm planning to do for all future bags with spring locks! other than maybe just avoid spring locks in general.. I do love Chrysties though..
  )
)
Also managed to figure out how to remove spring locks! I was pretty shocked at how easy it was haha
There was SOOOO much verdigris under that spring lock it was ridiculous!! *shield your eyes sensitive readers*
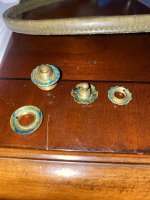
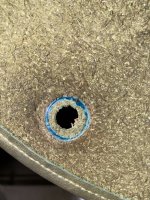
Gave the bag a dunk, conditioned, stuffed, and currently waiting for it to dry
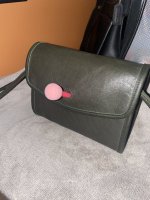
Anyone like my makeshift spring lock? Maybe I'll just leave that sponge in as the permanent closure...
The bag was very wrinkled, especially on the flap, so I felt I needed it to dry with some tension and since I took the spring lock out I had to improvise with my sponge hehe
It's still kinda wrinkly, but much improved! Does anyone have any tips on removing deep set wrinkles on bags or do we call it "character" and move on?
 (which btw, is what I'm planning to do for all future bags with spring locks! other than maybe just avoid spring locks in general.. I do love Chrysties though..
  )
)Also managed to figure out how to remove spring locks! I was pretty shocked at how easy it was haha
There was SOOOO much verdigris under that spring lock
 it was ridiculous!! *shield your eyes sensitive readers*

Gave the bag a dunk, conditioned, stuffed, and currently waiting for it to dry


Anyone like my makeshift spring lock?
 Maybe I'll just leave that sponge in as the permanent closure...
The bag was very wrinkled, especially on the flap, so I felt I needed it to dry with some tension and since I took the spring lock out I had to improvise with my sponge hehe
It's still kinda wrinkly, but much improved! Does anyone have any tips on removing deep set wrinkles on bags or do we call it "character" and move on?

Last edited:
I think I will try the Wizards. Still on the fence about removing. Need to watch some videos and examine the bag more...Very excited to see the results!
Regarding the hardware, some users are mentioning that you don't have to remove it. I have also polished without removing but I do so very carefully in order not to get the product on the leather. I have gotten some brasso on the leather and I quickly wipe it away and apply conditioner to the area because I can see it become instantly dehydrated. I feel that to do a more thorough polish, removing it is best, but if youre not totally comfortable doing that or if the brass doesn't look too bad, then no need!
Someone actually messaged me after saying that Wizard's metal renew is much better than brasso (and doesn't smell, even if you don't mind it), and I see that @Paris Girl mentioned using this product as well.
OMG. Thank you all. @LadaZuri @LaVinCoach @Paris Girl @katev
I hope I didn't miss anyone
The details on trimming and hardware was much needed and missing. Do you tend tackle hardware before or after rehabbing the leather (if you are keeping it on)?
I will definitely post before and after. I have to order a few supplies as my Local Tractor supply is limited to Saddle supplies.
Re addictive. I can see how that happens. Fewer calories than baking, though my husband might not be happy.
I usually do the hardware last but I hate polishing hardware so that may be the reason!
OMG. Thank you all. @LadaZuri @LaVinCoach @Paris Girl @katev
I hope I didn't miss anyone
The details on trimming and hardware was much needed and missing. Do you tend tackle hardware before or after rehabbing the leather (if you are keeping it on)?
I will definitely post before and after. I have to order a few supplies as my Local Tractor supply is limited to Saddle supplies.
Re addictive. I can see how that happens. Fewer calories than baking, though my husband might not be happy.
I typically do the hardware after. Never really gave it much thought as to whether it's better to do it before or after, I guess it's just more exciting for me to see the bag dunked and stuffed and the hardware is just an i'll-get-to-it-when-I-get-to-it kinda thing

I guess if I'm really thinking about when its better and being the overthinker/worst-case-scenarioist that I am, I would be slightly worried that if I did it before, any residue that remains on the hardware might be released into the water and cause stains (totally hypothetical, never had this happen nor do I know if its possible) I just like to be safe rather than sorry

You might have to resort to baking to make it up to your husband though...

If you aren't going to remove hardware and there is visible verdigris, I like to clean it before dunking the bag because it will stain the leather. I've cleaned hardware before dunking and it still needs polishing afterwards.I typically do the hardware after. Never really gave it much thought as to whether it's better to do it before or after, I guess it's just more exciting for me to see the bag dunked and stuffed and the hardware is just an i'll-get-to-it-when-I-get-to-it kinda thing
I guess if I'm really thinking about when its better and being the overthinker/worst-case-scenarioist that I am, I would be slightly worried that if I did it before, any residue that remains on the hardware might be released into the water and cause stains (totally hypothetical, never had this happen nor do I know if its possible) I just like to be safe rather than sorry
You might have to resort to baking to make it up to your husband though...
If you aren't going to remove hardware and there is visible verdigris, I like to clean it before dunking the bag because it will stain the leather. I've cleaned hardware before dunking and it still needs polishing afterwards.
By cleaning do you mean just removing the verdigris or applying a metal polish to it first? I've never applied metal polish before dunking but I do try to clean as much of the verdigris off as possible before dunking.
Hi all!
Just wanted to share my latest Cassie repaint. It started out as stone blue (1st photo) but I'm not a big blue bag girl (acquired Madison in Azure during the sale which scratched that itch).
Anyhow...I used all Angelus products...deglazer, acrylic leather paint in Avocado & matte finisher. The Angelus products were really easy to use (as opposed to the Fieblings I had used in the past). The matte finisher didn't give me much of the matte finish I was wanting but overall I'm quite pleased. Olive is my favorite color so when I learned the Cassie had been discontinued, I knew this would be my next project!
Cassie camera bag in Taupe is my next project...going black which will go great with the silver hardware. Any tips on achieving a closer to matte finish appreciated.
Thanks for letting me share!
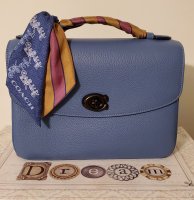
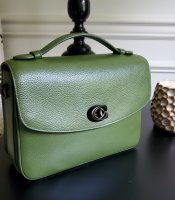
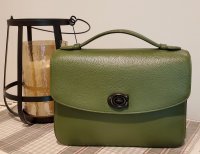


Very excited to see the results!
Regarding the hardware, some users are mentioning that you don't have to remove it. I have also polished without removing but I do so very carefully in order not to get the product on the leather. I have gotten some brasso on the leather and I quickly wipe it away and apply conditioner to the area because I can see it become instantly dehydrated. I feel that to do a more thorough polish, removing it is best, but if youre not totally comfortable doing that or if the brass doesn't look too bad, then no need!
Someone actually messaged me after saying that Wizard's metal renew is much better than brasso (and doesn't smell, even if you don't mind it), and I see that @Paris Girl mentioned using this product as well.
Sometimes you rehab a bag where the hardware can't be removed because it isn't accessible. I recently had that situation with the red Madison Spence. I taped around the hardware to protect the leather, started with 0000 steel wool, then switched to the coarser side of a scratch-free dish sponge. The results with the sponge were easier on the hands, less effort in general and beautiful!

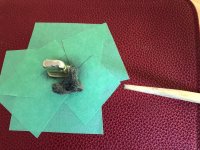

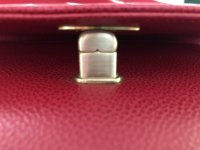
*Second vaccine yesterday... feeling tired, but extremely grateful to have been able to do my part as a responsible world citizen*
Hi all!
Just wanted to share my latest Cassie repaint. It started out as stone blue (1st photo) but I'm not a big blue bag girl (acquired Madison in Azure during the sale which scratched that itch).
Anyhow...I used all Angelus products...deglazer, acrylic leather paint in Avocado & matte finisher. The Angelus products were really easy to use (as opposed to the Fieblings I had used in the past). The matte finisher didn't give me much of the matte finish I was wanting but overall I'm quite pleased. Olive is my favorite color so when I learned the Cassie had been discontinued, I knew this would be my next project!
Cassie camera bag in Taupe is my next project...going black which will go great with the silver hardware. Any tips on achieving a closer to matte finish appreciated.
Thanks for letting me share!
View attachment 5128742View attachment 5128743View attachment 5128744
What a gorgeous result, @Teagaggle !!!

It's beautiful but I loved the original blue. That is my favorite color. Did you try the Angelus duller? I have added some to the paint I'm using. I'm not sure how well it is working. I don't think your bag is too shiny.Hi all!
Just wanted to share my latest Cassie repaint. It started out as stone blue (1st photo) but I'm not a big blue bag girl (acquired Madison in Azure during the sale which scratched that itch).
Anyhow...I used all Angelus products...deglazer, acrylic leather paint in Avocado & matte finisher. The Angelus products were really easy to use (as opposed to the Fieblings I had used in the past). The matte finisher didn't give me much of the matte finish I was wanting but overall I'm quite pleased. Olive is my favorite color so when I learned the Cassie had been discontinued, I knew this would be my next project!
Cassie camera bag in Taupe is my next project...going black which will go great with the silver hardware. Any tips on achieving a closer to matte finish appreciated.
Thanks for letting me share!
View attachment 5128742View attachment 5128743View attachment 5128744
Just removing the verdigris. I've cleaned it with vinegar before a bath.By cleaning do you mean just removing the verdigris or applying a metal polish to it first? I've never applied metal polish before dunking but I do try to clean as much of the verdigris off as possible before dunking.
Thank you! I did not try the duller. I'll order a small bottle & try it with my next job. I'll post here when I do! Thanks again!It's beautiful but I loved the original blue. That is my favorite color. Did you try the Angelus duller? I have added some to the paint I'm using. I'm not sure how well it is working. I don't think your bag is too shiny.
Register on TPF! This sidebar then disappears and there are less ads!
