Coach stopped using solid brass sometime in the 80s so I would expect it to just be plated. You can usually tell when it is solid brass as solid brass is very heavy, which is probably one of the reasons they stopped using it. Bags made in the 90s and later had a coating on top of the plating. Sometimes this coating wears off unevenly and the only way to get the brass looking good is remove the entire coating and shine up the brass. I personally wouldn't use a file - that seems like it would scratch. I use very fine steel wool along with brass polish. Usually the ring of the zipper pull isn't brass. The zipper itself can be polished with either vinegar or cape cod cloths.This was all so helpful @whateve , thank you!
So, quick recap of the progress on my made in the USA Companion Bag.
My bag was still pretty damp so multiple applications of CPR worked well and the leather is looking much better. I found Fiebings leather cement at my local art supply store and was able to fill in the gaps in the piping, but it soaks in and decreases as it sets so needs additional filling in. I’m slowly touching up the scraped-raw leather areas with a blend of matching acrylic thinned with CPR. It’s a little opaque, but covering the scrapes and cured Fiebings well. I’m considering adding some acrylic to the cement in the next round as a filler tint to mitigate the look of dried cement.
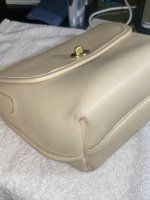
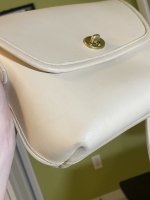
Question: I’m starting to address the verdigris on the brass. I saw a rehab short released by Coach that suggested using a fine nail buffer to remove scratches and tarnish, but I did a very light buff and I am worried I might be exposing silver. I thought the older bags were solid brass, but I either misunderstood and it’s brass over a base metal or clean brass is much cooler than I expected. Thoughts?
I planned to do a little buff and rub with the file before using Brasso and finishing with a Cape Cod cloth, but now I’m not sure what to do. I don’t want to stripe thinned brass, but I know any verdigris needs to be addressed. Any advice?
The Talon pull looks a little rusty too; nothing chunky, just discolored. Can I use Brasso here?
<em>In the picture, the right side has been lightly buffed; the left side under my finger has only been washed. </em>
View attachment 5101338
You are using an out of date browser. It may not display this or other websites correctly.
You should upgrade or use an alternative browser.
You should upgrade or use an alternative browser.
Coach Rehab and Rescue Club
- Thread starter greenpixie
- Start date
TPF may earn a commission from merchant affiliate
links, including eBay, Amazon, and others
More options
Who Replied?
Took the taupe Casino and black Metropolis outside this morning to dry out in the sun and turns out the Metropolis was also mouldy... I've hit it with vinegar.
That's it, I'm dousing every future bag in vinegar for an hour or so before dunking.
That's it, I'm dousing every future bag in vinegar for an hour or so before dunking.
Kudos on that rehab and thanks for sharing you 'special sauce' for the periwinkle refresh. Over the last few years, I thought, finding the touch up combo for periwinkle is like finding gold! I looked up at one point that periwinkle is from red and blue and then realized I don't have the interest and or patience at this for working with a detailed color touch up. Maybe in the future! So thanks for the dets.I used all Saphir Creme Surfine for the refresh in these colors: Blue Jean, violet, taupe, and cream. Mixed with a lot of CPR! If I was going to do it again, I’d probably use acrylic paint or Saphir Juvacuir to mix with the Blue Jean Creme Surfine instead of straight Creme Surfine! The CPR helped, but the Creme Surfine still took about a week before it felt permanent.
For the piping, I ended up mixing the Blue Jean Creme Surfine with purple and taupe Angelus leather paint and eggshell Saphir Creme renovatrice. This mix cured much faster than the Creme Surfine mix I used for the overall color refresh! It was alot thicker and I would cut it with lots of CPR if I was going to use this mix on more than the piping. Except for the Blue Jean Creme Surfine, I actually had all these product sitting around from various other rehabs
valv54 did an amazing touch up of a red Original Rambler using Saphir Surfine and mentioned it took a bit of time too for it to set, iirc.
Current state of things. Can't be bothered to do the hardware past a dash of Brasso so I'll leave the proper job for when I'm bored! I love how things are coming along today though!


I started to rehab my newly acquired BT basic bag made around 1980. When I dunked it, both the water and my hands turned a darkish honey colour. Several more dunks with hot water and Dawn did not reduce the honey colour. Neither did a run through the laundry. The glued-in serial number did not budge but neither did the honey seepage.
I don’t think that it had a coloured polish applied because filling the bag with water also turned that water honey coloured.
Is it possible that the bag was over saturated with BT colour when it was made?
I don’t think that it had a coloured polish applied because filling the bag with water also turned that water honey coloured.
Is it possible that the bag was over saturated with BT colour when it was made?
I started to rehab my newly acquired BT basic bag made around 1980. When I dunked it, both the water and my hands turned a darkish honey colour. Several more dunks with hot water and Dawn did not reduce the honey colour. Neither did a run through the laundry. The glued-in serial number did not budge but neither did the honey seepage.
I don’t think that it had a coloured polish applied because filling the bag with water also turned that water honey coloured.
Is it possible that the bag was over saturated with BT colour when it was made?
I have had bags where the color just runs no matter what. Oversaturation or maybe never firmly fixed? But the bags seem fine otherwise and haven't color transferred to clothes, so I put it down as a quirk of the dye process.

Thank you for your reassuring words.I have had bags where the color just runs no matter what. Oversaturation or maybe never firmly fixed? But the bags seem fine otherwise and haven't color transferred to clothes, so I put it down as a quirk of the dye process.
Thanks for the advice!
Just finished washing it with dawn (added a little white distilled vinegar too since it definitely smelled like a vintage coach bag) and it's nice and stuffed and ready to be conditioned! Looks like the stain came out! Hopefully the stain will still be out when it dries haha
In regards to the corners, they definitely look a little better after washing, but I may have to wait for it to dry to better assess. I guess I'm leaning more to a dye or some sort of leather color retouching product to match the texture of the leather more. I assumed acrylic paint would feel/look different and be more likely to crack, especially since its around the corners. I'm not looking to redye the whole bag, definitely would prefer to just touch up the parts that need it.
Attaching some progress pics below
View attachment 5099305
View attachment 5099306
View attachment 5099307
Got my paint, got my leather CPR and we're rolling on fixing this bag!
I'm using Folkart matte acrylic paint in the color "Linen" (#420). (Got this color recommendation after digging through TPF and finding @JOODLZ post, here's the link if anyone's curious https://forum.purseblog.com/threads/coach-rehab-and-rescue-club.624452/post-21647050). I would say it's a perfect match. Definitely looks a little lighter when you put it on a first, but after dabbing it and letting it dry, it's darkened a bit.
I'm using a small paint brush to kind of glob the paint/CPR mix on the worn parts and then quickly sponging over those areas with a damp painting sponge so that I can get the excess off and also to not lose the texture of the bag.
I find that it's a little tricky to paint since the Quincy style has corners that fold in, so if any paint gets in there it sort of pools. I've been wiping out any pooling with a damp paper towel so that it doesn't set in.
It's definitely going to need a couple of layers but I'm really liking the progress I'm seeing! Was pretty nervous about painting a bag myself for the first time but you guys have all been so helpful, I really appreciate it

Here's some pics with the first layer done (before pics quoted above)
Attachments
Very hot today, perfect rehab weather.
I didn't rehab my burgundy Rambler last weekend because I took advantage of the cooler weather to build a potting bench for my patio. I got two coats of paint on it before the humidity rolled in. This weekend is going to be 95°F and muggy so I will be more than happy to spend my time indoors in the air conditioning, dunking bags. Here's a before pic of my burgundy OG Rambler next to my mahogany OG Rambler. Stay tuned for after pics! (I tossed in a pic of my potting bench because I'm so proud of it. My Dad came over to help me but he made me do all the measuring and cutting. We had so much fun that I'm thinking of luring him over here to help me build a custom shelf for my bags.)
View attachment 5100784
View attachment 5100786
I am a turquoise girl through and through... and LOVE your potting bench!!!

Took the taupe Casino and black Metropolis outside this morning to dry out in the sun and turns out the Metropolis was also mouldy... I've hit it with vinegar.
That's it, I'm dousing every future bag in vinegar for an hour or so before dunking.
I dunk every bag with a generous amount (at least 4 cups) of white vinegar mixed in with the Dawn and hot water. It takes care of any mould issues and might save you a step in your rehab.

Got my paint, got my leather CPR and we're rolling on fixing this bag!
I'm using Folkart matte acrylic paint in the color "Linen" (#420). (Got this color recommendation after digging through TPF and finding @JOODLZ post, here's the link if anyone's curious https://forum.purseblog.com/threads/coach-rehab-and-rescue-club.624452/post-21647050). I would say it's a perfect match. Definitely looks a little lighter when you put it on a first, but after dabbing it and letting it dry, it's darkened a bit.
I'm using a small paint brush to kind of glob the paint/CPR mix on the worn parts and then quickly sponging over those areas with a damp painting sponge so that I can get the excess off and also to not lose the texture of the bag.
I find that it's a little tricky to paint since the Quincy style has corners that fold in, so if any paint gets in there it sort of pools. I've been wiping out any pooling with a damp paper towel so that it doesn't set in.
It's definitely going to need a couple of layers but I'm really liking the progress I'm seeing! Was pretty nervous about painting a bag myself for the first time but you guys have all been so helpful, I really appreciate it
Here's some pics with the first layer done (before pics quoted above)
It's looking great!
I dunk every bag with a generous amount (at least 4 cups) of white vinegar mixed in with the Dawn and hot water. It takes care of any mould issues and might save you a step in your rehab.
Thank you so much - I was actually going to ask you how much when I saw your post mentioning the other day!

Thank you! I love turquoise too. I have red brick walls, natural stain wood Adirondack patio furniture and an orange-ish clay chiminea so I think the turquoise potting bench will really pop on my patio. I wanted a burst of color out there in my little sanctuary.I am a turquoise girl through and through... and LOVE your potting bench!!!
This might be a dumb question but after retouching a bag with acrylic paint + CPR and it's fully dried, should the bag never be washed/dunked again? Would that wash off the acrylic paint?
Along the same vein, could you condition a bag that's been painted?
Along the same vein, could you condition a bag that's been painted?
My saddle Pony which I’m guessing was made around the 70s did the same. When I conditioned with my hands they came away orange, and no other bag has ever done that. It’s hasn’t “leaked” color since it’s been dry, thankfully.I started to rehab my newly acquired BT basic bag made around 1980. When I dunked it, both the water and my hands turned a darkish honey colour. Several more dunks with hot water and Dawn did not reduce the honey colour. Neither did a run through the laundry. The glued-in serial number did not budge but neither did the honey seepage.
I don’t think that it had a coloured polish applied because filling the bag with water also turned that water honey coloured.
Is it possible that the bag was over saturated with BT colour when it was made?
Register on TPF! This sidebar then disappears and there are less ads!