Will do!Stains on patent get incorporated into the coating and are impossible to get out. Painting is a challenge because of the glossy coating. Once I saw a youtube video in which someone removed the patent coating but it seemed really complicated. If you paint it, let us know what works and show us your results.
You are using an out of date browser. It may not display this or other websites correctly.
You should upgrade or use an alternative browser.
You should upgrade or use an alternative browser.
Coach Rehab and Rescue Club
- Thread starter greenpixie
- Start date
TPF may earn a commission from merchant affiliate
links, including eBay, Amazon, and others
More options
Who Replied?
Excellent thank you! I have them so I’ll give it a try today!Yes! Cape Cod Polishing Cloths work beautifully and leave no residue! (Available through Amazon). Be careful not to touch the leather with the product or it will leave a darkened area. If you touch the leather accidently, wipe immediately with CPR and the mark will disappear.
Thanks for the reminder to get these. I have been using random jewelry cloths but have actually removed hardware on the last few bags I cleaned and even with a little effort, the brass looks so nice. But I would like to do something for the zipper of my distressed Marketing Tote and this would be a good test case for them.Yes! Cape Cod Polishing Cloths work beautifully and leave no residue! (Available through Amazon). Be careful not to touch the leather with the product or it will leave a darkened area. If you touch the leather accidently, wipe immediately with CPR and the mark will disappear.
BTW, even with my budget jewelry wipes, there is a dusty residue. I bought the purple 3M Delicate Surface painter's tape and have used it on several bags to protect the leather. Removing it did not affect the surface of the leather. I know way back, there were posts on how some would wrap parts of the bag, very creatively, especially straps, handles when cleaning D rings, etc with plastic wrap!
I’ve tried painters tape too, it’s great!Thanks for the reminder to get these. I have been using random jewelry cloths but have actually removed hardware on the last few bags I cleaned and even with a little effort, the brass looks so nice. But I would like to do something for the zipper of my distressed Marketing Tote and this would be a good test case for them.
BTW, even with my budget jewelry wipes, there is a dusty residue. I bought the purple 3M Delicate Surface painter's tape and have used it on several bags to protect the leather. Removing it did not affect the surface of the leather. I know way back, there were posts on how some would wrap parts of the bag, very creatively, especially straps, handles when cleaning D rings, etc with plastic wrap!
Thanks for the reminder to get these. I have been using random jewelry cloths but have actually removed hardware on the last few bags I cleaned and even with a little effort, the brass looks so nice. But I would like to do something for the zipper of my distressed Marketing Tote and this would be a good test case for them.
BTW, even with my budget jewelry wipes, there is a dusty residue. I bought the purple 3M Delicate Surface painter's tape and have used it on several bags to protect the leather. Removing it did not affect the surface of the leather. I know way back, there were posts on how some would wrap parts of the bag, very creatively, especially straps, handles when cleaning D rings, etc with plastic wrap!
Cape Cod Polishing Cloths leave no residue whatsoever.

Sunny and hot again today and I spent a few hours slathering various conditioners on the Ergo Zip and distressed Dinky. They're sunning until the evening now and then I'll finish them. So happy with how the Ergo has turned out (so far)!
It's forecast to be even hotter tomorrow and Tuesday so I'm considering redunking the Camel Court but I've got a lot of work to get done so it will probably have to wait haha
haha
It's forecast to be even hotter tomorrow and Tuesday so I'm considering redunking the Camel Court but I've got a lot of work to get done so it will probably have to wait
hahaHi! New here, recently found tPF while researching vintage Willis. Found one, love it, but cannot for the life of me determine if it’s black or navy.
The Willis is in pretty good shape, but saggy and stinky; like must, talc, and stale perfume. I tried airing out, but she really needs a proper clean. I’m worried I’ll destroy her, but seeing your lovely rehabs is giving a me a boost of confidence.
I’d like to soak, but don’t know if that’s ok given the wooden dowel? I feel confident the brass would be fine, as I’ve seen good outcomes here. Just Dawn to clean and vinegar for the smell? Leather therapy instead? Should I remove the lock if I can? It’s a little tarnished.
Some stitching is loose around the dowel. Should I mend before soaking? Or will the leather plump so much that this will be a nightmare after? I have leather needles and waxed thread used from a recent boot/sole mend.
Finally, what do I do once it’s mostly-dry? Leather CPR? Apple? Blackrock? I’ve never used any of these, but have seen these mentioned in the Coach threads. Will need to order as the local hardware store guy looked as me like I was nuts when I asked. I’m in the US if that helps.
Anything else to be aware of? Thanks so much everyone!
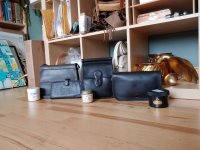
View attachment 5090114
View attachment 5090115
View attachment 5090116
View attachment 5090117
I find using a 1/8 flat head screwdriver the perfect tool for removing the D rings for cleaning and polishing. Pardon if this was already mentioned, I was away a bit and I am just now catching up on posts!
Last edited:
I just found the right number of air packs with which to stuff the Ergo Zip and now I wish I'd known before as it's not perfectly reshaped from the old clothes I stuffed it with after the dunk! Lol. I love the bag so much! Can't wait to start wearing it. Wish I had a (Camel) tan one also.Sunny and hot again today and I spent a few hours slathering various conditioners on the Ergo Zip and distressed Dinky. They're sunning until the evening now and then I'll finish them. So happy with how the Ergo has turned out (so far)!
It's forecast to be even hotter tomorrow and Tuesday so I'm considering redunking the Camel Court but I've got a lot of work to get done so it will probably have to wait
I roll up towels in a sausage to stuff mine...tend to take them out about 2 hours after dunk when I do my first CPR.I just found the right number of air packs with which to stuff the Ergo Zip and now I wish I'd known before as it's not perfectly reshaped from the old clothes I stuffed it with after the dunk! Lol. I love the bag so much! Can't wait to start wearing it. Wish I had a (Camel) tan one also.
Okay, end results are in! Lol. One thing I didn't think about though was that I conducted my experiment on black bags (and 1 gray) which would not account for any darkening of the leather the various products might produce... I think I will have to do this again! I'm such a dork.Well, I'm getting these started later then I'd planned. I had a big test to take for grad school, focused on that for some time. Anyway, here they go! But I have a question. On the bag with the top bar thingy (I can't remember the name right now--my brain...), do y'all take that out before you dunk it? It seems like the wise choice to me, but I can't get it out of there. I got the hardware off (and it was quite gross), but that thing (is it wood?) is in there very snugly. Any advice?
Anyway, here are the bags, sans hardware still and with one coat of each product. I think I'll do a second coat on them since they were all super dry. Y'all, I gotta say, I like them all! I used the same method with each, warming the oils by rubbing my palms together until quite warm and rubbing into the bag also until heat was generated. I used a drier afterward very carefully because I'd never done it before. I'm not sure I even got close enough to have an effect. I was a bit nervous.
In application I prefer the spreadability of Renapur and Obenauf's, but I feel like all the bags came out pretty shiny. The BR might be the best in terms of shine though. Here are pics of each bag with the products used.
Attachments
-
 20210530_160925.jpg184.9 KB · Views: 33
 -
 20210530_160843.jpg177.7 KB · Views: 32
 -
 20210530_160937.jpg204.8 KB · Views: 28
 -
 20210530_160941.jpg258.6 KB · Views: 27
 -
 20210530_160947_HDR.jpg195.6 KB · Views: 28
 -
 20210530_162545.jpg235.7 KB · Views: 28
 -
 20210530_162555.jpg289.2 KB · Views: 26
 -
 20210530_162608_HDR.jpg232.9 KB · Views: 23
Okay, end results are in! Lol. One thing I didn't think about though was that I conducted my experiment on black bags (and 1 gray) which would not account for any darkening of the leather the various products might produce... I think I will have to do this again! I'm such a dork.
Anyway, here are the bags, sans hardware still and with one coat of each product. I think I'll do a second coat on them since they were all super dry. Y'all, I gotta say, I like them all! I used the same method with each, warming the oils by rubbing my palms together until quite warm and rubbing into the bag also until heat was generated. I used a drier afterward very carefully because I'd never done it before. I'm not sure I even got close enough to have an effect. I was a bit nervous.
In application I prefer the spreadability of Renapur and Obenauf's, but I feel like all the bags came out pretty shiny. The BR might be the best in terms of shine though. Here are pics of each bag with the products used.
Are you able to share how you use the drier? Do you mean like a blow drier for hair? Thanks! They are all lovely!
I just held it near the bags so a bit of heat reached them. When they felt warmish I rubbed the product in a little more, each side at a time. Mind you, I'm totally experimenting. I believe there are a couple people on here who have this heat method down.Are you able to share how you use the drier? Do you mean like a blow drier for hair? Thanks! They are all lovely!
I just held it near the bags so a bit of heat reached them. When they felt warmish I rubbed the product in a little more, each side at a time. Mind you, I'm totally experimenting. I believe there are a couple people on here who have this heat method down.
Thank you for your reply! I hope you will share more photos!
I just held it near the bags so a bit of heat reached them. When they felt warmish I rubbed the product in a little more, each side at a time. Mind you, I'm totally experimenting. I believe there are a couple people on here who have this heat method down.
I did the same thing as you when I worked on an extremely dry Plaza last year. I slathered it in Renapur & hit it with a hairdryer for 10 mins before letting it sit & wiping off the excess. The results were really good from what I can remember but I never kept the bag so I have no idea if some of the dryness ever came back. I did make sure to tell the buyer to condition it periodically in the note I wrote so hopefully it’s still ok, wherever it is…lol
How would you repair the stitching on this bag?
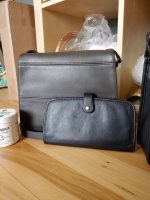
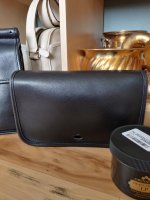
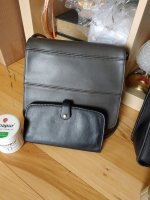
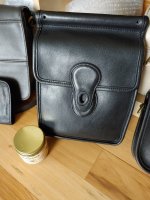
I recently picked up a black Willis that was made in Turkey in 1998 at a good price and it is in pretty good shape except for one major issue.
The stitching is ripped on both sides where the flap attaches to the dowel rod, see picture below. I have occasionally sewn up a couple of loose/missing stitches on a few bags and it worked okay, but it was hard work and I don't know if my limited skills are up to this major challenge.
What do you think? Should I take it straight to the Cobbler and ask to have it sewn professionally or should I first try to repair it myself?
If you've ever done a major sewing rehab on a leather bag, how would you advise me to proceed? Please be specific - what type of thread, needle, and tools would you use? Would you start at the ends and work toward the middle or vice versa? Would you try to glue it before you start stictching to hold it in place?
Help! And thanks in advance for your advice!
View attachment 5090573
I would take it to a cobbler! I did the same type of sewing on my Post Pouch on just one side and it was sooooo hard to get the needle straight through. There’s some sort of hard layer (maybe plastic?) in between the leather layers that you need to get the needle through as well, or at least there was on my Post Pouch.
I'm really interested in learning how you end up fixing this. I have an aubergine Willis that needs to be re-stitched.
I am really grateful to have found an excellent, old school, cobbler a few months ago. She has done 3 absolutely invisible repairs for me on piping that had pulled away from the seam. The only downside is that she is quite elderly and likely to retire at any time. With our hobby finding one we can trust is so helpful!
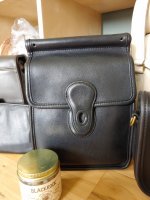
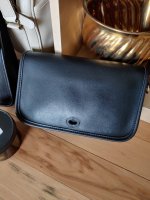
Well, taking the Black Willis to the Cobbler was the right decision, I picked it up yesterday and it looks great! I haven't rehabbed it yet but I am sure that it will turn out well.
He said that the thread was dry-rotted and that's the reason it gave way at both corners (the pressure points). He restictched the entire top of the bag below the dowel rod.
It wasn't cheap ($18) which is the same amount that I paid for the bag, but it looks much better. I could never have repaired it myself. Here are some pictures after the stitching was professionally repaired.


Last edited:
Register on TPF! This sidebar then disappears and there are less ads!