Well, I think I've done all I can for my hippie. It's not perfect by any means. The crease on the flap is making me a little crazy, but the upper corner of pocket underneath is very stiff and causing the flap to keep bending. There are some stains on the leather, some unevenness to the color throughout, and, of course, my cracked corners. But it's got that distressed look I wanted and the leather is in much better shape, so I'm a happy camper.
I did probably a 20 minute soak with dawn and hot water, scrubbed with a tooth brush, then rinsed. When it was still damp, I did two coats of leather therapy (maybe 4 on the corner cracks). I then did an unknown number of coats of CPR (it was a lot), again with extras on the corners. I touched up the areas where the edge coating was cracked/missing the best I could with leather paint, and then did one coat of blackrocks.
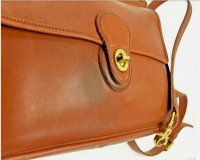
I forgot to take my own before photos, so I'm just going to take them from the listing.
Before:


After:


Thanks for all the advice throughout this process!
I did probably a 20 minute soak with dawn and hot water, scrubbed with a tooth brush, then rinsed. When it was still damp, I did two coats of leather therapy (maybe 4 on the corner cracks). I then did an unknown number of coats of CPR (it was a lot), again with extras on the corners. I touched up the areas where the edge coating was cracked/missing the best I could with leather paint, and then did one coat of blackrocks.
I forgot to take my own before photos, so I'm just going to take them from the listing.
Before:
After:
Thanks for all the advice throughout this process!


 I feel like it goes with everything!
") But if anyone is looking, say the word!
But if anyone is looking, say the word!