I have wasted tons of time doing this! Once I found a thread in which they discussed interesting threads from the past, and I had to check out those threads. Some took days to read.
Thread inception! Lol

TPF may earn a commission from merchant affiliate
links, including eBay, Amazon, and others
I have wasted tons of time doing this! Once I found a thread in which they discussed interesting threads from the past, and I had to check out those threads. Some took days to read.

I usually go down a rabbit hole on this site, lmao. So many threads I didn’t even know existed! Sometimes I wander off into the off topic, non-bag related threads & am throughly entertained by the discussions! (as a lurker)
Ohh...thats tiny!I purchased this legacy collection Amanda based on the Pony Express on a local classified site. I couldn’t believe how small it was in person lol!
Anyways, can someone tell me how to reshape these later made bags? Is it possible to dunk them? This one had a cotton lining. TYIA!:
View attachment 5069479View attachment 5069480
Personally, I wouldn't dunk that if I could get away with not dunking. I've never had a black bag from that collection but with all the others I've had, the color is only on the surface. That bag looks like it is in great condition other than being a little squished. I'd stuff it and put it in a steamy room. I'd take the strap off and flatten it under a stack of books.I purchased this legacy collection Amanda based on the Pony Express on a local classified site. I couldn’t believe how small it was in person lol!
Anyways, can someone tell me how to reshape these later made bags? Is it possible to dunk them? This one had a cotton lining. TYIA!:
View attachment 5069479View attachment 5069480
I agree....even I would find a way to buy it from themPersonally, I wouldn't dunk that if I could get away with not dunking. I've never had a black bag from that collection but with all the others I've had, the color is only on the surface. That bag looks like it is in great condition other than being a little squished. I'd stuff it and put it in a steamy room. I'd take the strap off and flatten it under a stack of books.
ETA: I wish Coach would remake that bag in a larger size. I know it would sell well. They are missing out on a golden opportunity.
Ohh...thats tiny!
ETA...Ive did a more modern bag with a cotton lining...just the same as the vintage bag. My 2006? Parker shoulder bag with the nice smooshy leather came out fine.
Personally, I wouldn't dunk that if I could get away with not dunking. I've never had a black bag from that collection but with all the others I've had, the color is only on the surface. That bag looks like it is in great condition other than being a little squished. I'd stuff it and put it in a steamy room. I'd take the strap off and flatten it under a stack of books.
ETA: I wish Coach would remake that bag in a larger size. I know it would sell well. They are missing out on a golden opportunity.
I agree....even I would find a way to buy it from them
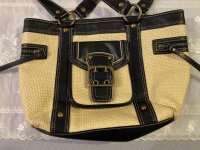
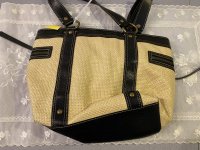
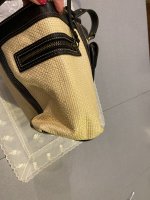
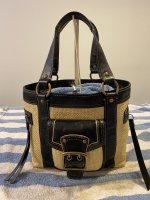
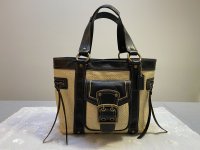
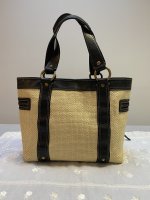
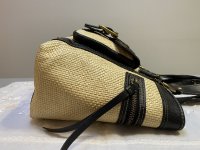
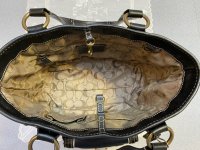
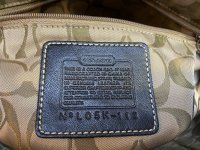
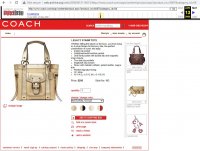
Here is my latest rehab, I've been focusing on summery bags lately! It is the Legacy Straw Tote 113 in Natural/Black with Brass hardware that was released in Spring 2006 for $298. The bag also came in Natuaral/Gold, Natural/White, and Natural/Red.
I paid $10 for the bag at a local thrift store and it was kindly authenticated by @BeenBurned. It was in decent condition except that it had been squashed like a pancake and the hangtag was missing. I already knew that it's possible to reshape these straw bag because I had rehabbed the same (or similar) bag in Natural/Gold several years ago; but I was worried that the black leather color might bleed into the straw during bathing.
Before dunking the bag I did some spot-testing for color bleed. First I dunked the tassels in warm water and soap and looked for black coloration in the water but there was nothing. Next I tried dunking the handles but there was still no bleeding. Finally, I lifted the flap on the front pocket and spot-tested an area that wouldn't show, by scrubbing both the leather and the straw with sudsy water; there was no color-bleeding so I felt comfortable moving forward to give the bag a bath.
I dunked the bag in the sink with Dawn and warm water. Even though the bag looked pretty clean the water soon turned dirty gray. I've seen this before with straw/woven bags. I think that dust collects in the woven spaces over time. I changed the water and suds and gave it a second bath, scrubbing the bottom corners and some spots on the lining. Then I rinsed it well in clean water, let it drain, and stuffed it for drying.
Proper shaping is always important when rehabbing any bag, but I've learned the hard way that it is even more important with a light-weight bag like a straw bag - especially when that bag has a heavy pocket, flap, or buckle on the front. If you don't get the weighting right during shaping, the bag may fall forward on its face whenever you set it down after drying!
I overstuffed the bag with towels and used facecloths to stuff the outside pocket. I inserted a heavy pyrex glass lid inside the bag near the rear and tried to angle it a little toward the back to counterweight the front pocket. I used wooden kitchen utensils to position the handles properly during drying.
After a day of drying I removed the towels and pulled the lining outside so that it could continue drying. Next I conditioned the leather trim with leather CPR and Blackrocks and gave it a brisk brushing.
I hate to polish brass so I insist that Legacy style bags are supposed to have antique gold. I did a little brass polishing but not a lot.
To protect this delicate bag I applied FrayChek to the 4 bottom corners and I sprayed the bag with Apple Garde Rain & Stain Repellent. I replaced the hangtag with the best option I had available. I used a black hangtag with contrast stitching, similar to the original, but I think that it is a little smaller than the original.
See below for before, during, and after rehab pictures of the Legacy Straw Tote 113 (Natural/Black, 2006). Also below is the original listing for the bag on the Coach website on April 13, 2006 as found on the Wayback Machine.
Before Rehab:
View attachment 5069783
View attachment 5069784
View attachment 5069785
During Rehab (Drying and Shaping After Bathing):
View attachment 5069786
After Rehab:
View attachment 5069788
View attachment 5069789
View attachment 5069790
View attachment 5069791
View attachment 5069796
Listing on the Coach Website (April 13, 2006):
View attachment 5069794
 Thank you so much for the tutorial! I always learn so much from you!
Well, vinegar bath has definitely helped. Leather felt very stiff and dry after, but the improvements I made in the shape prior to the mold questions were not lost. Still have some suspicious spots, but they are lighter. Still faintly reeks of vinegar.I’m feeling optimistic after a vinegar soak. I don’t mind my house smelling of vinegar and the bag is sunning now. Will update later.
Again...Its Magic!Here is my latest rehab, I've been focusing on summery bags lately! It is the Legacy Straw Tote 113 in Natural/Black with Brass hardware that was released in Spring 2006 for $298. The bag also came in Natuaral/Gold, Natural/White, and Natural/Red.
I paid $10 for the bag at a local thrift store and it was kindly authenticated by @BeenBurned. It was in decent condition except that it had been squashed like a pancake and the hangtag was missing. I already knew that it's possible to reshape Coach straw bags because I had rehabbed the same (or similar) bag in Natural/Gold several years ago; but I was worried that the black leather color might bleed into the straw during bathing.
Before dunking the bag I did some spot-testing for color bleed. First I dunked the tassels in warm water and soap and looked for black coloration in the water but there was nothing. Next I tried dunking the handles but there was still no bleeding. Finally, I lifted the flap on the front pocket and spot-tested an area that wouldn't show by scrubbing both the straw and the leather with sudsy water, there was no color-bleeding so I felt comfortable moving forward to give the bag a bath.
I dunked the bag in the sink with Dawn and warm water. Even though the bag looked pretty clean the water soon turned dirty gray. I've seen this before with straw/woven bags. I think that dust collects in the woven spaces over time. I changed the water and suds and gave it a second bath, scrubbing the bottom corners and some spots on the lining. Then I rinsed it well in clean water, let it drain, and stuffed it for drying.
Proper shaping during drying is always important when rehabbing a bag, but I've learned the hard way that it is even more important with a light-weight bag like a straw bag - especially when that bag has a heavy pocket, flap, or buckle on the front. If you don't get the weighting right during shaping, the bag may fall forward on its face whenever you set it down after drying!
I overstuffed the bag with towels and used facecloths to stuff the outside pocket. I inserted a heavy pyrex glass lid inside the bag near the rear and tried to angle it a little toward the back to counterweight the front pocket. I used wooden kitchen utensils to position the handles properly during drying.
After a day of drying I removed the towels and pulled the lining outside so that it could continue drying. Next I conditioned the leather trim with leather CPR and Blackrocks and gave it a brisk brushing.
I hate to polish brass so I insist that Legacy style bags are actually supposed to have an antique gold finish. I did a little brass polishing but not a lot.
To protect this delicate bag I applied FrayChek to the 4 bottom corners and I sprayed the bag with Apple Garde Rain & Stain Repellent. I replaced the hangtag with the best option I had available. I used a black hangtag with contrast stitching, similar to the original, but I think that it is a little smaller than the original.
See below for before, during, and after rehab pictures of the Legacy Straw Tote 113 (Natural/Black, 2006). Also below is the original listing for the bag on the Coach website on April 13, 2006 as found on the Wayback Machine.
Before Rehab:
View attachment 5069783
View attachment 5069784
View attachment 5069785
During Rehab (Drying and Shaping After Bathing):
View attachment 5069786
After Rehab:
View attachment 5069788
View attachment 5069789
View attachment 5069790
View attachment 5069791
View attachment 5069796
Listing on the Coach Website (April 13, 2006):
View attachment 5069794
If this bag is a total loss to you, I would suggest sandding, use 800 grits sand paper lightly sand the entire leather surface, pay attention not to sand any stitching threads. It won't take out any polish in the leather pores, but will remove what is on the surface. You may end up with a Nubuc bag, or the leather may be already too fragile from all the chemicals used to handle sanding, but it worth trying when all else failed. I sanded two bags in the past ,both were very dirty bone colors, they were sanded to prepare for dyeing.I have officially been defeated by the shoe polish. Almost an entire one litre bottle of acetone, half a bottle of non-acetone nail polish remover, two thirds of Saphir Renomat, a cup of Fairy and countless other household chemicals not to mention tonnes of conditioner later, I have managed to remove maybe less than half of it. Soaking overnight twice turned out to have absolutely no effect and it's literally impossible to just budge. £££££!!!
She completely caked it up and left zero naked leather. If she had been so thorough and disciplined with literally any leather conditioner, I would instead be here singing her praises. I even called my local cobbler who said that it's most likely unfortunately all just soaked into the leather and wouldn't come out.
Love your straw bag rehabs! So inspiring!Here is my latest rehab, I've been focusing on summery bags lately! It is the Legacy Straw Tote 113 in Natural/Black with Brass hardware that was released in Spring 2006 for $298. The bag also came in Natuaral/Gold, Natural/White, and Natural/Red.
I paid $10 for the bag at a local thrift store and it was kindly authenticated by @BeenBurned. It was in decent condition except that it had been squashed like a pancake and the hangtag was missing. I already knew that it's possible to reshape Coach straw bags because I had rehabbed the same (or similar) bag in Natural/Gold several years ago; but I was worried that the black leather color might bleed into the straw during bathing.
Before dunking the bag I did some spot-testing for color bleed. First I dunked the tassels in warm water and soap and looked for black coloration in the water but there was nothing. Next I tried dunking the handles but there was still no bleeding. Finally, I lifted the flap on the front pocket and spot-tested an area that wouldn't show by scrubbing both the straw and the leather with sudsy water, there was no color-bleeding so I felt comfortable moving forward to give the bag a bath.
I dunked the bag in the sink with Dawn and warm water. Even though the bag looked pretty clean the water soon turned dirty gray. I've seen this before with straw/woven bags. I think that dust collects in the woven spaces over time. I changed the water and suds and gave it a second bath, scrubbing the bottom corners and some spots on the lining. Then I rinsed it well in clean water, let it drain, and stuffed it for drying.
Proper shaping during drying is always important when rehabbing a bag, but I've learned the hard way that it is even more important with a light-weight bag like a straw bag - especially when that bag has a heavy pocket, flap, or buckle on the front. If you don't get the weighting right during shaping, the bag may fall forward on its face whenever you set it down after drying!
I overstuffed the bag with towels and used facecloths to stuff the outside pocket. I inserted a heavy pyrex glass lid inside the bag near the rear and tried to angle it a little toward the back to counterweight the front pocket. I used wooden kitchen utensils to position the handles properly during drying.
After a day of drying I removed the towels and pulled the lining outside so that it could continue drying. Next I conditioned the leather trim with leather CPR and Blackrocks and gave it a brisk brushing.
I hate to polish brass so I insist that Legacy style bags are actually supposed to have an antique gold finish. I did a little brass polishing but not a lot.
To protect this delicate bag I applied FrayChek to the 4 bottom corners and I sprayed the bag with Apple Garde Rain & Stain Repellent. I replaced the hangtag with the best option I had available. I used a black hangtag with contrast stitching, similar to the original, but I think that it is a little smaller than the original.
See below for before, during, and after rehab pictures of the Legacy Straw Tote 113 (Natural/Black, 2006). Also below is the original listing for the bag on the Coach website on April 13, 2006 as found on the Wayback Machine.
Before Rehab:
View attachment 5069783
View attachment 5069784
View attachment 5069785
During Rehab (Drying and Shaping After Bathing):
View attachment 5069786
After Rehab:
View attachment 5069788
View attachment 5069789
View attachment 5069790
View attachment 5069791
View attachment 5069796
Listing on the Coach Website (April 13, 2006):
View attachment 5069794
