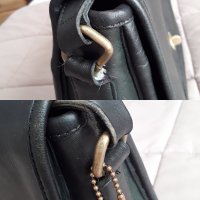
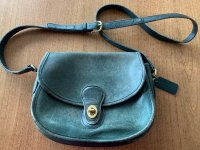
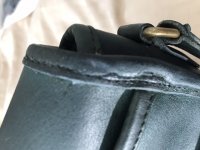
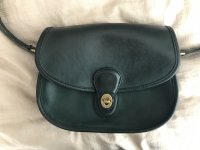
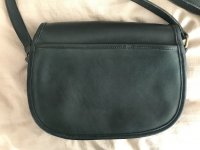
The derby always looks deceptively larger than it really is.My BT Derby arrived. It is smaller than I expected. I planned it for use as a small bag with few items but had hoped it could be an everyday bag too. Not an everyday for me it seems. She is kind of stiff, had verdigris at the lock, a mark on her bottom lining which also needs gluing, parts of the strap are nearly black and it has a slight odor of perfume
I wiped her down with vinegar and used some on the brass to take the green off. She is hanging in the garage to air. Anticipating dunking on Monday.
Should I glue before or after the dunk?
View attachment 4720694 View attachment 4720695 View attachment 4720696 View attachment 4720697
You are using an out of date browser. It may not display this or other websites correctly.
You should upgrade or use an alternative browser.
You should upgrade or use an alternative browser.
Coach Rehab and Rescue Club
- Thread starter greenpixie
- Start date
TPF may earn a commission from merchant affiliate
links, including eBay, Amazon, and others
More options
Who Replied?Oooh, wee little thing! So cute. I'd glue after the dunk.My BT Derby arrived. It is smaller than I expected. I planned it for use as a small bag with few items but had hoped it could be an everyday bag too. Not an everyday for me it seems. She is kind of stiff, had verdigris at the lock, a mark on her bottom lining which also needs gluing, parts of the strap are nearly black and it has a slight odor of perfume
I wiped her down with vinegar and used some on the brass to take the green off. She is hanging in the garage to air. Anticipating dunking on Monday.
Should I glue before or after the dunk?
View attachment 4720694 View attachment 4720695 View attachment 4720696 View attachment 4720697
I wanted it for times like Thanksgiving when we go out and I want something nicer looking, but small to fit under my napkin so I can wear it up with me to get food, that would hold my phone, sanitizer, tissues and at least my small wallet. It should do that, but not much elseThe derby always looks deceptively larger than it really is.
It was me. It takes some finesse to get it to look perfect. It is always hard to match it to a factory coat edge. Usually I end up removing all the factory coating and redoing the entire edge. You could try adding more paint and try to shape it with your fingers. Or you could do it with leather cement and then cover it with paint.@whateve I think you recommend the puff paint for edge fix on straps. I can't find the post.
If it wasn't you, maybe you can still help?
I got the puff paint, put a coat on, it covered the "naked" areas really well and matched the factory edge coat. Is there any tricks to get it to look as close to the actual edge coat? Mine is more flat as where you know the factory one is more "domed?". Maybe I didn't add enough? There's still a dip where the factory edge coat stops and the puff paint starts.
Just having a hard time. Obviously. Lol
I bought this green prairie bag off Craigslist and this one was an ordeal to rehab!
It was super dry and the color was faded. I am usually willing to pay more for a bag in better condition but vintage coach is rare where I live and I wanted to save it.
After dunking the first time and moisturizing with both chamberlains leather milk and balm, it improved slightly but the color was still faded. I had some aqua and black fiebings leather dye, mixed some and painted. It came out streaky so I used acetone to remove the dye, then mixed the dyes with leather milk to apply again. Colorwise, it was a success! Not 100% but it has the burnished look. However, after dunking a second time to remove the excess dye, while most of bag turned out OK after moisturizing (again, chamberlains), the flap was really dry like sandpaper. While dying, I also noticed that the piping was resewn at some point but it was really crooked and the inner pocket piece was starting to come apart. I hand sewed that part of the piping and attached the pocket piece... not the best sew job but stitches are finally straight.
There’s actually more crooked stitches on the other side of the bag but that side is holding up structurally and crooked stitches can only be seen from the back... hand stitching was a pain so I’m going to leave as is. Going back to the dry flap, I finally caved and bought some Leather cpr. After another dunk to remove impurities and what seemed like 15 coats of Leather CPR... voila! The stitches are still crooked on one side at the back (on the left, handstitching on the right) but I can live with it.
It was super dry and the color was faded. I am usually willing to pay more for a bag in better condition but vintage coach is rare where I live and I wanted to save it.

After dunking the first time and moisturizing with both chamberlains leather milk and balm, it improved slightly but the color was still faded. I had some aqua and black fiebings leather dye, mixed some and painted. It came out streaky so I used acetone to remove the dye, then mixed the dyes with leather milk to apply again. Colorwise, it was a success! Not 100% but it has the burnished look. However, after dunking a second time to remove the excess dye, while most of bag turned out OK after moisturizing (again, chamberlains), the flap was really dry like sandpaper. While dying, I also noticed that the piping was resewn at some point but it was really crooked and the inner pocket piece was starting to come apart. I hand sewed that part of the piping and attached the pocket piece... not the best sew job but stitches are finally straight.

There’s actually more crooked stitches on the other side of the bag but that side is holding up structurally and crooked stitches can only be seen from the back... hand stitching was a pain so I’m going to leave as is. Going back to the dry flap, I finally caved and bought some Leather cpr. After another dunk to remove impurities and what seemed like 15 coats of Leather CPR... voila! The stitches are still crooked on one side at the back (on the left, handstitching on the right) but I can live with it.


Oh good! I was afraid I was bothering you for no reason. Lol glad it was you.It was me. It takes some finesse to get it to look perfect. It is always hard to match it to a factory coat edge. Usually I end up removing all the factory coating and redoing the entire edge. You could try adding more paint and try to shape it with your fingers. Or you could do it with leather cement and then cover it with paint.
I'll try to reshape it once I add another coat. If that doesn't work, I'll just remove it all and put it all back on. It doesn't look bad. It just looks awkward.
What a great colour...and what an ordeal to get it that way.I bought this green prairie bag off Craigslist and this one was an ordeal to rehab!
It was super dry and the color was faded. I am usually willing to pay more for a bag in better condition but vintage coach is rare where I live and I wanted to save it.
View attachment 4720810
After dunking the first time and moisturizing with both chamberlains leather milk and balm, it improved slightly but the color was still faded. I had some aqua and black fiebings leather dye, mixed some and painted. It came out streaky so I used acetone to remove the dye, then mixed the dyes with leather milk to apply again. Colorwise, it was a success! Not 100% but it has the burnished look. However, after dunking a second time to remove the excess dye, while most of bag turned out OK after moisturizing (again, chamberlains), the flap was really dry like sandpaper. While dying, I also noticed that the piping was resewn at some point but it was really crooked and the inner pocket piece was starting to come apart. I hand sewed that part of the piping and attached the pocket piece... not the best sew job but stitches are finally straight.
View attachment 4720811
There’s actually more crooked stitches on the other side of the bag but that side is holding up structurally and crooked stitches can only be seen from the back... hand stitching was a pain so I’m going to leave as is. Going back to the dry flap, I finally caved and bought some Leather cpr. After another dunk to remove impurities and what seemed like 15 coats of Leather CPR... voila! The stitches are still crooked on one side at the back (on the left, handstitching on the right) but I can live with it.
View attachment 4720812 View attachment 4720813
I love this rehab narrative and admire your tenacity in "saving" this bag. It's just gorgeous and looks many times better than before you brought it back to life.....good for you!!!I bought this green prairie bag off Craigslist and this one was an ordeal to rehab!
It was super dry and the color was faded. I am usually willing to pay more for a bag in better condition but vintage coach is rare where I live and I wanted to save it.
View attachment 4720810
After dunking the first time and moisturizing with both chamberlains leather milk and balm, it improved slightly but the color was still faded. I had some aqua and black fiebings leather dye, mixed some and painted. It came out streaky so I used acetone to remove the dye, then mixed the dyes with leather milk to apply again. Colorwise, it was a success! Not 100% but it has the burnished look. However, after dunking a second time to remove the excess dye, while most of bag turned out OK after moisturizing (again, chamberlains), the flap was really dry like sandpaper. While dying, I also noticed that the piping was resewn at some point but it was really crooked and the inner pocket piece was starting to come apart. I hand sewed that part of the piping and attached the pocket piece... not the best sew job but stitches are finally straight.
View attachment 4720811
There’s actually more crooked stitches on the other side of the bag but that side is holding up structurally and crooked stitches can only be seen from the back... hand stitching was a pain so I’m going to leave as is. Going back to the dry flap, I finally caved and bought some Leather cpr. After another dunk to remove impurities and what seemed like 15 coats of Leather CPR... voila! The stitches are still crooked on one side at the back (on the left, handstitching on the right) but I can live with it.
View attachment 4720812 View attachment 4720813
I bought this green prairie bag off Craigslist and this one was an ordeal to rehab!
It was super dry and the color was faded. I am usually willing to pay more for a bag in better condition but vintage coach is rare where I live and I wanted to save it.
View attachment 4720810
After dunking the first time and moisturizing with both chamberlains leather milk and balm, it improved slightly but the color was still faded. I had some aqua and black fiebings leather dye, mixed some and painted. It came out streaky so I used acetone to remove the dye, then mixed the dyes with leather milk to apply again. Colorwise, it was a success! Not 100% but it has the burnished look. However, after dunking a second time to remove the excess dye, while most of bag turned out OK after moisturizing (again, chamberlains), the flap was really dry like sandpaper. While dying, I also noticed that the piping was resewn at some point but it was really crooked and the inner pocket piece was starting to come apart. I hand sewed that part of the piping and attached the pocket piece... not the best sew job but stitches are finally straight.
View attachment 4720811
There’s actually more crooked stitches on the other side of the bag but that side is holding up structurally and crooked stitches can only be seen from the back... hand stitching was a pain so I’m going to leave as is. Going back to the dry flap, I finally caved and bought some Leather cpr. After another dunk to remove impurities and what seemed like 15 coats of Leather CPR... voila! The stitches are still crooked on one side at the back (on the left, handstitching on the right) but I can live with it.
View attachment 4720812 View attachment 4720813
You really worked hard for it, but what a gorgeous color!
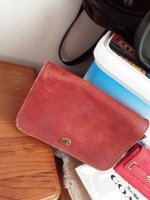
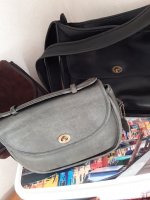
ok ..it was Christmas for me this arvo.
5 items delivered.
The wallet which wont take me much to fix up...little bit of glue and a clean and fill her up.
The taft is fab...but the verdigris is blah...knew it was there but will have to do a lot on the zipper.
The precreed looks rust more than red and she will be dunked as she is dirty...and anchors on the clips.
Same with the plaza..bit more faded than I thought but she has anchors as well.
The Berkeley is in great condition...shes getting a dunk as soon as she can.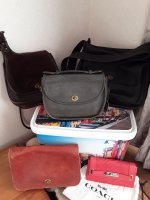


What a great colour...and what an ordeal to get it that way.
I love this rehab narrative and admire your tenacity in "saving" this bag. It's just gorgeous and looks many times better than before you brought it back to life.....good for you!!!
You really worked hard for it, but what a gorgeous color!
Thank you
 ! I almost gave up but everyone keeps raving about Leather CPR and it worked. Thank you all for sharing your rehab stories and great tips!
What a treasure trove. Do you find the Taft too big? The pre creed will probably surprise you. The color will become more vibrant after a dunk.ok ..it was Christmas for me this arvo.
5 items delivered.
The wallet which wont take me much to fix up...little bit of glue and a clean and fill her up.
The taft is fab...but the verdigris is blah...knew it was there but will have to do a lot on the zipper.
The precreed looks rust more than red and she will be dunked as she is dirty...and anchors on the clips.
Same with the plaza..bit more faded than I thought but she has anchors as well.
The Berkeley is in great condition...shes getting a dunk as soon as she can.View attachment 4720907 View attachment 4720908 View attachment 4720909
For me the taft is a perfect size....I kind of loved it as soon as I got it out of its box. I tend to like bigger bags as I tend to carry lots of unneeded crap.What a treasure trove. Do you find the Taft too big? The pre creed will probably surprise you. The color will become more vibrant after a dunk.
Yes..am looking forward to doing the precreed but think she might have a bit pf spue (sp) so might do try the hairdryer trick before anything else...wont hurt to try.
The plaza looks really nice in gray. I think it's my favorite out of this awesome lot. I can't wait to see it in its rehab glory.ok ..it was Christmas for me this arvo.
5 items delivered.
The wallet which wont take me much to fix up...little bit of glue and a clean and fill her up.
The taft is fab...but the verdigris is blah...knew it was there but will have to do a lot on the zipper.
The precreed looks rust more than red and she will be dunked as she is dirty...and anchors on the clips.
Same with the plaza..bit more faded than I thought but she has anchors as well.
The Berkeley is in great condition...shes getting a dunk as soon as she can.View attachment 4720907 View attachment 4720908 View attachment 4720909
Register on TPF! This sidebar then disappears and there are less ads!

