You are using an out of date browser. It may not display this or other websites correctly.
You should upgrade or use an alternative browser.
You should upgrade or use an alternative browser.
Coach Rehab and Rescue Club
- Thread starter greenpixie
- Start date
TPF may earn a commission from merchant affiliate
links, including eBay, Amazon, and others
More options
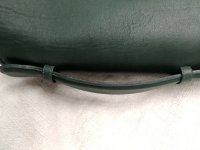
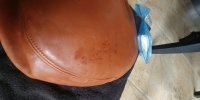
Who Replied?Don't have Crosby, but have 3 court bags. The green one is in like new condition, and the handle edge is factory sealed with same color paint. The black and navy court, both bags were in rough condition when I got them, the edge of handled were much worse than your crosby's. I painted both bag's edge of handles with same color paint.I need some advice. My green Crosby is nearing the end of its drying phase and I am not sure what to do with the edge of the handle. Should it look like this? If not, green leather paint (would need to buy) or clear ( which I have)?
View attachment 4707325
@Morgan_Bellini is your Crosby handle sealed in the edges?
It will looks better if you touch up the handle edge. Same color or slightly darker shade.
Attachments

Thanks! I could tell my Court was missing edge color, but this Crosby was so hard to tell. I think I am going to look into paint. Of course no shade of green is in my stable.Don't have Crosby, but have 3 court bags. The green one is in like new condition, and the handle edge is factory sealed with same color paint. The black and navy court, both bags were in rough condition when I got them, the edge of handled were much worse than your crosby's. I painted both bag's edge of handles with same color paint.
It will looks better if you touch up the handle edge. Same color or slightly darker shade.
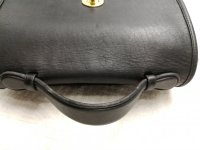
I was wrong, it appears that the handle edges on my Crosby are sealed or painted. I didn't notice before.I need some advice. My green Crosby is nearing the end of its drying phase and I am not sure what to do with the edge of the handle. Should it look like this? If not, green leather paint (would need to buy) or clear ( which I have)?
View attachment 4707325
@Morgan_Bellini is your Crosby handle sealed in the edges?

I was wrong, it appears that the handle edges on my Crosby are sealed or painted. I didn't notice before.
View attachment 4708058
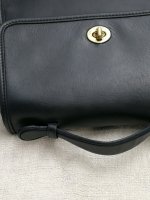
thanks! Looks like I am buying green paint
")
I have just received an order of super fine 000 steel wool and I have some questions. I have never used steel wool on hardware before; what method do you use when polishing hardware with steel wool? Can it scratch or damage the hardware if used improperly - how do you avoid that?
Do you always use the steel wool on brass or just when it seems to have a protective coating?
I see that the package advises wearing gloves and protective eyewear so I will do that - do you have any other tips for working with steel wool? My only prior experience has been scrubbing pots with a Brillo pad!
Last edited:
I have never worn protective eyewear (I wear glasses, maybe they qualify) and usually forget to wear gloves.I have just received an order of super fine 000 steel wool and I have some questions. I have never used steel wool on hardware before; what method do you use when polishing hardware with steel wool? Can it scratch or damage the hardware if used improperly - how do you avoid that?
Do you always use the steel wool on brass or just when it seems to have a protective coating?
I see that the package advises wearing gloves and protective eyewear so I will do that - do you have any other tips for working with steel wool? My only prior experience has been scrubbing pots with a Brillo pad!
I just pull a bit of the steel wool off and form it into a small ball (smaller than a marble) and rub the surface of the brass, coated or uncoated, turning the little ball until all has become shiny and thus no longer abrasive.
I have never worn protective eyewear (I wear glasses, maybe they qualify) and usually forget to wear gloves.
I just pull a bit of the steel wool off and form it into a small ball (smaller than a marble) and rub the surface of the brass, coated or uncoated, turning the little ball until all has become shiny and thus no longer abrasive.
I was going to start working on brass this weekend too!
After you use the steel wool, do you typically follow with polish and buffing?
Here is round 2 of my signature fabric experiment. I finally decided to just immerse the whole thing in the dye. It would have worked better if I had evenly saturated the fabric, but I was trying to hold the handles and lining out of the dye bath. Dye definitely has a blue tone, a midnight black instead of just flat black.
After rinsing for what seemed like hours I decided to throw the whole thing in the washing machine.
The dye worked fine, and the bag came through the rough treatment with flying colors, but my technique needed improvement to get even color all over.
I am done with this bag, and chalking it up to a learning experience. The wristlet is usable so I will keep that. Hope my experiment helps someone!
I just rub it with a small section of a Cape Cod Metal Polishing Cloth. I do use gloves for that!I was going to start working on brass this weekend too!
After you use the steel wool, do you typically follow with polish and buffing?
I think they both look awesome and I'd have never known you didn't buy them that way.Here is round 2 of my signature fabric experiment. I finally decided to just immerse the whole thing in the dye. It would have worked better if I had evenly saturated the fabric, but I was trying to hold the handles and lining out of the dye bath. Dye definitely has a blue tone, a midnight black instead of just flat black.
After rinsing for what seemed like hours I decided to throw the whole thing in the washing machine.
The dye worked fine, and the bag came through the rough treatment with flying colors, but my technique needed improvement to get even color all over.
I am done with this bag, and chalking it up to a learning experience. The wristlet is usable so I will keep that. Hope my experiment helps someone!
View attachment 4708313
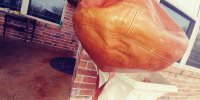
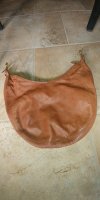
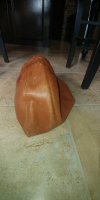
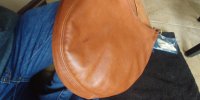
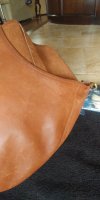
Here is my attempt at a not-so-fun rehab. I took a chance on this hobo style for $40 shipped to see if I even like the rounded body, and thought I could play with it as my first paint rehab while we are all stuck at home. Here are the before photos. Dry dry dry. Lots of scratches and scuffs and some loss of color along with some dark stains. There wasn't really a good side as both sides were not great looking. The last photo is after the dunk and hanging to dry.
Attachments
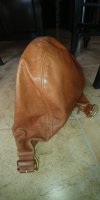
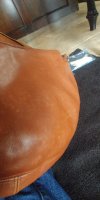
These photos were after it dried from the dunk and after maybe 3 coats of CPR. The areas of color loss did not really improve with CPR. Even the scratches and scuffs did not really improve all that much, which sometimes they do blend in with CPR on some bags and on some bags they don't, but generally I don't see a huge improvement until I apply Blackrock or Renapur. I did not apply either of those two products because I was waiting for some Wood n Stuff paint in british tan to arrive, and today it did arrive. The last photo was one of the first spots I started applying a paint and CPR mixture.
Attachments
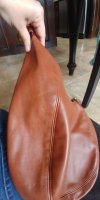
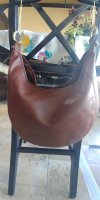
These photos are after I was finished applying the paint and CPR mixture. I have to admit, this was not really fun for me. But it was kind of cool to see how that mixture spread and made for an even application. I had to really concentrate some application in certain dark spots and like a fellow rehabber advised, layers layers layers is the key. That is very true. I was not really going for an amazing overhaul on this bag. I just wanted to get the dark spots to a place where they looked like natural wear on this color of leather. I am pretty happy with it although I cannot say for sure that I will feel comfortable carrying this bag that much because I will always feel like the stains and/or paint will look conspicuous in bright daylight and I will not want anyone to think I am carrying a bag with a bad, splotchy paint job. Anyway, I think it did get to a place of looking mostly like natural wear. On the spots where it looked pitted, it actually was not pitted, but that was a tough area to work on. I got it looking pretty good probably two times and told myself I better stop while it looked good but of course I didn't, I kept going sponging on more paint and trying to smooth it in and I messed it up so it took three attempts to get me to finally get to a natural look and then actually STOP there. So even thought it still looks like of pitted in photos, it is actually not, its that the paint color was actually a tad too light, so there are some light and dark variations right in that entire bottom corner area. I ended up applying the mixture to really the entire bag whereas when I began I thought I might only apply to the stains. The wrinkling on one side did not really improve but that is actually OK because it makes the bag feel pretty soft and it wraps right around me very nicely. Sorry so many pictures.


Register on TPF! This sidebar then disappears and there are less ads!