A cosmetic sponge is slightly different from the sponges that came with Renapur but I don't think it would matter. I like using the sponge because I'm not supposed to allow my skin to come into contact with certain ingredients.Do you think if i buy a cosmetics sponge that would compare in texture and quality to the ones you received with your jar? I was just going to use my fingers or a soft cloth but then I thought about the cosmetics sponges.
You are using an out of date browser. It may not display this or other websites correctly.
You should upgrade or use an alternative browser.
You should upgrade or use an alternative browser.
Coach Rehab and Rescue Club
- Thread starter greenpixie
- Start date
TPF may earn a commission from merchant affiliate
links, including eBay, Amazon, and others
More options
Who Replied?
Will do! I bought a green Station on Mercari last Sunday and it finally shipped today. It's my Renapur guinea pig bag.Should be fine. Please let us know what you think of it after your project is finished!
You reminded me I have this in my rehab pile. Off to the sink.@CoachMaven moving the conversation here because I polished the hardware and then dunked my Elliott! There was absolutely NO color loss, no dirt nothing in the bath! Dumped out the soap water and rinsed, and let it sit in fresh water for 10 min and now I have it upside down draining extra water. Here are some before pics.
View attachment 4683754View attachment 4683755 View attachment 4683756 View attachment 4683757 View attachment 4683758

A cosmetic sponge is slightly different from the sponges that came with Renapur but I don't think it would matter. I like using the sponge because I'm not supposed to allow my skin to come into contact with certain ingredients.
personally I prefer cosmetic sponge. Used the foam sponge came with packing at first, maybe I was rubbing too hard, tiny foam pieces came off. So I changed to cosmetic sponge. It works much better for me.Do you think if i buy a cosmetics sponge that would compare in texture and quality to the ones you received with your jar? I was just going to use my fingers or a soft cloth but then I thought about the cosmetics sponges.
Attachments
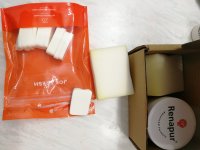

Yes, those are the ones I was thinking of! They look like marshmallows and they're so smooshy and soft. Probably gentle on the leather.personally I prefer cosmetic sponge. Used the foam sponge came with packing at first, maybe I was rubbing too hard, tiny foam pieces came off. So I changed to cosmetic sponge. It works much better for me.
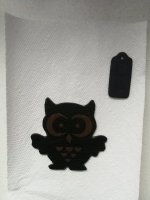
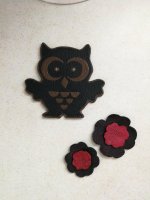
So cute! I love owls!Owl hangtag in progress. First coat paint is drying.
Help, please!
I have never dunked and/or reconditioned a white, ivory or beige colored vintage leather Coach. My Lindsay bag could use moderate cleaning, but I'm really hesitant to do this because of its color.
Please share with me any and all helpful tips for rehabbing light color, vintage leather bags.
Thanks so much!
Kim
Morning! @houseof999 suggested I post my hardware project on my deep red, signature canvas Cassie.
Attached is a stock photo of the bag with the brass hardware, which I was changing to a dark finish.
Also attached is a photo of the paint I used. Dries to touch in 30 minutes but really cures in 48 hours.
I used painter's tape for delicate surfaces & taped around the areas to be painted. Since I was going to spray the turnlock area, I then covered the rest of the bag with aluminum foil as it could really be molded to the bag to protect it.
Once sprayed, I let it dry (with a fan on it) for several hours, removed the tape & moved onto the side pieces, which again, I taped off.
For those, I sprayed some paint into a disposable container & used a small painting sponge (the kind with a small wooden handle) & just dabbed it on. It doesn't give as smooth of a surface but those areas are never the focus of anyone's attention.
Lastly, for the strap, I had buckles in the dark hardware in a container of leftover or excess parts (likely from some other bag project). I cut the sewn areas, took off the brass & then, using heavy duty thread, re-sewewd those ends (see pic). The buckle could not be removed so I used the painter's tape again & covered the remainder of that strap piece in foil. I sprayed it & touched up hard to reach areas with a detail brush. You can see the difference in color/finish with the stock dogleash clips but IMO, you'd never know unless you were really inspecting it.
Last, attached is a pic of a Cassie with the original, untouched dark turnlock & the one I did & then a photo of the finished bag.
I'm really happy with the outcome. The most important part, as I'm sure you all know, is true patience between the steps.
Hope all of this makes sense. Thanks for letting me share.
Morning! @houseof999 suggested I post my hardware project on my deep red, signature canvas Cassie.
Attached is a stock photo of the bag with the brass hardware, which I was changing to a dark finish.
Also attached is a photo of the paint I used. Dries to touch in 30 minutes but really cures in 48 hours.
I used painter's tape for delicate surfaces & taped around the areas to be painted. Since I was going to spray the turnlock area, I then covered the rest of the bag with aluminum foil as it could really be molded to the bag to protect it.
Once sprayed, I let it dry (with a fan on it) for several hours, removed the tape & moved onto the side pieces, which again, I taped off.
For those, I sprayed some paint into a disposable container & used a small painting sponge (the kind with a small wooden handle) & just dabbed it on. It doesn't give as smooth of a surface but those areas are never the focus of anyone's attention.
Lastly, for the strap, I had buckles in the dark hardware in a container of leftover or excess parts (likely from some other bag project). I cut the sewn areas, took off the brass & then, using heavy duty thread, re-sewewd those ends (see pic). The buckle could not be removed so I used the painter's tape again & covered the remainder of that strap piece in foil. I sprayed it & touched up hard to reach areas with a detail brush. You can see the difference in color/finish with the stock dogleash clips but IMO, you'd never know unless you were really inspecting it.
Last, attached is a pic of a Cassie with the original, untouched dark turnlock & the one I did & then a photo of the finished bag.
I'm really happy with the outcome. The most important part, as I'm sure you all know, is true patience between the steps.
Hope all of this makes sense. Thanks for letting me share.
View attachment 4685240 View attachment 4685241 View attachment 4685242 View attachment 4685243 View attachment 4685244 View attachment 4685245 View attachment 4685246 View attachment 4685247
It looks amazing! Thanks for sharing your techniques, there are some great tips here. I like the idea of using aluminum foil to mask off areas. You're so right about patience.
Thanks for posting, such a great idea and the finished bag looks fantastic.Morning! @houseof999 suggested I post my hardware project on my deep red, signature canvas Cassie.
Attached is a stock photo of the bag with the brass hardware, which I was changing to a dark finish.
Also attached is a photo of the paint I used. Dries to touch in 30 minutes but really cures in 48 hours.
I used painter's tape for delicate surfaces & taped around the areas to be painted. Since I was going to spray the turnlock area, I then covered the rest of the bag with aluminum foil as it could really be molded to the bag to protect it.
Once sprayed, I let it dry (with a fan on it) for several hours, removed the tape & moved onto the side pieces, which again, I taped off.
For those, I sprayed some paint into a disposable container & used a small painting sponge (the kind with a small wooden handle) & just dabbed it on. It doesn't give as smooth of a surface but those areas are never the focus of anyone's attention.
Lastly, for the strap, I had buckles in the dark hardware in a container of leftover or excess parts (likely from some other bag project). I cut the sewn areas, took off the brass & then, using heavy duty thread, re-sewewd those ends (see pic). The buckle could not be removed so I used the painter's tape again & covered the remainder of that strap piece in foil. I sprayed it & touched up hard to reach areas with a detail brush. You can see the difference in color/finish with the stock dogleash clips but IMO, you'd never know unless you were really inspecting it.
Last, attached is a pic of a Cassie with the original, untouched dark turnlock & the one I did & then a photo of the finished bag.
I'm really happy with the outcome. The most important part, as I'm sure you all know, is true patience between the steps.
Hope all of this makes sense. Thanks for letting me share.
View attachment 4685240 View attachment 4685241 View attachment 4685242 View attachment 4685243 View attachment 4685244 View attachment 4685245 View attachment 4685246 View attachment 4685247
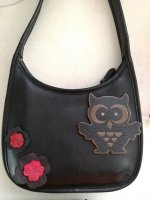
Second coat of paint is down. One of my black Ergo bag has some deep scratches, I might just use these as stickers, make a holloween bag.Owl hangtag in progress. First coat paint is drying.
Attachments
Thank you so much for sharing! I love the result! You definitely have a LOT of patience to get to those little areas inside the leather loops! That can't be easy to do! I am getting inspired to spray the hardware on one of my vintage bags! It's easier for those because you can easily take the hardware off on the vintage coach bags. I'll get to it someday when DH can take the boys to a park or something. Lol!Morning! @houseof999 suggested I post my hardware project on my deep red, signature canvas Cassie.
Attached is a stock photo of the bag with the brass hardware, which I was changing to a dark finish.
Also attached is a photo of the paint I used. Dries to touch in 30 minutes but really cures in 48 hours.
I used painter's tape for delicate surfaces & taped around the areas to be painted. Since I was going to spray the turnlock area, I then covered the rest of the bag with aluminum foil as it could really be molded to the bag to protect it.
Once sprayed, I let it dry (with a fan on it) for several hours, removed the tape & moved onto the side pieces, which again, I taped off.
For those, I sprayed some paint into a disposable container & used a small painting sponge (the kind with a small wooden handle) & just dabbed it on. It doesn't give as smooth of a surface but those areas are never the focus of anyone's attention.
Lastly, for the strap, I had buckles in the dark hardware in a container of leftover or excess parts (likely from some other bag project). I cut the sewn areas, took off the brass & then, using heavy duty thread, re-sewewd those ends (see pic). The buckle could not be removed so I used the painter's tape again & covered the remainder of that strap piece in foil. I sprayed it & touched up hard to reach areas with a detail brush. You can see the difference in color/finish with the stock dogleash clips but IMO, you'd never know unless you were really inspecting it.
Last, attached is a pic of a Cassie with the original, untouched dark turnlock & the one I did & then a photo of the finished bag.
I'm really happy with the outcome. The most important part, as I'm sure you all know, is true patience between the steps.
Hope all of this makes sense. Thanks for letting me share.
View attachment 4685240 View attachment 4685241 View attachment 4685242 View attachment 4685243 View attachment 4685244 View attachment 4685245 View attachment 4685246 View attachment 4685247
Don't scrub. Things that look like stains on light bags are actually the color wearing off and the leather color coming through. Ink marks and actual stains can sometimes be bleached off with zit cream - get the maximum strength benzoyl peroxide, apply it directly to the spots, then sit in the sun for a few days. Clean it off with leather cleaner and if you're lucky, the stains will be gone. I just did this to a white wallet that had blue and red ink marks, and they completely disappeared without changing the color of the leather. If all else fails, you may need to touch up the color with paint.Help, please!
I have never dunked and/or reconditioned a white, ivory or beige colored vintage leather Coach. My Lindsay bag could use moderate cleaning, but I'm really hesitant to do this because of its color.
Please share with me any and all helpful tips for rehabbing light color, vintage leather bags.
Thanks so much!
Kim
Going to get this dunked later! I see so much potential!


Register on TPF! This sidebar then disappears and there are less ads!