2020 resolution - shopping my own bag and wallet collection. Any one else?

TPF may earn a commission from merchant affiliate
links, including eBay, Amazon, and others

This is the Coach Noa that I had pulled as my bag to be used and abused during Covid. I've had it for forever and I adore it but was ready to donate it soon.
Then I realized, it has never lost its shape, it is one of my favourite and most functional crossbodies, and the only reason I was looking to donate it is because of the colour.
My favourite colour is blue but I struggle with the shades on the market- not sure if others feel the same way.
Anyway, I decided to colourblock it to completely refresh it. I am so happy with the choice and will not be letting it go until it falls apart. I think if I tire of the colour, I'll just strip and re-paint it orange or something, lol.

Lots of details on this one that I can't quite show in the pics, but I will try.
- The original colour is the wallet in front of the bag (it comes with the bag, so it's the best representation of the original colour).
- I mixed 3 shades of blue, so the front panel, back panel, side panels and the back of the bag (that sits against the body) are all different degrees of blue. It's obvious IRL, but not showing up in the pics for some reason.
- The bag strap is also colourblocked- original colour on the bottom, royal blue on the top. It shows when I carry it.
- The front snap closure flap, d-ring loops for the strap, some of the side panels and the bottom panels of the bag are in purple. I went for opposite colours on the side gussets- so the one side has blue in front and purple in the back, the other side vice versa. A small detail but makes me giddy that I thought to do it that way.
- I decided to colour block the hangtag as well- logo side blue, backside purple. Made sure to flip it so it shows in the pics.
- Used a regular sealant on this one because I didn't want it metallic, I just wanted it to be happy shades.

I shouldn't have painted this one now because I'm suffering terribly from insomnia and I'm not sure how cleanly I painted it. Once I've managed to get some sleep, I'll have to take a closer look and see if I accidentally went over any hardware or edge paint, and then clean that up as needed.

Also, the only reason I can do this kind of nonsense is because I never resell my stuff, so it gives me the freedom to experiment. Obviously not good if you will eventually resell.

Hope I haven't derailed the thread too much. :smile:
View attachment 4861708View attachment 4861709View attachment 4861710
Wow! Your work looks great! I´m drooling! Lots to learnover here!
Doing a full surface is something I haven´t succeeded in so far. I painted one vintage handbag light pink over some dark colour and am not too happy with the result. It feels pasted on. Well, I guess it IS pasted on. Too much paint, too quickly as I did it for an occasion in one rushed go... Actually I´ve been looking at this bag several times recently and wondered should I strip it and start over. I guess, I should!

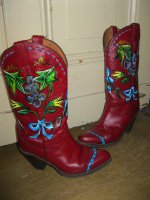
A decent full colour change I can show are a pair of boots, though.
before: SAM_2544 (2).JPG and after: IMG_3290.JPG
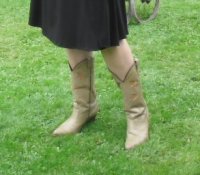
 
:lol: So sweet! :love:

I use the Acrylic paints. I thought the oil dye range was exclusively for dyeing suede, which is something I have never done (but hope to try one day).


:yes: I've also always heard that Angelus is the gold standard.
Thank-you!
As far as I have heard the oil dye can be used on natural leather and in contrast to the acrylic which is a surface thing will sink into the leather and actually dye it. I haven´t tried it out. My paints were bought for doodling on bags and jackets after I produced some fails with other brands of paints. The bag reapir aspect came much later.
 
  • Like
Reactions: Bag peace
Do you have to prepare the Leather in anyway to paint it? Also is there a Leather glue that can be used on a soft leather strap?

For leather glue, I use Fiebings Leathercraft cement.
Thanks! :smile: I've painted 3 bags in the last day, and a watch strap. I'll snap some pics in a bit and share.
Truly, no skill involved. Just slow, steady strokes. Cover up any bits you don't want to get paint on with masking tape.
Also, I should note that I just change the colours because I get bored, but if you take a peek at the Coach Rehab thread: those people are miracle workers!

It depends. You can purchase a leather preparer and deglazer (also Angelus brand). That stuff will strip the original colour/any protective coating to allow the leather to absorb the new colour better. I have never used it myself. At most, I have used surgical spirit/rubbing alcohol to prep an area where I can see a clear protective coating (Marc Jacobs' older bags have this on the straps). Usually, I just clean with a damp cloth, paint, then apply a finishing coat to seal the new paint.

If you're working on an expensive bag, I would strongly suggest checking out the rehab threads (particularly the Coach one) to get tips and tricks. I only ever look at the before/after pics because I'm not someone who regularly restores vintage, but you just know that everyone active in there is skilled and happy to share their knowledge.

I'll pull the pieces I just re-painted overnight and upload pics in a second (sorry, for the unsolicited spam lol).

Edit to add: I think both @cowgirlsboots and @whateve regularly paint/restore/rejuvinate. They will surely have more information to share on the topic. I just play with paints like a 5 year old! :lol:

Edit again because major brain fog! I cannot recommend a specific leather glue. I have used a generic one I picked up from some supermarket to make minor repairs. I'm sure someone else can better advise there. :smile:
I love all your projects! They look beautiful! I haven't done many complete recoloring jobs. Since most of what I do is on vintage Coach, I like to maintain as much of the original as possible.
Oh, I don´t do any more than play with paints, either...
Before painting with Angelus Acrylic on any leather item I have been told to clean with acetone to deglaze and prepare the surface. (The shop I bought the paint told me I can do this instead of using the expensive deglazer.)
Sometimes when the leather feels slick to me I even sand it with a very fine leather sanding pad or a dirt eraser. It´s a brutal treatment, but so far has worked well for me when I paint pictures on leather jackets or bags.
When I use the Acrylic paint for tiny corner repairs I usually just wipe with alcohol and play with the paint.
To finish the paintjob off I either use Angelus Finisher or Fiebings Resolene (which I prefer for durability.)
My red wallet for example I simply painted with Angelus acrylic paint without any prior treatment (but after ruining the surface and original colour with a baby wipe when trying to clean it up- please be very careful with baby wipes!) and finished with Elephant. The paintjob does not show and is durable.

When using "Leather Fresh" I follow the recommendations of the seller and clean with lighter fluid when there are bigger surfaces involved. For tiny repairs like recently on the corners of my woc I don´t do any preparation, just use the paint (which is a filler at the same time) with a fine brush, sometimes even my fingertips, dry it with a hairdryer and use Elephant Leather Preserver as a finisher.

When filling defects with liquid leather I have made the experience, that the result gets much nicer when I forget about the instructions and apply it with my fingertips. Anybody who knows what they are doing would tell me off!

For leather glue this is my preferred product.

View attachment 4861811
For tiny edge or corner repairs, I just mix a bit of regular acrylic craft paint (the cheap stuff they sell for $1 a bottle at Walmart) with conditioner. I use fabric puffy paint to fix holes in edges.
 
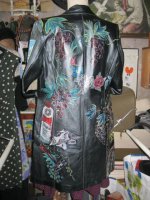
While being off topic anyway.... here´s my biggest failure. I used Morello (which is a liquid thinner based laquer type of paint and not suitable for painting pictures) on the most awful cheap pork split leather without any preparations.... it started flaking off very quickly
when I folded the coat up to replace the lining and meanwhile only stays in place thanks to several coats of Resolene on top. I don´t dare wear it. It´s a showpiece.


IMG_5319.JPG IMG_5320.JPG IMG_5321.JPG
 
I'll share the one that I have easy access to right now- purple and white snakeskin bag attached.
I've been unable to sleep so have been occupying myself by refreshing the paint on this bag. It originally was a plum purple that had faded to a pink-ish hue, so I've just painted the panels metallic purple. I snapped some pics for you before putting it away.

This is the first (maybe the 2nd?) bag I dreamt up, sketched and then hunted for a local artisan to make for me. It was a real challenge communicating my vision with the lovely brother/sister duo who ended up creating it for me when I was in Indonesia. I wanted a Chinese lantern flower shape and was so proud of the end result. It's 8x7", and I propped it open to display the inner white panels, but it does not stay open like that if you're not holding it open.
Unfortunately, it was so unique and dear to me that I have barely used it in all the years I've had it.
It's python (a choice I made because the skin is a byproduct of the python meat they ate locally, so as ethical as I could get with an exotic).

I pulled this bag out right after my 1st round of covid and told myself that life is too short to save it. I'm going to use and enjoy this, and if the scales fall off or it falls apart, at least I enjoyed it rather than just admiring it.

Now as I write this out, I know this bag is likely not considered unique to others. There are plenty of bucket/lantern style bags out in the market nowadays that are similar to this. But at the time, and in my heart, it's special. :biggrin:


The vintage Brio is here so you can have that picture!
I don't even understand how this bag got to me this quickly- it was due to arrive late next week! I snapped a picture before quarantining it and sanitizing my hands.

I love it! It's chubby! Ha ha! It's got quite a wide base that makes it look like it has a beer gut! :P
I normally like a slim profile in my bags, but this chubby quality really suits it! It's exactly as listed- minor discolouration in the white portions of the bag and along the braided strap. Nothing I can't fix up with some leather paint.
Lining has minor colour change (a little yellow from age, so I should be able to wash it and get it clean again), but otherwise, looks like it's never been used! This bag is my age (early 1980s) which makes me like it even more, ha ha.
The pleated white panels on the sides are actually snap pockets. Mind you, tiny ones that may only fit a mini bottle of sanitizer or an oyster card/slim case. Still love that detail.
I plan to use it as soon as I'm out of quarantine. My mum is going to flip for it! :biggrin:

Pics of the Coach bag whenever I get it. Very excited about that one as well. My bag closet is getting a real makeover.

Edited to adjust massive pictures and fix a ton of typos! :smile:

View attachment 4861550
View attachment 4861551View attachment 4861552
I'll split this into 2 posts because I'm not sure how pictures show up on other people's devices and I don't want anyone to open this page to a block of text/giant pics. :P

This is not the watch I painted overnight (that strap is still damp so I'm not touching it), but I painted this one about a year ago with the same purple from the snake bag I posted above. It originally had a dark brown strap with that sky blue dial but, I really hate brown (sorry, I know people adore it but I don't).
The watch I just painted has a dark grey dial so I painted the tan strap yellow. I happen to love that grey/yellow colour combo.

The pleated lambskin bag attached was originally a dull turquoise colour. I don't have any before pics. To be honest, the pics I've been posting since I joined this thread are the first I've ever taken of my bags. which explains why they're all so rubbish lol
I have always loved the bag, the leather and the pleats, but the colour was so flat that I never reached for it. I've been wanting a blue metallic leather bag all year, then realized this was the perfect bag for me to turn into a metallic myself. It's my custom mix of blues with a touch of silver mica to make it metallic.
It's a royal blue IRL, not the cobalt it appears in the photo.
Due to the style of the bag, I used a Satin finisher (sealant) to give it a slight sheen.
View attachment 4861704View attachment 4861705
This is the Coach Noa that I had pulled as my bag to be used and abused during Covid. I've had it for forever and I adore it but was ready to donate it soon.
Then I realized, it has never lost its shape, it is one of my favourite and most functional crossbodies, and the only reason I was looking to donate it is because of the colour.
My favourite colour is blue but I struggle with the shades on the market- not sure if others feel the same way.
Anyway, I decided to colourblock it to completely refresh it. I am so happy with the choice and will not be letting it go until it falls apart. I think if I tire of the colour, I'll just strip and re-paint it orange or something, lol.

Lots of details on this one that I can't quite show in the pics, but I will try.
- The original colour is the wallet in front of the bag (it comes with the bag, so it's the best representation of the original colour).
- I mixed 3 shades of blue, so the front panel, back panel, side panels and the back of the bag (that sits against the body) are all different degrees of blue. It's obvious IRL, but not showing up in the pics for some reason.
- The bag strap is also colourblocked- original colour on the bottom, royal blue on the top. It shows when I carry it.
- The front snap closure flap, d-ring loops for the strap, some of the side panels and the bottom panels of the bag are in purple. I went for opposite colours on the side gussets- so the one side has blue in front and purple in the back, the other side vice versa. A small detail but makes me giddy that I thought to do it that way.
- I decided to colour block the hangtag as well- logo side blue, backside purple. Made sure to flip it so it shows in the pics.
- Used a regular sealant on this one because I didn't want it metallic, I just wanted it to be happy shades.

I shouldn't have painted this one now because I'm suffering terribly from insomnia and I'm not sure how cleanly I painted it. Once I've managed to get some sleep, I'll have to take a closer look and see if I accidentally went over any hardware or edge paint, and then clean that up as needed.

Also, the only reason I can do this kind of nonsense is because I never resell my stuff, so it gives me the freedom to experiment. Obviously not good if you will eventually resell.

Hope I haven't derailed the thread too much. :smile:
View attachment 4861708View attachment 4861709View attachment 4861710
Amazing handiwork. I like the contrast of purple metallic against the white snakeskin. The metallic clutch looks fabulous and would go with so many outfits. The colour block bag is fun looking. Well done all around!
 
  • Like
Reactions: Bag peace
Wow! Your work looks great! I´m drooling! Lots to learnover here!
Doing a full surface is something I haven´t succeeded in so far. I painted one vintage handbag light pink over some dark colour and am not too happy with the result. It feels pasted on. Well, I guess it IS pasted on. Too much paint, too quickly as I did it for an occasion in one rushed go... Actually I´ve been looking at this bag several times recently and wondered should I strip it and start over. I guess, I should!

A decent full colour change I can show are a pair of boots, though.
before: View attachment 4861820 and after: View attachment 4861819
These boots as red boots with your custom detailing @cowgirlsboots look amazing! :heart:
 
For leather glue, I use Fiebings Leathercraft cement.

I love all your projects! They look beautiful! I haven't done many complete recoloring jobs. Since most of what I do is on vintage Coach, I like to maintain as much of the original as possible.

For tiny edge or corner repairs, I just mix a bit of regular acrylic craft paint (the cheap stuff they sell for $1 a bottle at Walmart) with conditioner. I use fabric puffy paint to fix holes in edges.

Thank-you! I´ll take some mental notes. The edge repairs with puffy fabric paint you showed us are superb!
 
  • Like
Reactions: whateve
This is the Coach Noa that I had pulled as my bag to be used and abused during Covid. I've had it for forever and I adore it but was ready to donate it soon.
Then I realized, it has never lost its shape, it is one of my favourite and most functional crossbodies, and the only reason I was looking to donate it is because of the colour.
My favourite colour is blue but I struggle with the shades on the market- not sure if others feel the same way.
Anyway, I decided to colourblock it to completely refresh it. I am so happy with the choice and will not be letting it go until it falls apart. I think if I tire of the colour, I'll just strip and re-paint it orange or something, lol.

Lots of details on this one that I can't quite show in the pics, but I will try.
- The original colour is the wallet in front of the bag (it comes with the bag, so it's the best representation of the original colour).
- I mixed 3 shades of blue, so the front panel, back panel, side panels and the back of the bag (that sits against the body) are all different degrees of blue. It's obvious IRL, but not showing up in the pics for some reason.
- The bag strap is also colourblocked- original colour on the bottom, royal blue on the top. It shows when I carry it.
- The front snap closure flap, d-ring loops for the strap, some of the side panels and the bottom panels of the bag are in purple. I went for opposite colours on the side gussets- so the one side has blue in front and purple in the back, the other side vice versa. A small detail but makes me giddy that I thought to do it that way.
- I decided to colour block the hangtag as well- logo side blue, backside purple. Made sure to flip it so it shows in the pics.
- Used a regular sealant on this one because I didn't want it metallic, I just wanted it to be happy shades.

I shouldn't have painted this one now because I'm suffering terribly from insomnia and I'm not sure how cleanly I painted it. Once I've managed to get some sleep, I'll have to take a closer look and see if I accidentally went over any hardware or edge paint, and then clean that up as needed.

Also, the only reason I can do this kind of nonsense is because I never resell my stuff, so it gives me the freedom to experiment. Obviously not good if you will eventually resell.

Hope I haven't derailed the thread too much. :smile:
View attachment 4861708View attachment 4861709View attachment 4861710
Wow you did a fantastic job!
 
Oh, I don´t do any more than play with paints, either...
Before painting with Angelus Acrylic on any leather item I have been told to clean with acetone to deglaze and prepare the surface. (The shop I bought the paint told me I can do this instead of using the expensive deglazer.)
Sometimes when the leather feels slick to me I even sand it with a very fine leather sanding pad or a dirt eraser. It´s a brutal treatment, but so far has worked well for me when I paint pictures on leather jackets or bags.
When I use the Acrylic paint for tiny corner repairs I usually just wipe with alcohol and play with the paint.
To finish the paintjob off I either use Angelus Finisher or Fiebings Resolene (which I prefer for durability.)
My red wallet for example I simply painted with Angelus acrylic paint without any prior treatment (but after ruining the surface and original colour with a baby wipe when trying to clean it up- please be very careful with baby wipes!) and finished with Elephant. The paintjob does not show and is durable.

When using "Leather Fresh" I follow the recommendations of the seller and clean with lighter fluid when there are bigger surfaces involved. For tiny repairs like recently on the corners of my woc I don´t do any preparation, just use the paint (which is a filler at the same time) with a fine brush, sometimes even my fingertips, dry it with a hairdryer and use Elephant Leather Preserver as a finisher.

When filling defects with liquid leather I have made the experience, that the result gets much nicer when I forget about the instructions and apply it with my fingertips. Anybody who knows what they are doing would tell me off!

For leather glue this is my preferred product.

View attachment 4861811
Thanks for all the info.
 
  • Like
Reactions: cowgirlsboots
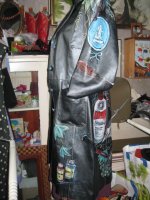
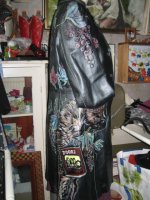
While being off topic anyway.... here´s my biggest failure. I used Morello (which is a liquid thinner based laquer type of paint and not suitable for painting pictures) on the most awful cheap pork split leather without any preparations.... it started flaking off very quickly
when I folded the coat up to replace the lining and meanwhile only stays in place thanks to several coats of Resolene on top. I don´t dare wear it. It´s a showpiece.


View attachment 4861880 View attachment 4861881 View attachment 4861882
Very Cool!
 
I'll split this into 2 posts because I'm not sure how pictures show up on other people's devices and I don't want anyone to open this page to a block of text/giant pics. :P

This is not the watch I painted overnight (that strap is still damp so I'm not touching it), but I painted this one about a year ago with the same purple from the snake bag I posted above. It originally had a dark brown strap with that sky blue dial but, I really hate brown (sorry, I know people adore it but I don't).
The watch I just painted has a dark grey dial so I painted the tan strap yellow. I happen to love that grey/yellow colour combo.

The pleated lambskin bag attached was originally a dull turquoise colour. I don't have any before pics. To be honest, the pics I've been posting since I joined this thread are the first I've ever taken of my bags. which explains why they're all so rubbish lol
I have always loved the bag, the leather and the pleats, but the colour was so flat that I never reached for it. I've been wanting a blue metallic leather bag all year, then realized this was the perfect bag for me to turn into a metallic myself. It's my custom mix of blues with a touch of silver mica to make it metallic.
It's a royal blue IRL, not the cobalt it appears in the photo.
Due to the style of the bag, I used a Satin finisher (sealant) to give it a slight sheen.
View attachment 4861704View attachment 4861705
I love your projects!! I don’t have the nerve to touch up my bags like this as I have no talent whatsoever. :biggrin:
Thanks for all the info.
DC, seeing all the hand painting on leathers here, I thought about you — have you not tried/planned to paint on a bag of yours?
 
  • Like
Reactions: keodi
Wow! Your work looks great! I´m drooling! Lots to learnover here!
Doing a full surface is something I haven´t succeeded in so far. I painted one vintage handbag light pink over some dark colour and am not too happy with the result. It feels pasted on. Well, I guess it IS pasted on. Too much paint, too quickly as I did it for an occasion in one rushed go... Actually I´ve been looking at this bag several times recently and wondered should I strip it and start over. I guess, I should!

A decent full colour change I can show are a pair of boots, though.
before: View attachment 4861820 and after: View attachment 4861819
Stunning boots!!!!! :love:
 
Aww, thank-you so much! I am over the moon with this purchase.
It´s new to me.
I´ve been hunting for a new wallet for a while. It should be huge and red. After a lot of research I ordered a brandnew one from a German brand and when it arrived the snob in me was not pleased. It was well made, but not what I perceive as real quality. It went back.
Then- back in the deep rabbit hole- I noticed this Dior woc had re-appeared in the classifieds. It had been listed before at a much higher price. I enquired about it and bought it at a very nice price compared to every other Dior woc- some in awful condition- I´d seen for sale. It came with the original box! The condition was almost perfect, too. No faults that couldn´t be taken care of with a little paint and and some courage.
No, it´s not red. It clearly feels red to me- very intense red vibes!

Being me I haven´t worn it, yet. Not even tried to fit my things into it. The box sits on my sewing table. From time to time I take it out and caress the silky perfection of the lambskin...
It is quite dreamy! I get it.
 
  • Like
Reactions: cowgirlsboots
Top