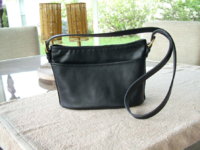
I stalked this bag at Salvation Army for over a month until it was 50% OFF day! It probably went un-noticed because of the lack of a hangtag. Authenticated by Hyacinth as a 1996 Worth Bag #4143 (http://forum.purseblog.com/coach-shopping/authenticate-this-coach-763164-156.html#post22879414), it was in good overall condition, just needed a little love.
There were a couple of small scuffs on one bottom corner and the zipper pull needed some attention. But when I got her home and started pre-bath cleaning the inside...I think she was previously owned by the Cookie Monster! Crumbs, crumbs and more crumbs. This is the first time I turned a bag inside out to clean all the nooks and crannies with a toothbrush. (By the way, turning a dry bag is much harder than a wet one IMO.)
She got a good, warm soak and scrub with Dawn. Rinsed, reshaped and stuffed, as usual. Minimal color in the bath water (more about this later). Two rounds of Leather CPR brought back the squoosh we all love. When I started Blackrocks, especially on the strap, I picked up a LOT of black when I wiped it off. Does anyone else experience this? The second application, after a rest day, did the same thing, but a little less. After a couple of days of sitting, I buffed with a microfiber cloth and got very little color. Any explanations for this?
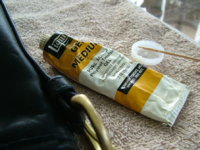
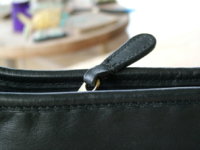
The Leather CPR and Blackrocks did well on the scuffs, but the zipper pull needed some attention, as the lining material had separated from the leather and wasnt pretty at all. I used Acrylic Gel Medium applied with a toothpick, carefully separating the leather from the lining and inserting the gel. See my Courier Pouch rehab for more about this stuff. The photo shows it wet - kind of translucent white, but it dries clear. Worked like a charm! Painted over with black acrylic and were good to go.
Polished the brass and she looks brand new! If we havent said it enough on this thread...BLACK bags are ideal rehabs for beginners. Theyre usually very forgiving and easy and a good first experience in rehabbing. I wish they were all this easy! Maybe I'll finally call Coach for some hangtags!
There were a couple of small scuffs on one bottom corner and the zipper pull needed some attention. But when I got her home and started pre-bath cleaning the inside...I think she was previously owned by the Cookie Monster! Crumbs, crumbs and more crumbs. This is the first time I turned a bag inside out to clean all the nooks and crannies with a toothbrush. (By the way, turning a dry bag is much harder than a wet one IMO.)
She got a good, warm soak and scrub with Dawn. Rinsed, reshaped and stuffed, as usual. Minimal color in the bath water (more about this later). Two rounds of Leather CPR brought back the squoosh we all love. When I started Blackrocks, especially on the strap, I picked up a LOT of black when I wiped it off. Does anyone else experience this? The second application, after a rest day, did the same thing, but a little less. After a couple of days of sitting, I buffed with a microfiber cloth and got very little color. Any explanations for this?
The Leather CPR and Blackrocks did well on the scuffs, but the zipper pull needed some attention, as the lining material had separated from the leather and wasnt pretty at all. I used Acrylic Gel Medium applied with a toothpick, carefully separating the leather from the lining and inserting the gel. See my Courier Pouch rehab for more about this stuff. The photo shows it wet - kind of translucent white, but it dries clear. Worked like a charm! Painted over with black acrylic and were good to go.
Polished the brass and she looks brand new! If we havent said it enough on this thread...BLACK bags are ideal rehabs for beginners. Theyre usually very forgiving and easy and a good first experience in rehabbing. I wish they were all this easy! Maybe I'll finally call Coach for some hangtags!

")


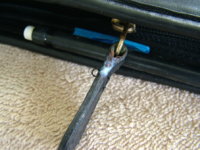
 The really bad parts are these side fittings and the hooks on the straps. May dunk the bag tomorrow then give it another try.


 The seller did not tell me all these and I was a little disappointed but she is still a gorgeous beauty.