Coach Rehab and Rescue Club

TPF may earn a commission from merchant affiliate
links, including eBay, Amazon, and others

Status
Not open for further replies.
That's an amazing difference, congratulations! Where did you get the aleene's fabric fusion? Will you still be able to use the back slip pocket?

Strap edging is so important to the overall appearance of the bag, nice work!

Great job, you saved that bag's life and made her beautiful and useful again!

Thanks, katev! I got the Aleene's Fabric Fusion at Michael's - their guide to adhesives said it would work on leather, and it does! I was gingerly testing it this morning to make sure it had dried and and wouldn't pull away...my DH then took it from me and shoved his big old fist down into the pocket - I almost passed out! But, the glue held tight, so yep - I'll still be able to use the pocket! :happy dance:

The edging really does make a big difference - I'm really, really happy with how it turned out. And, again, thank you so much for sharing your ideas and successes. I'm now officially hooked, and can't wait to start on my next one!!
 
She looks great! How easy is the leather filler to use? I have a Coach I got at a great price, but it had a button sewn onto the front, yes, a button, no idea why. Anyway, I have a small hole to fill.

lol-that's funny, I remembered the button bag the other day and couldn't remember who ended up with it. I wondered if it had gotten fixed yet.

I can't even remember what bag it was, I just remember that I bought a bag (my basic bag) from the same seller and was checking to see what else they had and thought "wth? a button?"
 
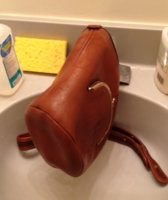
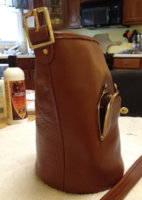
Welp, I think I'm ready to declare by first rehab complete...my 1998 Black Station Bag.

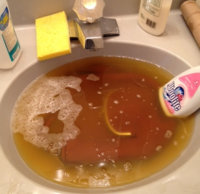
Some of you may remember that I had an issue with the back slip pocket coming undone on the left hand side and was flopping into the bag. I took it to the cobbler and wasn't willing to pay the cost to restitch it related to what I paid for the bag itself. Definitely a lesson learned in carefully looking over a vintage find before buying it! So, I ended up doing a dirty cheaters' trick. My main goal was to stop it from flapping into the bag, so I bought some Aleene's Fabric Fusion and glued the sucker down. :shame: Not how I would ideally deal with the issue, but the annoying flapping into the bag is gone.

For washing and conditioning, I used Woolite to give her a bath. Then, I ended up applying three applications of Leather Therapy Restorer and Conditioner (I love this stuff!). Then, last night, I hand massaged in some Cadillac Boot and Shoe Care. Finally, this morning, I used a product that I got as a sample with my Leather Therapy Restorer. It's called Leather Finish - basically it provides protection from sun, wind and moisture and leaves a nice, mellow glow to the leather. The product itself is a thin, white liquid - applied sparingly with a sponge.

For the hardware, I used Wright's brass polish and am very pleased with the results (but, like others, I gotta say that polishing the hardware is my least favorite part of the process!!). Then I mixed together some black acrylic paint (the thick kind in the tube) with some leather conditioner and touched up the edges on the bag and on the strap. That made a HUGE difference in the strap as it had a lot of color loss on the edges and looked dingy and gray. (I actually stole this strap from my Pocket Purse, which is still finishing up its rehab process - had to use Leather Filler on that bag due to some areas of dry rot - I'll be posting after pics of that one soon) - and I'll probably just trade the strap back and forth between the two bags.

Coach is sending me a new hang tag, and then I think she's good to go! I'm posting a before pic for comparison, along with a few different angles of after shots. For my first time doing this, I'm really happy with how it turned out - but I'd love to hear what you ladies think! And, most importantly, thank you all so much for your advice, ideas and encouragement - you all rock!! :rochard:

Can't wait to load this little lady up and start using her!! :D

wow, it looks great! Nice work!
 
She looks great! How easy is the leather filler to use? I have a Coach I got at a great price, but it had a button sewn onto the front, yes, a button, no idea why. Anyway, I have a small hole to fill.

Thank you!

I'm still getting the knack of the leather filler - I had quite a few areas of dry rot on edges and corners of my Pocket Purse, along with a big old gouge/hole along the edging of the pocket under the flap. The consistency is very similar to glue, and it dries quickly to a pearly whitish color. It's 30% water, so when it dries it will "shrink up", so multiple applications can be needed for larger holes.

For the smaller holes in the edging it worked great - for the big gouge, it's going to need more work, and honestly, I'm not skilled enough yet to get it all smooth and beautiful - but as long as it 'patches' the hole, I can live with it not looking perfect - gives the old gal a little character. I do need to learn more about 'sanding' over the filler to smooth it out - so I'm currently devouring some of docride's posts.

For the smaller little holes, I actually just used Kiwi Leather Dye to cover over them once the filler dried - they are now pretty much undetectable. I actually used the Kiwi Leather Dye to cover a pretty bad scuff spot on the bottom corner of my Station Bag, too, and you can't even see the spot anymore - worked amazingly.

For the larger holes, I used an acrylic paint/conditioner mixture over the dried filler, which works, but you can still kind of see where the spots are. Regardless, it's a huge improvement over where it started. I'll hopefully have some after pics to share tomorrow or Tuesday.

All of my holes were on the edging, but I think the filler would work great for button holes on the body of the bag as well. What color is your bag? If it's black, I'd wholly recommend the Kiwi Leather Dye to color over the filler when it dries.

Geez, sorry for being so longwinded!! :p
 
  • Like
Reactions: Ava_13579
Welcome! I have never used mink oil in any form so I cannot comment. Recently I have been using emu oil in liquid form and I like it.

I try not to get too much conditioner on the suede lining but I don't worry about it too because it gets absorbed into the leather.

yey! thanks katev for the reply =) emu oil is REALLY expensive here in my country so i'm using a local product made of beeswax and it really flattens the suede part of the bags specifically the handles. hmmm, i guess i should switch to liquid leather conditioners then?

we don't have apple, or lexol here, or even leather cpr (available only online for twice the price) so i will have to ask my sister abroad to send me any of these leather conditioners soon. probably emu oil also hihi =)

Thanks katev. You guys are really amazing.

The Philippines has a long tradition of crafting excellent leather products. I am sure that you can find local products that will work well for rehabbing. Ask at a local cobbler or tack shop for advice, good luck!
 
Hey There my lovely Rehabbers!! It's been too long since I have been on here! But I have a big big problem :( my husband found me this adorable Willis bag at the GW yesterday for $15

image-2748932053.jpg

it's in excellent shape except its smooshed, there is a bad pen mark on the front and the dang GW wrote $15 on the inside pocket...IN permanent marker!!! :( so, when I tried to spot clean with water this is what happened...

image-1096521376.jpg


image-3297394547.jpg

I was going to bathe her anyway to give her a "lift" but not I'm wondering, what do I do about the "15"? :(
Any suggestions? On that and the pen on the front?


image-3638622940.jpg
 
eehlers said:
Thank you!

I'm still getting the knack of the leather filler - I had quite a few areas of dry rot on edges and corners of my Pocket Purse, along with a big old gouge/hole along the edging of the pocket under the flap. The consistency is very similar to glue, and it dries quickly to a pearly whitish color. It's 30% water, so when it dries it will "shrink up", so multiple applications can be needed for larger holes.

For the smaller holes in the edging it worked great - for the big gouge, it's going to need more work, and honestly, I'm not skilled enough yet to get it all smooth and beautiful - but as long as it 'patches' the hole, I can live with it not looking perfect - gives the old gal a little character. I do need to learn more about 'sanding' over the filler to smooth it out - so I'm currently devouring some of docride's posts.

For the smaller little holes, I actually just used Kiwi Leather Dye to cover over them once the filler dried - they are now pretty much undetectable. I actually used the Kiwi Leather Dye to cover a pretty bad scuff spot on the bottom corner of my Station Bag, too, and you can't even see the spot anymore - worked amazingly.

For the larger holes, I used an acrylic paint/conditioner mixture over the dried filler, which works, but you can still kind of see where the spots are. Regardless, it's a huge improvement over where it started. I'll hopefully have some after pics to share tomorrow or Tuesday.

All of my holes were on the edging, but I think the filler would work great for button holes on the body of the bag as well. What color is your bag? If it's black, I'd wholly recommend the Kiwi Leather Dye to color over the filler when it dries.

Geez, sorry for being so longwinded!! :p

It's a small hole, I think it will be smaller when washed. It's an off white bag, so luckily I can paint over the repair once I fill the hole. I'm off to search for Kiwi leather dye! Thanks so much!
 
Hey There my lovely Rehabbers!! It's been too long since I have been on here! But I have a big big problem :( my husband found me this adorable Willis bag at the GW yesterday for $15

View attachment 1821693

it's in excellent shape except its smooshed, there is a bad pen mark on the front and the dang GW wrote $15 on the inside pocket...IN permanent marker!!! :( so, when I tried to spot clean with water this is what happened...

View attachment 1821691


View attachment 1821692

I was going to bathe her anyway to give her a "lift" but not I'm wondering, what do I do about the "15"? :(
Any suggestions? On that and the pen on the front?


View attachment 1821694

What a nice husband and a great find!


I hate the way that the GW writes on their bags and the Salvation Army staples the price tags to the items! Charge a quarter more and use a real tag!


Light-colored bags are tough to rehab and ink marks are really challenging if not impossible. Below are pics of a light-colored Sonoma bag that had ink marks and it rehabbed pretty well, put the marks were a bit less obvious and I think that the pebbled leather does a good job of hiding flaws.


If it were my bag I would wash the bag and use a mild soap to scrub the marked areas. While it was still in the sink I would treat the marks with hairspray or rubbing alcohol and rub gently. Be careful because sometimes you can remove the color of the bag as well and that just makes the marks more obvious!


This process may just lighten the marks and make them less obvious, you will have to see what happens.


Stuff it with towels or rags to shape it and let it dry and rehab as usual. It is very difficult to touch up the front of a light-colored with acrylic paint. It is hard to exactly match the color of the finish. But that is another option you can try. At least the paints wipe off easily with water when they are fresh.


If nothing else works you can consider dying it a darker color, but that would be a shame because it is such a pretty color. Good luck!


http://forum.purseblog.com/coach/a-nice-rehab-project-but-still-bit-flawed-703093.html#post19832105
 
katev said:
What a nice husband and a great find!

I hate the way that the GW writes on their bags and the Salvation Army staples the price tags to the items! Charge a quarter more and use a real tag!

Light-colored bags are tough to rehab and ink marks are really challenging if not impossible. Below are pics of a light-colored Sonoma bag that had ink marks and it rehabbed pretty well, put the marks were a bit less obvious and I think that the pebbled leather does a good job of hiding flaws.

If it were my bag I would wash the bag and use a mild soap to scrub the marked areas. While it was still in the sink I would treat the marks with hairspray or rubbing alcohol and rub gently. Be careful because sometimes you can remove the color of the bag as well and that just makes the marks more obvious!

This process may just lighten the marks and make them less obvious, you will have to see what happens.

Stuff it with towels or rags to shape it and let it dry and rehab as usual. It is very difficult to touch up the front of a light-colored with acrylic paint. It is hard to exactly match the color of the finish. But that is another option you can try. At least the paints wipe off easily with water when they are fresh.

If nothing else works you can consider dying it a darker color, but that would be a shame because it is such a pretty color. Good luck!

http://forum.purseblog.com/coach/a-nice-rehab-project-but-still-bit-flawed-703093.html#post19832105

Thanks for the advise Katev! I have her in the sink now, scrub #1 is done and that I just used mild soap scrubbing with a toothbrush. The hairspray/alcohol is a good idea ill try that next
Here is her current state

image-2883909816.jpg


image-1319790204.jpg

I'm so sad the ink is bleeding through but at least the transfer is on the inside of the slip pocket lol
(small accidental victory) hahaha
I really don't want to dye her. I love the color! And I have not yet attempted a dye job lol

On another note about the pink suede bag, I ended up not soaking it. I took it to a leather shop and they warned against it because of the light color...I brushed her but it didn't do much on the side of improvement eh. So I stuck her in a pillow case and put her on a shelf to be tackled another time hahaha
 
Well, I started some new rehab projects today and they each present different challenges. But first an update on my smoke stinky navy willis! She is much better but still has a little odor! I bought 2 large mesh bags of charcoal fish tank filters from the pet store the other day and put them inside the biggest compartments in the bag and then sealed it up in 2 plastic bags and put it away for awhile to see if that helps. I haven't even thought about starting on my stinky green laurel yet!

I bought 2 of my current rehab projects at a garage sale for a total of $5 for both and Hyacinth has authenticated them as genuine, made in the USA, near-vintage bags. The authentication pics are at the links below.

The first is a periwinkle Casey bag. She is in good structural shape but the inside is a beautiful blue color and the outside is a dirty gray color. I am hoping that she is just really dirty and that I will be able to restore that gorgeous color. I also have to call Coach and ask for a gold hangtag to replace the missing tag.

Periwinkle Casey Bag, style 9923, USA from around 1993:
http://forum.purseblog.com/coach-shopping/authenticate-this-coach-763164-8.html#post22428319

The second garage sale bargain bag is a black Janice's Legacy. She is very dry, worn, scuffed, faded and generally "badly beaten up" but she is my first Janice's bag - and for $2.50, why not try to fix her up?! The AT pics are below.

Black Janice’s Legacy 9950 (USA, 1996)
http://forum.purseblog.com/coach-shopping/authenticate-this-coach-763164-8.html#post22428292

The last bag is also a US made vintage bag and I am rehabbing it for a friend. It is a black Collegiate bag and she bought it in 1989 and she has been carrying it almost exclusively ever since! The bags looks great, which proves that there is no need to abuse a much-used bag, the way many of our rehab projects have been treated!

I thought that this was going to be an easy rehab but when I started working on her I realized that all the hardware has verdigris! I pryed off both parts of the turnlock before bathing her and that ugly green color was everywhere, yuck! So forget about an easy rehab!

I knew that this bag was genuine but I posted the pics at the link below in the ID thead and Hyacinth kindly gave me a lot of information about her.

Collegiate Bag, style 9815, from around 1989. Listed then for around $126:
http://forum.purseblog.com/coach/id-coach-item-post-any-coach-item-name-355205-327.html#post22509497

They have all been bathed and are stuffed and drying right now. We will have to see what adventures they will each offer in the future!
 
An update...I decided to take the plunge and dunk my Bonnie Cashin for Meyers bag to both clean and reshape her...many thanks to Ledobe for helping to boost my courage in doing so!

Here are some pics. So far, she's quite the trooper! And...look who's standing up all by herself? She's currently letting a coat of Leather Therapy sink in. No cracking at all and the leather already feels supple and 'thicker' than it did pre-dunk. So glad I decided to give it a try!

I took a pic of the wrinkling on the back. I think she may have had some water damage or something in the past that caused the wrinkling in this one area as the suede inside at the same spot was affected too - the nap is longer and shaggier. I got some pure, refined emu oil, so will be trying that to see if it helps.

For those that have used emu oil...do you apply with your hands?
 

Attachments

  • image-1811681311.jpg
    image-1811681311.jpg
    147 KB · Views: 541
  • image-3623980495.jpg
    image-3623980495.jpg
    86.5 KB · Views: 512
  • image-1446977966.jpg
    image-1446977966.jpg
    127.4 KB · Views: 533
  • image-627622432.jpg
    image-627622432.jpg
    160.9 KB · Views: 523
Status
Not open for further replies.
Top