Scarves "Upcycled" and DIY Scarves

TPF may earn a commission from merchant affiliate
links, including eBay, Amazon, and others

hugs, Kat! E, I adore the orange and bolduc flower and all the other gorgeous ribbon things here!

Guys, I have permission to post Scaethoven's pic of her spiral and square bolduc ribbon key chain here. I don;t know how to make them myself, but am just grateful to have one. If someone more handy knows how, please feel free to chime in.

Entitled spiral and square key chain respectively. (photo credit Scaethoven)
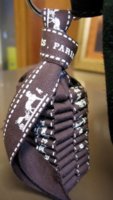
Square bolduc keyfob_2.jpeg

Spiral bolduc keyfob_2.jpeg
 
Last edited:
^^^
O-M-G! Wow, that is lovely, and very clever! Thansk for posting it on her behalf!

it looks a bit like what I used to do as a kid...weave plastic ribbons into a pattern, as a key chain (long corn on the cob like, with different colours), I cannot for the life of me rembemer how it was done!

eta. you are lucky to have one;)
 
Last edited:
This looks amazing!!

hugs, Kat! E, I adore the orange and bolduc flower and all the other gorgeous ribbon things here!

Guys, I have permission to post Scaethoven's pic of her spiral and square bolduc ribbon key chain here. I don;t know how to make them myself, but am just grateful to have one. If someone more handy knows how, please feel free to chime in.

Entitled spiral and square key chain respectively. (photo credit Scaethoven)
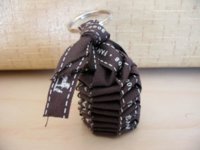
View attachment 912409

View attachment 912408
 
Hi

Since 880 has outed my little craft item I wanted to acknowledge the SA in the San Francisco store who had one of these. I took a picture and from that I managed to figure out how to do one.

Here is a photo how-to for the spiral version:


attachment.php


You need to start with two long pieces of bolduc of about the same length. Cross them over at the centre to get to the starting position.

For a spiral you always work in thew same direction (in the example above I'm working clockwise). Keep layering up until you have about 5-6 inches of ribbon left then knot around a keyring. For a square version, when you get to step 6 layer up on top of the base square by folding back on yourself working in the opposite direction. In the diagram the base was formed working clockwise so the second layer will be worked anti-clockwise, the third layer clockwise, fourth anti-clockwise and so on.

HTH!
 

Attachments

  • Bolduc keyfob instructions x.JPG
    Bolduc keyfob instructions x.JPG
    73.1 KB · Views: 1,947
Thank you for this amazing "how-to"!

Hi

Since 880 has outed my little craft item I wanted to acknowledge the SA in the San Francisco store who had one of these. I took a picture and from that I managed to figure out how to do one.

Here is a photo how-to for the spiral version:


attachment.php


You need to start with two long pieces of bolduc of about the same length. Cross them over at the centre to get to the starting position.

For a spiral you always work in thew same direction (in the example above I'm working clockwise). Keep layering up until you have about 5-6 inches of ribbon left then knot around a keyring. For a square version, when you get to step 6 layer up on top of the base square by folding back on yourself working in the opposite direction. In the diagram the base was formed working clockwise so the second layer will be worked anti-clockwise, the third layer clockwise, fourth anti-clockwise and so on.

HTH!
 
I bought a Hermes phone strap in CDG airport.
They have a long one but orange is not my favourite
So I fold the phone strap and elongated with the ribbon Bolduc
The necklace charm is from Kelly Caleche perfume
I love them so much the ribbon is so good as a phone strap
IMG_1203.JPG
 
Great idea! Thank you for sharing!

I bought a Hermes phone strap in CDG airport.
They have a long one but orange is not my favourite
So I fold the phone strap and elongated with the ribbon Bolduc
The necklace charm is from Kelly Caleche perfume
I love them so much the ribbon is so good as a phone strap
IMG_1203.JPG
 
Top