You are using an out of date browser. It may not display this or other websites correctly.
You should upgrade or use an alternative browser.
You should upgrade or use an alternative browser.
Bag Inserts List: New Updates post #4,032
- Thread starter Christiflora
- Start date
TPF may earn a commission from merchant affiliate
links, including eBay, Amazon, and others
More options
Who Replied?Can anyone recommend an insert for a Jypsiere 31?
Thank you.
https://forum.purseblog.com/threads/bag-inserts-list.688779/page-168#post-32317985

Which insert is best for a Kelly retourne to keep its shape
https://forum.purseblog.com/threads/bag-inserts-list.688779/page-168#post-32317985

DIY Insert organizer for Kelly 20cm:
I don’t think there’s a ready made insert for the Kelly 20cm (and it’s debatable whether this cute baby really needs an insert) so I decided to try my hand at making my own version of a teeny tiny fourbi-like organizer. Wonderful tpfer hotshot is the source of my inspiration... [emoji173]️
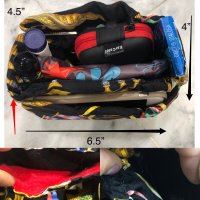
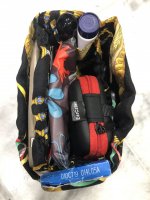
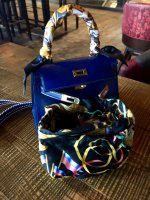
-Dimensions of K20 sellier insert: 6.5”L x 4”W x 4.5”T
-4 internal side pockets (2 smaller slip pockets, 1 long slip pocket, 1 long pocket with elasticized closure).
-1 external long slip pocket
-reversible so I can change the orientation of the pockets (in versus out)
I recycled one of my H 90 silk scarves for this project and ended up having a lot of material leftover. This really turned out to be a labor of love and madness because it took me a ridiculously long time to finish mostly because I wasn’t working from a pattern and didn’t take the time on the front end to make a muslin mock up before working with silk. [emoji848].
Overall, I’m content with how it turned out. (It also fits nicely in a 25 Kelly sellier.). If I make another insert in the future, I will definitely use a sewing machine!
Just wanted to share the specs I used in case anyone else is thinking about starting on a DIY insert project!
I don’t think there’s a ready made insert for the Kelly 20cm (and it’s debatable whether this cute baby really needs an insert) so I decided to try my hand at making my own version of a teeny tiny fourbi-like organizer. Wonderful tpfer hotshot is the source of my inspiration... [emoji173]️


-Dimensions of K20 sellier insert: 6.5”L x 4”W x 4.5”T
-4 internal side pockets (2 smaller slip pockets, 1 long slip pocket, 1 long pocket with elasticized closure).
-1 external long slip pocket
-reversible so I can change the orientation of the pockets (in versus out)
I recycled one of my H 90 silk scarves for this project and ended up having a lot of material leftover. This really turned out to be a labor of love and madness because it took me a ridiculously long time to finish mostly because I wasn’t working from a pattern and didn’t take the time on the front end to make a muslin mock up before working with silk. [emoji848].
Overall, I’m content with how it turned out. (It also fits nicely in a 25 Kelly sellier.). If I make another insert in the future, I will definitely use a sewing machine!
Just wanted to share the specs I used in case anyone else is thinking about starting on a DIY insert project!
DIY Insert organizer for Kelly 20cm:
I don’t think there’s a ready made insert for the Kelly 20cm (and it’s debatable whether this cute baby really needs an insert) so I decided to try my hand at making my own version of a teeny tiny fourbi-like organizer. Wonderful tpfer hotshot is the source of my inspiration... [emoji173]️
View attachment 4210079View attachment 4210081View attachment 4210082
-Dimensions of K20 sellier insert: 6.5”L x 4”W x 4.5”T
-4 internal side pockets (2 smaller slip pockets, 1 long slip pocket, 1 long pocket with elasticized closure).
-1 external long slip pocket
-reversible so I can change the orientation of the pockets (in versus out)
I recycled one of my H 90 silk scarves for this project and ended up having a lot of material leftover. This really turned out to be a labor of love and madness because it took me a ridiculously long time to finish mostly because I wasn’t working from a pattern and didn’t take the time on the front end to make a muslin mock up before working with silk. [emoji848].
Overall, I’m content with how it turned out. (It also fits nicely in a 25 Kelly sellier.). If I make another insert in the future, I will definitely use a sewing machine!
Just wanted to share the specs I used in case anyone else is thinking about starting on a DIY insert project!
Beyond words to describe! Thanks for sharing such a wonderful diy bag insert! [emoji4] Unfortunately, I am terrible in sewing! [emoji23]
DIY Insert organizer for Kelly 20cm:
I don’t think there’s a ready made insert for the Kelly 20cm (and it’s debatable whether this cute baby really needs an insert) so I decided to try my hand at making my own version of a teeny tiny fourbi-like organizer. Wonderful tpfer hotshot is the source of my inspiration... [emoji173]️
View attachment 4210079View attachment 4210081View attachment 4210082
-Dimensions of K20 sellier insert: 6.5”L x 4”W x 4.5”T
-4 internal side pockets (2 smaller slip pockets, 1 long slip pocket, 1 long pocket with elasticized closure).
-1 external long slip pocket
-reversible so I can change the orientation of the pockets (in versus out)
I recycled one of my H 90 silk scarves for this project and ended up having a lot of material leftover. This really turned out to be a labor of love and madness because it took me a ridiculously long time to finish mostly because I wasn’t working from a pattern and didn’t take the time on the front end to make a muslin mock up before working with silk. [emoji848].
Overall, I’m content with how it turned out. (It also fits nicely in a 25 Kelly sellier.). If I make another insert in the future, I will definitely use a sewing machine!
Just wanted to share the specs I used in case anyone else is thinking about starting on a DIY insert project!
It looks incredible.. lala, you are an inspiration to us all & thanks for showing your beautiful handwork!!
Well done
Oh wow, this is beautiful and right up my alley! Between you and @hotshot - I would love more details as I have a scarf that I've been mulling over to make an insert for my pico. How did you make it reversible? I would be hand-sewing, and if I can figure out a way to keep my rolled edges that may be nice.DIY Insert organizer for Kelly 20cm:
I don’t think there’s a ready made insert for the Kelly 20cm (and it’s debatable whether this cute baby really needs an insert) so I decided to try my hand at making my own version of a teeny tiny fourbi-like organizer. Wonderful tpfer hotshot is the source of my inspiration... [emoji173]️
View attachment 4210079View attachment 4210081View attachment 4210082
-Dimensions of K20 sellier insert: 6.5”L x 4”W x 4.5”T
-4 internal side pockets (2 smaller slip pockets, 1 long slip pocket, 1 long pocket with elasticized closure).
-1 external long slip pocket
-reversible so I can change the orientation of the pockets (in versus out)
I recycled one of my H 90 silk scarves for this project and ended up having a lot of material leftover. This really turned out to be a labor of love and madness because it took me a ridiculously long time to finish mostly because I wasn’t working from a pattern and didn’t take the time on the front end to make a muslin mock up before working with silk. [emoji848].
Overall, I’m content with how it turned out. (It also fits nicely in a 25 Kelly sellier.). If I make another insert in the future, I will definitely use a sewing machine!
Just wanted to share the specs I used in case anyone else is thinking about starting on a DIY insert project!
DIY Insert organizer for Kelly 20cm:
I don’t think there’s a ready made insert for the Kelly 20cm (and it’s debatable whether this cute baby really needs an insert) so I decided to try my hand at making my own version of a teeny tiny fourbi-like organizer. Wonderful tpfer hotshot is the source of my inspiration... [emoji173]️
View attachment 4210079View attachment 4210081View attachment 4210082
-Dimensions of K20 sellier insert: 6.5”L x 4”W x 4.5”T
-4 internal side pockets (2 smaller slip pockets, 1 long slip pocket, 1 long pocket with elasticized closure).
-1 external long slip pocket
-reversible so I can change the orientation of the pockets (in versus out)
I recycled one of my H 90 silk scarves for this project and ended up having a lot of material leftover. This really turned out to be a labor of love and madness because it took me a ridiculously long time to finish mostly because I wasn’t working from a pattern and didn’t take the time on the front end to make a muslin mock up before working with silk. [emoji848].
Overall, I’m content with how it turned out. (It also fits nicely in a 25 Kelly sellier.). If I make another insert in the future, I will definitely use a sewing machine!
Just wanted to share the specs I used in case anyone else is thinking about starting on a DIY insert project!
Incredible. I think Hermes and other high end designers really bring out the best artists in all of us.
It must make you happy to open your bag and see this beautiful insert every single time.
I still can’t believe you recycled an H scarf!
Oh wow, this is beautiful and right up my alley! Between you and @hotshot - I would love more details as I have a scarf that I've been mulling over to make an insert for my pico. How did you make it reversible? I would be hand-sewing, and if I can figure out a way to keep my rolled edges that may be nice.
I laid out the scarf to the size I wanted and then folded it in half so that the backsides of the pattern were facing each other and the front sides of the pattern were facing out (visible). Initially, the silk makes the fabric a bit slippery and hard to hold a shape, but as you begin to sew together both sheets of the fabric to create seams along the sides, it starts to hold shape. If the front side of the scarf pattern is facing out/up on both the external and internal “walls” of the insert, then you will be able to turn the insert inside out (reversible). I created a removable rectangle shaped base piece similar to the Chameleon inserts that I can pop into the bottom for added structure. Because I can pop out this flat base piece, I can easily turn the insert inside out so that the 4 pockets are on the inside of the insert or flip it the other way so that the 4 pockets are on the outside. Then I just pop the base piece back in the middle.
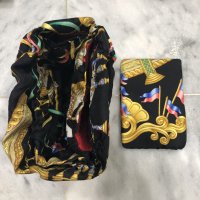
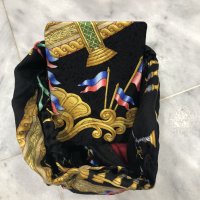
To give the base piece structure, I inserted a piece of plastic laminate in between the fabric. I wanted to use something that was thin and stiff but still flexible so I ran an empty laminating pouch through my laminating machine and cut out a piece from that. (The laminate thickness is 10 mil which is roughly the same as the plastic page marker that you snap into a ring bound day planner, but a piece of plastic folder would work as well.)
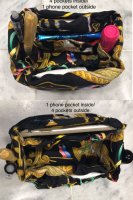
The top photo is my insert flipped so that the 4 pockets face the middle and the 1 phone pocket is on the outside.
The bottom photo is my insert flipped the other way so that the 4 pockets are on the outside and the 1 phone pocket faces the middle.
P.S. I chose to hand sew my insert so that it would be easier to remove stitching mistakes! [emoji3]
Thanks! This is awesome! I'm trying to figure out an insert for my Pico18, so something squarish, compared to the one I use in my J28 - that one only works if I leave the bag unlocked and it loses it's iconic shape.I laid out the scarf to the size I wanted and then folded it in half so that the backsides of the pattern were facing each other and the front sides of the pattern were facing out (visible). Initially, the silk makes the fabric a bit slippery and hard to hold a shape, but as you begin to sew together both sheets of the fabric to create seams along the sides, it starts to hold shape. If the front side of the scarf pattern is facing out/up on both the external and internal “walls” of the insert, then you will be able to turn the insert inside out (reversible). I created a removable rectangle shaped base piece similar to the Chameleon inserts that I can pop into the bottom for added structure. Because I can pop out this flat base piece, I can easily turn the insert inside out so that the 4 pockets are on the inside of the insert or flip it the other way so that the 4 pockets are on the outside. Then I just pop the base piece back in the middle.
View attachment 4212549View attachment 4212550
To give the base piece structure, I inserted a piece of plastic laminate in between the fabric. I wanted to use something that was thin and stiff but still flexible so I ran an empty laminating pouch through my laminating machine and cut out a piece from that. (The laminate thickness is 10 mil which is roughly the same as the plastic page marker that you snap into a ring bound day planner, but a piece of plastic folder would work as well.)
View attachment 4212561
The top photo is my insert flipped so that the 4 pockets face the middle and the 1 phone pocket is on the outside.
The bottom photo is my insert flipped the other way so that the 4 pockets are on the outside and the 1 phone pocket faces the middle.
P.S. I chose to hand sew my insert so that it would be easier to remove stitching mistakes! [emoji3]
I like the separate base idea and I know exactly how the 10mil lam would work. Did you do round corners as well?

I realized this morning that I could use cable tie wrap strips as stiffeners on the sides - kinda like the plastic strips that give structure to some bras and corsets.
Hmmm...another option to get max use out of the pico capacity is to just do a base and 1.5" side like a tray. In which case I will go looking for some offcut vinyl to give the sides some shape.
Yes I just saw one on Mel’s unboxing video.Does anyone by chance have a discount code for the B35 7RP insert? Many thanks!
MIM25x7RP for 25€ off each insert.
Hoping they come out with new colours for fall!
Ty! I love their inserts. I just received my 2nd one. Lovely fit and well made.Yes I just saw one on Mel’s unboxing video.
MIM25x7RP for 25€ off each insert.
Hoping they come out with new colours for fall!
Sure!
For the Evelyne PM, I ordered an insert that was W9.5” x D2.5” x H9”.
Her standard PM insert is W9.5” x D2.5” x H7”.
For the Evelyne GM, I ordered an insert that was W11” x D2.5” x H11”, but I probably could’ve done a half inch or one inch shorter in the height.
Her standard GM insert is W11” x D2.5” x H8”.
My suggestion is to take a measuring tape and measure from the bottom of the Evelyne and see if you would like the insert to go as high up as the height I used. If you would like it to be a little lower or a little higher, you can specify a height measurement and she’ll do it for you. [emoji6]
This is brilliant. Does your PM also have outside pockets and 2 zippers? Did you show us pictures of that one or the GM. I need to order this right now.
This is brilliant. Does your PM also have outside pockets and 2 zippers? Did you show us pictures of that one or the GM. I need to order this right now.
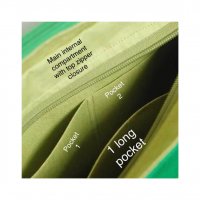
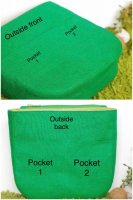
I requested the same specs for both GM and PM inserts. On the outside, there are 2 pockets on the front of the insert and 2 pockets on the back of the insert. On the inside, there are 2 pockets on one side and 1 long pocket on the other side, and a zipper closure on top to keep the contents secure. Adjacent to this zipper closure is a second zipper closure to a compartment that is the same depth as the internal compartment with the pockets.
Register on TPF! This sidebar then disappears and there are less ads!

