If you have padlock with loose lock or stuck key, you can use the following steps to try and fix your padlock. I fixed my padlock of my vanilla paddy this way. THought if I posted the photos how I do it, it may help.
So...
Pic 1: Padlock and key from my vanilla
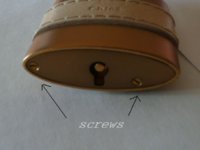
pic 2 and 3: You need a flathead, small size screwdriver, like the ones people use to fix their glasses, to open the bottom of the padlock.
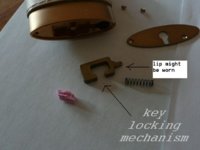
pic 4: All of the parts lying on the table. Note the spring, the locking mechanism and a piece of foam that I just cut from one of the dishwashing foams. The reason that the key can be stuck or padlock is loose is because this lip of the mechanism can be worn amd the spacing needed to lock can then be off.
pic 5: Pic of everything put back together. Put the piece of foam ont the left of the locking mechanism. Make sure you put in the locking mechanism in the correct direction. Also, it is easier done/closing the face plate with padlock unlocked. After you are done, screw the face plate back. The size of the foam may be by trial and error, depending on how worn your locking mechanism is. You can use the photos to ref mine.
Total project time: 30 min to 1 hour.
If you have any questions, can pm me. Have fun!
So...
Pic 1: Padlock and key from my vanilla
pic 2 and 3: You need a flathead, small size screwdriver, like the ones people use to fix their glasses, to open the bottom of the padlock.
pic 4: All of the parts lying on the table. Note the spring, the locking mechanism and a piece of foam that I just cut from one of the dishwashing foams. The reason that the key can be stuck or padlock is loose is because this lip of the mechanism can be worn amd the spacing needed to lock can then be off.
pic 5: Pic of everything put back together. Put the piece of foam ont the left of the locking mechanism. Make sure you put in the locking mechanism in the correct direction. Also, it is easier done/closing the face plate with padlock unlocked. After you are done, screw the face plate back. The size of the foam may be by trial and error, depending on how worn your locking mechanism is. You can use the photos to ref mine.
Total project time: 30 min to 1 hour.
If you have any questions, can pm me. Have fun!


 .
.

