Pulls, they seem inevitable. Perhaps its the tradeoff for being cozy and chic but considering the price of H shawls I needed to find a way to fix them on my own since sending them for repair would mean they were away from me all the time and I dont have many so I would truly miss them. So this is what Ive learned, I hope its helpful to you.
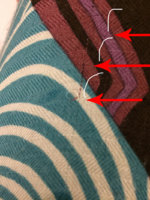
This method is only for pulls where the thread has not broken. You need a loop to work with. Broken threads would require reweaving or removal by a specialist. Ive been told that H can send them out but for your everyday, regular old snag-this works great.
Heres how I learned:
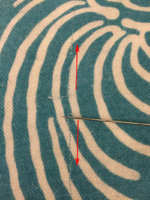
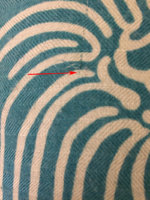
I caused a huge pull in my Black and White Zebra Pegasus shawl about 2 months after getting it while on a business trip. It was my first shawl and I was devastated as it was already sold out. I thought for sure it was ruined for life. The pull was huge and multi directional but amazingly there were no broken threads, just loops of thread. I found myself staying in possibly the noisiest hotel room in all of New York and couldnt sleep at all so I decided to see what I could do with the shawl. I pulled the shade off the lamp, grabbed a fine sewing needle from the sewing kit and started gently probing at the pull.
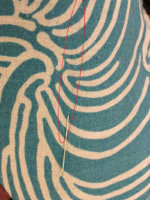
Heres where the beauty and complexity of the H designs really pay off. I could follow the pulls all the way through the design. I experimentally tried picking up the thread about 1cm from the loop and seeing if I could pull the thread back. It worked! I stayed up most of the night fixing my Zebra and then finished the monster pull over the next few days. You cannot even tell how bad the damage was save for a little fuzz at the site of the big 5 loop pile up. The key was matching up the thread with the design. Its part sewing and part puzzle.
This method is only for pulls where the thread has not broken. You need a loop to work with. Broken threads would require reweaving or removal by a specialist. Ive been told that H can send them out but for your everyday, regular old snag-this works great.
Heres how I learned:
I caused a huge pull in my Black and White Zebra Pegasus shawl about 2 months after getting it while on a business trip. It was my first shawl and I was devastated as it was already sold out. I thought for sure it was ruined for life. The pull was huge and multi directional but amazingly there were no broken threads, just loops of thread. I found myself staying in possibly the noisiest hotel room in all of New York and couldnt sleep at all so I decided to see what I could do with the shawl. I pulled the shade off the lamp, grabbed a fine sewing needle from the sewing kit and started gently probing at the pull.
Heres where the beauty and complexity of the H designs really pay off. I could follow the pulls all the way through the design. I experimentally tried picking up the thread about 1cm from the loop and seeing if I could pull the thread back. It worked! I stayed up most of the night fixing my Zebra and then finished the monster pull over the next few days. You cannot even tell how bad the damage was save for a little fuzz at the site of the big 5 loop pile up. The key was matching up the thread with the design. Its part sewing and part puzzle.