Re-dyeing a PS1?

IOSCHA

deal hunter extraordinaire
Dec 13, 2019
61
200
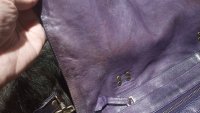
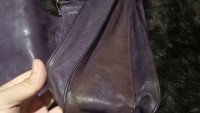
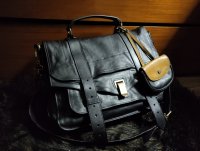
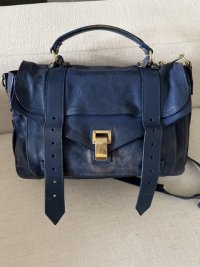
A year ago, I scored a large PS1 at a great price ($100ish) from a local consignment store. Since it was an impulsive 2AM online purchase, the excitement got to me and I just paid for it without thinking much. When I went to pick it up, I then realized why it was so cheap.

The staining. The fading. The deformed strap that looked like it was used as a hanger. I'll let you be the judge as to whether $100 was too generous a price.

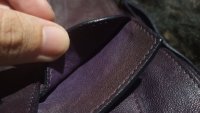
IMG_20210220_181546.jpgIMG_20210220_181606.jpgIMG_20210220_182413.jpgIMG_20210220_182559.jpg

Anyway, after a year of gathering dust, I felt like I would use the bag a lot more if it didn't look that tired. After lurking in the PurseForum for the better part of a week, I decided to be brave and do a DIY dye project after seeing and hearing several success stories here. I would have taken the PS1 to a professional, but I figured I can save money since the quoted prices can be more than what I paid for the entire bag, and I had done a re-dye job on my Pashli which went well.

Question is, can I dye the bag back to the original eggplant-esque kind of purple? If not, should I pick the safe option and color it black? Suggestions and validations are very much welcome!
 
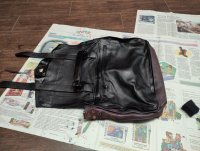
After more than a month of procrastinating amongst other things, I finally had the chance to start the redye project! I decided to dye the PS1 black since I couldn't find the exact purple shade (and I don't trust my color mixing abilities enough), and black seemed like a safe bet overall.

I used a deglazer to strip the factory finish before applying the dye, which I diluted with a small amount of water so it wouldn't be too gloopy. For better coverage, I mostly used a regular household sponge instead of the wool dauber that came with the dye, though the wool dauber came in handy for harder to reach spots.

Overall, it took me two days to finish the dye job; one day actually dyeing it, and another day just looking it over really closely because I kept finding spots I either missed, or didn't apply enough coats.

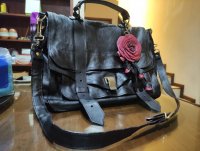
IMG_20210401_140012.jpg IMG_20210402_161725.jpgIMG_20210402_204827.jpg

I would have taken more progress shots, but the mess that I made during the entire thing prevented me from touching my phone. I think I did a pretty good job if I do say so myself, all things considered.

However, I did notice that the lambskin felt much stiffer after the dye job. I applied two coats of conditioner (mink oil) to try and help soften it back like in the second picture, but it clearly wasn't as supple as before. In the third picture, I already cleaned some excess dye using an all-purpose sneaker cleaner, and then reapplied like two or three coats of the mink oil. I don't know if there is such a thing as overconditioning, but I intend to find out soon!
 
After more than a month of procrastinating amongst other things, I finally had the chance to start the redye project! I decided to dye the PS1 black since I couldn't find the exact purple shade (and I don't trust my color mixing abilities enough), and black seemed like a safe bet overall.

I used a deglazer to strip the factory finish before applying the dye, which I diluted with a small amount of water so it wouldn't be too gloopy. For better coverage, I mostly used a regular household sponge instead of the wool dauber that came with the dye, though the wool dauber came in handy for harder to reach spots.

Overall, it took me two days to finish the dye job; one day actually dyeing it, and another day just looking it over really closely because I kept finding spots I either missed, or didn't apply enough coats.

View attachment 5042800 View attachment 5042801View attachment 5042802

I would have taken more progress shots, but the mess that I made during the entire thing prevented me from touching my phone. I think I did a pretty good job if I do say so myself, all things considered.

However, I did notice that the lambskin felt much stiffer after the dye job. I applied two coats of conditioner (mink oil) to try and help soften it back like in the second picture, but it clearly wasn't as supple as before. In the third picture, I already cleaned some excess dye using an all-purpose sneaker cleaner, and then reapplied like two or three coats of the mink oil. I don't know if there is such a thing as overconditioning, but I intend to find out soon!
It looks like you did a great job. Wow, the effort and perseverance! I admire you but this is why I would never take on such a project. I feel exhausted just reading this. But it's always amazing to see a well deserving used bag like this come back to life (as long as others do the work :biggrin: )!
 
It looks like you did a great job. Wow, the effort and perseverance! I admire you but this is why I would never take on such a project. I feel exhausted just reading this. But it's always amazing to see a well deserving used bag like this come back to life (as long as others do the work :biggrin: )!

Thank you! I considered sending it to a professional at first, but I wanted to save up a bit since I was out of work for some time. That, and a combination of lockdown boredom + the sort of DIY confidence after seeing a YouTube tutorial and thinking "wow, that looks easy/fun!" :biggrin:. It's certainly not for everyone, but for me there's this sense of accomplishment that I tried something new, regardless of the outcome. Live and learn, right?
 
Wow - that's an impressive transformation! I bet the leather will soften up at least a bit as you use the bag. It looks fantastic! :smile:

Thank you! As it turns out, the leather did soften up considerably after two weeks of regular use, though I'm not really sure whether that was the semi-regular overconditioning or my habit of overstuffing my bags :lol:

1618594556895.jpg

It's nearly as soft as prior to the dye job, but I'm not 100% sure about the texture. You'd know it's a dye job as soon as you touch the leather, but I think it was worth it because I'm using the bag a lot more! :biggrin:
 
I'm glad it turned out well! :smile: In the picture, it looks perfect - I'd never guess it was re-dyed. Is there any dye transfer, I mean from the bag to the clothing?
 
I'm glad it turned out well! :smile: In the picture, it looks perfect - I'd never guess it was re-dyed. Is there any dye transfer, I mean from the bag to the clothing?

No, there was no dye transfer whatsoever after it had fully dried, but I did notice some of the dye coming off when I used an all-purpose sneaker cleaner to test whether the dye really penetrated the leather. I ended up lightly scrubbing the entire bag using a toothbrush just to make sure all the excess dye had come off. I haven't sealed the color with a topcoat finisher yet since I'm still deciding whether I want it to be matte or glossy. Fingers crossed I can make it look semi-professional! :lol:
 
THANK YOU for taking the time to post about your re-dye project! I'm in a similar situation where the discoloration was hidden from me in the photos and I would use my PS1 a lot more if I could just color it black. Can you share what products you used (and what you'd recommend for the topcoat)?
 
THANK YOU for taking the time to post about your re-dye project! I'm in a similar situation where the discoloration was hidden from me in the photos and I would use my PS1 a lot more if I could just color it black. Can you share what products you used (and what you'd recommend for the topcoat)?

To start with, I used regular nail polish remover (any store-bought acetone would do, I think) and for the coloring I used Fiebing's Leather Dye.

According to a Google search, Fiebing's Pro Dye can result in richer colors but my local store didn't stock them so I went with the regular Leather Dye. It took several coats to completely cover the purple, but I think it's not too shabby if I do say so myself :smile:

In the end I decided to skip the topcoat because of a mishap with another bag (applied a bit too much and the finish literally cracked) and went with regular mink oil (forgot the brand, but any conditioner will do) and some shoe polish (Kiwi if I recall correctly).

Hope this helps! Would love to see your own results :biggrin:
 
  • Like
Reactions: Ista
I was going to start a new thread but I figured I would reply to this one! I received my medium for a low price in worse condition than disclosed by the seller. The metal clasp had broken off - luckily the screws were in the bag and I was able to fix it. The top handle was fraying - got rid of that with scissors and a lighter. There was gum melted into a pocket (gross!) and overall the blue was fading. After cleaning the interior lining with laundry detergent/water I deglazed it using the deglazer that comes with the Tarrago kit. I then used Fiebing's dye and applied two coats. This stuff dries pretty quickly but I let it dry overnight. I then applied the Tarrago dye to finish it off. This last step is key imo. It took the bag from a brownish black to a jet black. I then conditioned the bag with Apple Care leather conditioner - my personal favorite. All the materials can be purchased on Amazon.
IMG_6304 Medium.jpegIMG_6360 Medium.jpeg

The next thing I'm thinking of experimenting with is changing the color of the hardware. I like it as is but trying to spray paint it black has been on my mind
 
I was going to start a new thread but I figured I would reply to this one! I received my medium for a low price in worse condition than disclosed by the seller. The metal clasp had broken off - luckily the screws were in the bag and I was able to fix it. The top handle was fraying - got rid of that with scissors and a lighter. There was gum melted into a pocket (gross!) and overall the blue was fading. After cleaning the interior lining with laundry detergent/water I deglazed it using the deglazer that comes with the Tarrago kit. I then used Fiebing's dye and applied two coats. This stuff dries pretty quickly but I let it dry overnight. I then applied the Tarrago dye to finish it off. This last step is key imo. It took the bag from a brownish black to a jet black. I then conditioned the bag with Apple Care leather conditioner - my personal favorite. All the materials can be purchased on Amazon.
View attachment 5867929View attachment 5867930

The next thing I'm thinking of experimenting with is changing the color of the hardware. I like it as is but trying to spray paint it black has been on my mind
I never would've recognized it! You did a great job. Also, shame on the seller for trashing the bag and then not disclosing it when selling.
 
  • Insightful
  • Like
Reactions: Deprive and 880