I bought my first vintage LV bag a couple of months ago and now I'm all into the pre-loved stuff. I've 3 small kids and would stash my good stuff in my closet. When I have a new/perfect bag, that first ding just kills me! I want to baby my kids, not my bags. With the vintage bags, I can throw them around a little (plus buy more of them ).
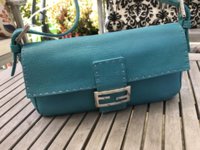
So I bought an old Fendi bag that had seen better days.

Most people are turned off by the hardware, but this is fixable! Also, you can see major fading in the leather, but this is thick hardy leather that can take abuse and multiple dye jobs--much like my own hair.
But boy, abuse it I did. In fixing the hardware, the black tarnish stuck to the leather like glue! Also, saddle soap may not have been the best way to clean up the mess. Tarragon dye, here we go!
Step 1: preparer liquid added to leather making the dark spots look really bad!

I picked shade 105 which was darker than I expected when dried.
You can see the new vs old color. I figured I can change the color again if I'm bored or hate it.
1st coat

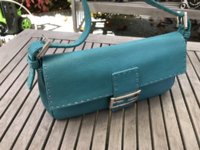
Finished bag! I was to lazy to do more than 2 coats. I did add Apple conditioner after the dye job and two coats of polish in the same color. This helped tone down the shine. Surprisingly, the polish color didn't exactly match the dye (darker, muddier).
Final step, color the stitching. I used a silver sharpie followed by a china marker in white to seal it.
Good enough for me! Now, I can throw this bag on my car floor and not care since all
seats are occupied.

Some things I learned for next time, polish hardware with more care. The polish wasn't even working! I had to use my 4-way nail file to grind the scratches off before polishing! But the hardware is shiney now!
Use a gentler leather cleaner.
So I bought an old Fendi bag that had seen better days.
Most people are turned off by the hardware, but this is fixable! Also, you can see major fading in the leather, but this is thick hardy leather that can take abuse and multiple dye jobs--much like my own hair.
But boy, abuse it I did. In fixing the hardware, the black tarnish stuck to the leather like glue! Also, saddle soap may not have been the best way to clean up the mess. Tarragon dye, here we go!
Step 1: preparer liquid added to leather making the dark spots look really bad!
I picked shade 105 which was darker than I expected when dried.
You can see the new vs old color. I figured I can change the color again if I'm bored or hate it.
1st coat
Finished bag! I was to lazy to do more than 2 coats. I did add Apple conditioner after the dye job and two coats of polish in the same color. This helped tone down the shine. Surprisingly, the polish color didn't exactly match the dye (darker, muddier).
Final step, color the stitching. I used a silver sharpie followed by a china marker in white to seal it.
Good enough for me! Now, I can throw this bag on my car floor and not care since all
seats are occupied.
Some things I learned for next time, polish hardware with more care. The polish wasn't even working! I had to use my 4-way nail file to grind the scratches off before polishing! But the hardware is shiney now!
Use a gentler leather cleaner.

 WOW! What a dye job!!!
