Dye project in progress!

It's very easy to do yourself if the bag if the bag is with regular hardware :smile:
Send me a message on facebook, then I will send you a video of how to do it :smile:

My facebook is: https://www.facebook.com/kristinajaneyoung
any chance you could post that lacing video??

and THANK you OP for sharing this journey with us! years later this is still a thorough and inspiring project! just got a bag that needs some tlc and instead of costly services i may use some of your tips. so cool!!
 
  • Like
Reactions: Jaded81
So I have this old camel city bag - the thing has really taken a beating thru the years, and I finally broke down and decided to dye her.

Wow.. will you dye my Givenchy Nightingale?


This process definitely isn't for the faint of heart. I happen to be an artist (I've also done some work w/ a fashion designer), and I've actually had some prior experience dyeing leather and suede - specifically, a skirt and some shoes - and I've done loads of leather dye color-mix tests on different types of leather (Kangaroo? Nailed it!).

I think what I'm getting at here is that my level of comfort with the materials was pretty high. It also takes some comfort with uncertainty and trust in yourself that you can make a solid final product!

Anyways - tonight I did the first coat of dye on my bag [disclaimer: I went with simple black], and I felt like sharing!
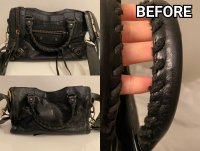
Before:
View attachment 2866387
View attachment 2866388
View attachment 2866389
View attachment 2866390

During:
View attachment 2866391
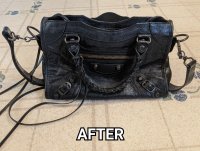
After:
View attachment 2866392
View attachment 2866393
View attachment 2866394

Materials-wise I used a decent portion of a bottle of Feibing's black leather dye (w/ a wool applicator), and I started by wiping the whole bag down with Feibing's dye prep.

The dye prep definitely makes a difference, as it removes a layer of dirt and finish from the leather that prepares it to take the dye. (I also have deglazer I could have used, but I've had mixed results with it in the past.)

At first, I was very surprised with how the dye didn't seem to fully absorb into some areas of the bag, but after gently continuing to rub w/ the applicator the color built up a bit more.

About halfway through I realized the cording for the handles had to go. It was just so frayed and crappy, and that was that. A few snips and they were gone! I'll have to shop around this week for a replacement for it.

Once I was done the whole bag felt a little stiff and somewhat dry (despite being sort of wet with dye), likely because the use is alcohol based... so I'm not concerned. She still has a ways to go! Currently hanging in my bathroom drying!

I'm going to keep updating as I go through the stages here, so thanks for listening to me blabber on about this! I'm excited! Feels really good to get my hands dirty again... :smile:

I'm definitely going to do a second coat over the whole bag,
 
Has anyone dyed a Bal an actual color aside from black? I recently purchased a light grey GSH work bag that I want to dye oxblood. The cords on the handles actually look pretty good but I'm not sure if I should use another kind of dye to dye them separately? Any suggestions?
 
  • Like
Reactions: ksuromax
Has anyone dyed a Bal an actual color aside from black? I recently purchased a light grey GSH work bag that I want to dye oxblood. The cords on the handles actually look pretty good but I'm not sure if I should use another kind of dye to dye them separately? Any suggestions?
what dye are you going to use?
thick? or thin? can you soak the cord with the dye?
 
Also, side note, I just received the bag I bought and it's truly beautiful and in great condition so I won't be dying it. I'll be on the lookout for a more beat up bag to work with lol! Guess this will just be one more addition to my collection! ;)
 
So i live i denmark, and i would like to see if i could find help here, i bought a vintage balenciaga first in the color apple green but in a very bad condition. i was wondering if there was anyone in denmark who fixed balenciaga bags, like handles, stains cuts in the leather and so on... i really want to use it but im scared it will break also since the color is such a rare:sad: i hope u can help
 
Just wanted to add to this thread since it was so helpful to me. I recently restored a preloved black city mini with RHW. The bag had a lot of cracked edging on the purse and strap, loose threads, the brass oxidation was rubbed off in a lot of places, the whipstitch cords on the handles were disintegrating, split tassel, etc.

Here's what I used to restore my bag:
- Angelus Acrylic Leather Paint 1oz in "black" and "flat black". I mixed equal parts of these together to match the existing edge coat finish. The regular "black" by itself matches the shine on the bag so I was able to do small touchups on non-edges. I used a lighter to burn off any frays before painting the edges. I did a lot of coats to really cover the cracks, but it dries fast.
- INSPIRELLE 3mm Black Waxed Cotton Cord. This was a great match to the original cord. The old cord disintegrated as I pulled it out. Rethreading the small handles on the mini was difficult. I wrapped the end of the cord tightly with scotch tape to thread the handle holes. Needle nose pliers were necessary to get the cord knots tight and tidy.
- Brass Darkening Solution 2oz and Birchwood Casey Brass Black 3oz. I couldn't find any info about restoring Bal brass hardware so I experimented with these two products to re-oxidize my brass. First, I wiped down all the hardware with acetone to remove any oils. Then, I drenched q-tips with the solution and swiped them over the exposed yellow brass. The chemicals react pretty quickly, it only takes a minute to darken. Then, I dabbed away the extra solution with wet paper towel. This didn't get everything back to the original oxidized color, but it toned down the yellow significantly. I decided not to paint a clear coat on top.
- Fiebing's Leathercraft Cement. I used this to glue together split tassels. I also used it to glue the shoulder strap pad back together. The pad had separated at each strap hole. After I glued it all together, I painted the edges of the shoulder pad with the Angelus paint mix.
- Apple Brand Leather Care Conditioner. I conditioned this purse about 5 times. It soaked up all the product each time and really improved the leather shine and feel.

Overall, it looks like I reversed a lot of wear and tear on my mini. Hopefully this info helps someone else!
 

Attachments

  • PhotoGrid_1634360823062.jpg
    PhotoGrid_1634360823062.jpg
    168.1 KB · Views: 43
  • PhotoGrid_1634361043977.jpg
    PhotoGrid_1634361043977.jpg
    250 KB · Views: 45
Just wanted to add to this thread since it was so helpful to me. I recently restored a preloved black city mini with RHW. The bag had a lot of cracked edging on the purse and strap, loose threads, the brass oxidation was rubbed off in a lot of places, the whipstitch cords on the handles were disintegrating, split tassel, etc.

Here's what I used to restore my bag:
- Angelus Acrylic Leather Paint 1oz in "black" and "flat black". I mixed equal parts of these together to match the existing edge coat finish. The regular "black" by itself matches the shine on the bag so I was able to do small touchups on non-edges. I used a lighter to burn off any frays before painting the edges. I did a lot of coats to really cover the cracks, but it dries fast.
- INSPIRELLE 3mm Black Waxed Cotton Cord. This was a great match to the original cord. The old cord disintegrated as I pulled it out. Rethreading the small handles on the mini was difficult. I wrapped the end of the cord tightly with scotch tape to thread the handle holes. Needle nose pliers were necessary to get the cord knots tight and tidy.
- Brass Darkening Solution 2oz and Birchwood Casey Brass Black 3oz. I couldn't find any info about restoring Bal brass hardware so I experimented with these two products to re-oxidize my brass. First, I wiped down all the hardware with acetone to remove any oils. Then, I drenched q-tips with the solution and swiped them over the exposed yellow brass. The chemicals react pretty quickly, it only takes a minute to darken. Then, I dabbed away the extra solution with wet paper towel. This didn't get everything back to the original oxidized color, but it toned down the yellow significantly. I decided not to paint a clear coat on top.
- Fiebing's Leathercraft Cement. I used this to glue together split tassels. I also used it to glue the shoulder strap pad back together. The pad had separated at each strap hole. After I glued it all together, I painted the edges of the shoulder pad with the Angelus paint mix.
- Apple Brand Leather Care Conditioner. I conditioned this purse about 5 times. It soaked up all the product each time and really improved the leather shine and feel.

Overall, it looks like I reversed a lot of wear and tear on my mini. Hopefully this info helps someone else!
Wow it looks incredible. Do you find that the Angelus Acrylic Leather Paint sits on top rather than getting soaked in?
 
Wow it looks incredible. Do you find that the Angelus Acrylic Leather Paint sits on top rather than getting soaked in?

The paint sits on top since it's acrylic, but if you use a thin coat and color match it, you won't be able to tell where you painted at all. It took a lot of layers on the edging to build up enough paint to fill and smooth out the cracks. Had to be very patient.
 
  • Like
Reactions: missucc