Here's how I do it:
Step 1: moisturize the eye area by patting, do not pull or tug the delicate skin
Step 2: Apply concealer in several small dots under your eyes. Pat to take out blue-ish tones. (Apply some concealer to the top lid to act as a base if you do not use an eyeshadow base)
Step 3: I use a creamy waterproof eyeshadow base on my top lid so that there's something for the eyeshadow to cling onto and to prevent running/smudging
Step 4: use a black eyeliner/kohl to rim the eyes.
On the top, run the liner as close to the lashes as possible (squiggle the pencil
into the lashes) from the inner corner of your eyes to the outter where you can extend the line a bit further to create 'cat eyes'. You can also use the liner to go 1-2mm above your natural lash line. I prefer a slightly blunt tip as opposed to a sharp one because the latter HURTS! lol
On the bottom, line from the inner to outter corners of your eye but I must warn you that if you have Asian eyes like me, do NOT line the inner lashline (ie the fleshy skin closest to your eyeball) because it will make your eyes look even smaller. Instead, line slightly below or at the lash line but don't go any further toward the eyeball... kwim? (some people will also use a greyish white liner to line the inner lower lashes and make the eyes 'pop'... I don't like this cuz I think it's a bit tacky looking imo)
Step 5: use a black eyeshadow sponge tip applicator (brushes tend to be harder to deal with, but you can try them once you have more experience. For me, I use both lol) to go around your eyes. Remember to NOT pick up too much shadow. It's better to go slower and apply in layers so that if you make a major mistake, it's easier to fix. Yup all about layering and blending now.
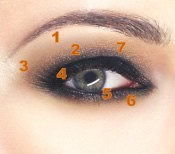
Step 6: in pic 3, it seems like they perked up her brow bones with a pearlish shadow. If you would like to do this there are 2 ways. I personally (1) start off with step 3 by applying my shimmery eyeshadow base all the way up to my brow bone. (2) Then after finishing step 4, I come back to the brow bones again to "define" the black smokey gradient cuz black shows errors and if there are any uneven patches of black eyeshadow, you can use a pearly white, cream, beige (actually I use a very light purple lol) shadow to fix the mistake. Here, I recommend a brush that doesn't pick up too much of the shadow cuz you want to highlight the brow bones, not blind people with shimmer lol.
Step 7: Curl lashes
Step 8: Add false eyelashes if you wish (I recommend the 'cluster' type and not an entire strand of fake lashes....)
Step 9: Mascara
Step10: Eye cleanup!!! That's right, use a Qtip and lightly roll+glide it under your eyes to pick up any loose eyeshadow that fell during the application. (actually for me, throughout all these steps, I take a piece of tissue, fold it in a lil square and press it under my eyes with my left hand to catch all the falling particles)
PS: if you wear contact lenses, put them on before doing your eyes.
PPS: do NOT attempt to use only a black eyeliner to save time/cost because it will run and smudge in an OH-SO-NOT-SEXY way lol (I laugh cuz it reminds me of my friend back in highschool...but I am totally serious at the same time!!!) ***AVOID at all cost***
Good luck