You are using an out of date browser. It may not display this or other websites correctly.
You should upgrade or use an alternative browser.
You should upgrade or use an alternative browser.
Scarves The How-To Guide for Scarves!!!! NO CHATTER!
- Thread starter jag
- Start date
More options
Who Replied?


Maybe you have seen this or it's posted in another tread or some model knot is posted but I found this link to Hermes Knotting card No.3. Might be some new ideas for someone 
http://usa.hermes.com/wcsstore/ConsumerDirectStorefrontAssetStore/files/playtime/playtime_hermes_scarf.pdf
http://usa.hermes.com/wcsstore/ConsumerDirectStorefrontAssetStore/files/playtime/playtime_hermes_scarf.pdf
Last edited by a moderator:
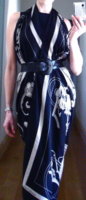
Saw this on the mannequin and asked my SA how it's done. So you need two 90cm scarves. Fold each in half into triangle. Tie one pointy tip and the apex of the triangle of the same scarf around your waist. Repeat with second scarf in a mirror image on the other side of your body. Now the diagonal line of each scarf drapes in your front. Next tie the free pointy tips of each scarf behind your neck and you're done.
I'd wear a bandeau top underneath to wear it out but thought it looks clearer this way for demo sake :0)
I'd wear a bandeau top underneath to wear it out but thought it looks clearer this way for demo sake :0)
Attachments


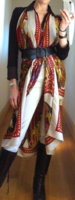
Here's another one I came up with while trying to maximize wardrobe when traveling. It's an Obi belt made out of a 90cm scarf.
You'll need a scarf ring (can't remember what's it called). Fold scarf on the diagonal into a wide band. Thread one end through the scarf ring with two smaller rings and secure it, with a tail about 2-3" long. Wrap scarf around you, then thread the other end through the bigger ring, this will have a much longer tail.
Make sure both tails are on the inside of the obi. Tie them together and tuck the knot inside, and you're done.
Attachments


Time to help resurrect this thread with some recent ideas for scarf tying. I don't want to start a new one, because that just divides good information further so I am adding on here.
One use for my scarf rings that "color outside the lines" a little.
Scarf folded in a basic thin bias fold, pass the ends opposite directions through the ring and center the scarf with the ends in the back and pull to whatever tightness you want. You can weave the ends up or down from there. Both are "up" in this pic.


More coming.
One use for my scarf rings that "color outside the lines" a little.
Scarf folded in a basic thin bias fold, pass the ends opposite directions through the ring and center the scarf with the ends in the back and pull to whatever tightness you want. You can weave the ends up or down from there. Both are "up" in this pic.
More coming.
Just tying a cowboy at the back and bringing the ends around front don't keep a 90 on you very well, so I started securing it at the side with a slim ring when I do a looser drape. Just put the ring on one of the sides once it is folded in a cowboy style triangle. Then tie ends in back and pass them around front, pulling one end through the ring to hold the scarf.

Last edited:
Probably the main way I wear a scarf in non bias mode is this- a twisted cowboy, with or without added scarf ring bling. I generally do all this while holding the scarf, but laid it down for the pics....
Fold scarf in triangle. You can fold it over on itself once or not...depending on the scarf and the look you want...

twist one end of the triangle towards you a half turn and the other end away a half turn...

tie behind your neck in a regular knot or a Bova knot (instructions coming soon). this is a small Bova knot:

Twisted Cowboy:

Fold scarf in triangle. You can fold it over on itself once or not...depending on the scarf and the look you want...
twist one end of the triangle towards you a half turn and the other end away a half turn...
tie behind your neck in a regular knot or a Bova knot (instructions coming soon). this is a small Bova knot:
Twisted Cowboy:
Bunnycat asked me to repeat this post of mine from the Scarf of The Day thread, so here goes!
How to tie the "ponytail" (tentative name) knot:
Scarf flat with face down.
Notice the weird bump at center? I tied a ponytail holder around the center.
 You could also self tie the wrong side center of the scarf into a knot. Then....right side facing up, make a triangle...

Tie the ends in the back and you then have a chestful of pretty drape!
Completed
How to tie the "ponytail" (tentative name) knot:
Scarf flat with face down.
Notice the weird bump at center? I tied a ponytail holder around the center.
You could also self tie the wrong side center of the scarf into a knot. Then....right side facing up, make a triangle... Tie the ends in the back and you then have a chestful of pretty drape!
Completed
Last edited:
It's been a long time coming. My interpretation of the uber popular Bova knot. Full credit goes to Bova123 and her SA's who taught her this very useful tie. I'm sorry I couldn't find Bova's original instructions. It was taking more time in the search tool than to just write a new tut.... here goes...This knot can be done while you are wearing the scarf, but until you get used to doing it, it is sometimes easier to make the knot, then put the scarf over your head....
Fold your scarf in a triangle.

pass the tails across one another use one tail to tie on to the other tail. do not try to tie them together, just wrap one tail around the other and tie it on to the other tail.

The knot should have the little tail of itself pointing outward towards the larger portion of the scarf. If it points backward away from the scarf, then I don't think this lays quite right.

make the same tie on the other side with the other tail, so both ends of the ties are running along the scarf pointing in to the larger triangle portion...

Put over your head and you are done! It has some natural twist to it when done this way. You can tuck the little leftover tail ends under the main part of the scarf and now you don't have a huge ponytail of scarf ends hanging out the back of your neck... Works all the way down to bandana size, though you will have to probably wear that one while tying this one.

Fold your scarf in a triangle.
pass the tails across one another use one tail to tie on to the other tail. do not try to tie them together, just wrap one tail around the other and tie it on to the other tail.
The knot should have the little tail of itself pointing outward towards the larger portion of the scarf. If it points backward away from the scarf, then I don't think this lays quite right.
make the same tie on the other side with the other tail, so both ends of the ties are running along the scarf pointing in to the larger triangle portion...
Put over your head and you are done! It has some natural twist to it when done this way. You can tuck the little leftover tail ends under the main part of the scarf and now you don't have a huge ponytail of scarf ends hanging out the back of your neck...
Works all the way down to bandana size, though you will have to probably wear that one while tying this one.
Last edited:
Got a troublesome tiny format to tame? Simple! Slide a scarf ring (or ad lib scarf ring like a plain metal band with no sharp edges) on to a small format (like gavroche or bandana size) and tie the ends in a small knot. You can adjust where you put the ring for different looks- off center on the triangle, or more necklace like with the ring pulled to the triangle point to fold it under.


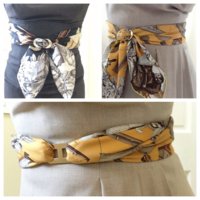
A flat knot to use up extra fabric when you don't want lots flapping about! Non - bulky it lies neatly on your chest. My photos show a 90.
1) Place scarf around neck in a bias-fold. 2) Wrap round from underneath from left to right .
3)Letting the top "tail" hang, take the bottom one, bring it over the top and pull out from behind.
4) Taking the same tail, pass it through the middle of the knot. Fluff knot so you can see each part. You can repeat this part as often as you wish, depending on how much fabric you have.
Voilà! I have tried to show the process in photos but don't know if they just confuse matters....


Here's the promised Mors ring tut from over in Scarf of The Day...
Have a Mors ring? Want a Mors Ring? DOn't know what to do with a Mors ring???
Never fear...it's got tons of uses and here are a few....
Make a Gavroche have more length. Just fold the gavroche in to a triangle, then attach the Mors to the ends like this. I can't get this over my head so you have to do one side and put it on, then attach the other. (I would tie first, put it on, then run the other end through the double ring.)

Looks like this on on:

Cowboy style with Mors ring:
I can't tie a 70 in front without choking myself ( ) so I use a Mors ring to give me some breathing room. SO use a basic cowboy tie which is fold in to a triangle behind your neck then bring the ends around the front and attach the Mors ring in a similar way shown for the gavroche (you may need to knot the ends to make it tidier once it is tied, I do.)
basic cowboy:

looks like this on. See...not enough tail to tie in front or leave hanging...

With Mors ring tied on:

Same thing with a 90:

And my favorite way to use a Mors in the summer is with a twilly:


Have a Mors ring? Want a Mors Ring? DOn't know what to do with a Mors ring???
Never fear...it's got tons of uses and here are a few....
Make a Gavroche have more length. Just fold the gavroche in to a triangle, then attach the Mors to the ends like this. I can't get this over my head so you have to do one side and put it on, then attach the other. (I would tie first, put it on, then run the other end through the double ring.)
Looks like this on on:
Cowboy style with Mors ring:
I can't tie a 70 in front without choking myself (
) so I use a Mors ring to give me some breathing room. SO use a basic cowboy tie which is fold in to a triangle behind your neck then bring the ends around the front and attach the Mors ring in a similar way shown for the gavroche (you may need to knot the ends to make it tidier once it is tied, I do.)basic cowboy:
looks like this on. See...not enough tail to tie in front or leave hanging...
With Mors ring tied on:
Same thing with a 90:
And my favorite way to use a Mors in the summer is with a twilly:
Register on TPF! This sidebar then disappears and there are less ads!